
Manage Expenses
Last updated on Aug 29, 2026
Create vendors, record Expense Transactions, and manage them day to day in Maxio, including renewals, synced Expense Obligations, and bill payments.
Create Vendors
A vendor must first exist in the system before you can record an Expense Transaction.
To create a vendor
-
Navigate to Expenses > Vendors and click Add Vendor.
-
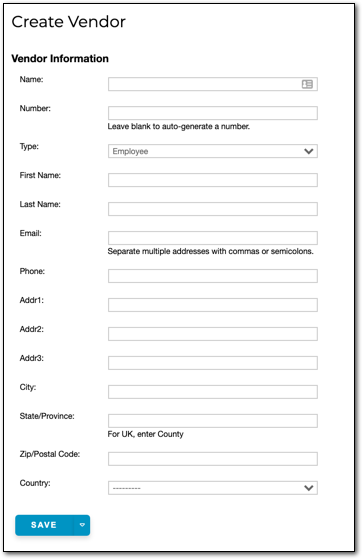
Enter a name for the vendor. For a business, enter the business name; for a commissioned employee, enter first and last name.
-
The remaining fields are optional but support greater granularity in reporting and searching. Use the following guidance:
- Type: Select Vendor for external businesses, or Employee for commissioned employees. This segmentation supports more detailed reporting.
- First/Last Name: Use these fields if you have a main contact at the business or your employee's name. These are optional and help lookup tasks.
- Email: Enter the business or employee's email address.
- Active: Leave this checked to keep the vendor available for new Expense Transactions. Uncheck it to retire a vendor you no longer use.
-
Click Save at the bottom of the screen.
Create Expense Transactions
Once a vendor exists, record the specific expense against that vendor as an Expense Transaction.
To create an Expense Transaction
-
Locate the appropriate vendor (or create one if necessary).
-
Open the vendor and click Add Expenses in the upper-right corner.
-
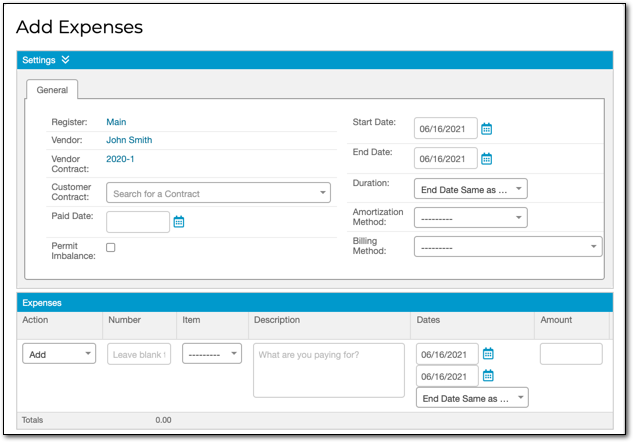
Select a register (if required) and choose a vendor contract for the expense. You typically only need one Vendor Contract per vendor unless you use multi-currency.
-
In the Add Expenses screen, begin with the General section at the top. Data entered here applies to all individual expenses listed below.
-
Configure each individual expense. For definitions of every field on this screen, see the Expense Field Glossary.
-
Click Submit at the bottom of the screen.
Renew Expenses
You can renew an Expense Transaction to reflect an upcoming expense that shares most of the same information as the original. You can renew an expense from the action menu or from the vendor's page.
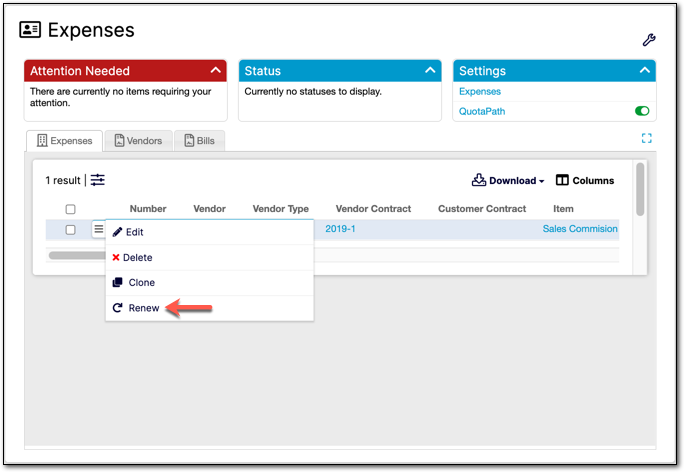
When you click Renew, the Renew Expense screen appears. Maxio automatically updates the Start Date for the renewal, and the Amount and other default item settings carry over.
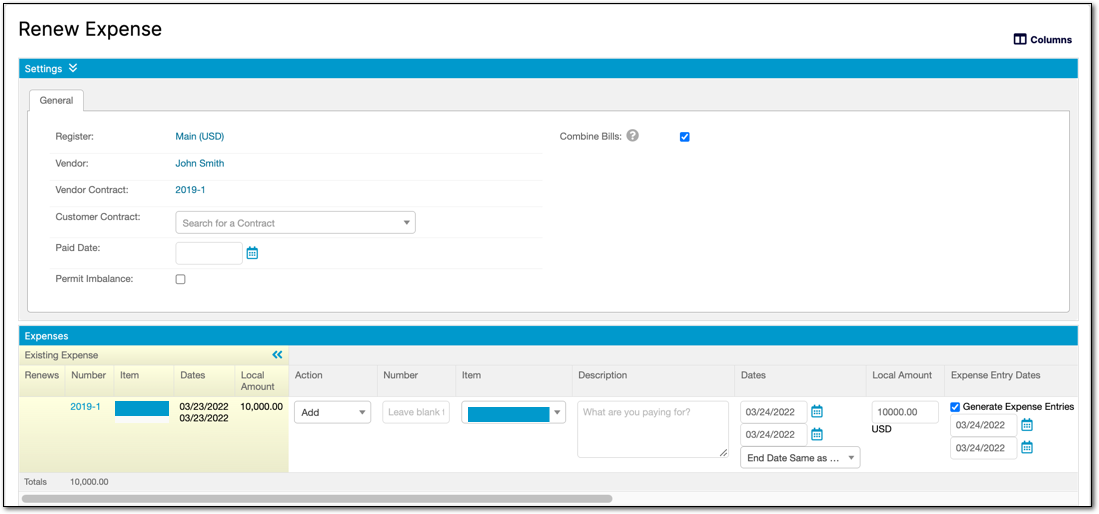
The Renew Expense screen also includes a Combine Bills option, checked by default, which generates one consolidated bill for the renewal instead of a separate bill for each expense in the batch.
After submission, you can add the Renews and Renewed By columns to the Expense Transactions list.
Expense Obligations
Expense obligations are expense-related items (for example earned and paid commissions) that sync into Maxio from other systems. You must process each obligation in order to amortize the expense and create the required financial records.
Syncing expense obligations is currently available through our integration with QuotaPath.
The Expense Obligations queue supports saved list views, so you can save your own combination of columns, sorting, and filters for the queue and return to it later.
Process an Expense Obligation
Each synced obligation stays queued until you convert it into an Expense Transaction.
To process an Expense Obligation
-
Open the Expense Obligations screen and click the Sync button in the top-right corner.
-
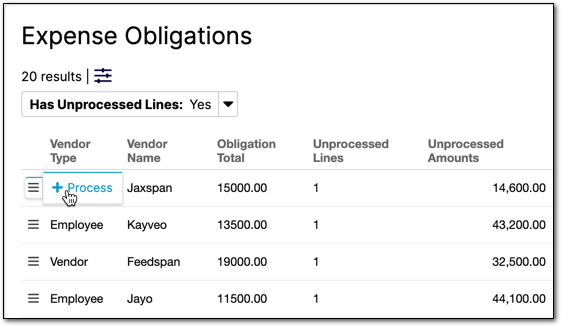
Maxio retrieves obligations from the external system; the results appear at the top of the screen and any expense obligations appear in the queue.
-
To process an obligation, hover over the action menu and click Process.
-
Select a vendor and a contract for the obligation. You can create a new vendor or contract, or select an existing one.
-
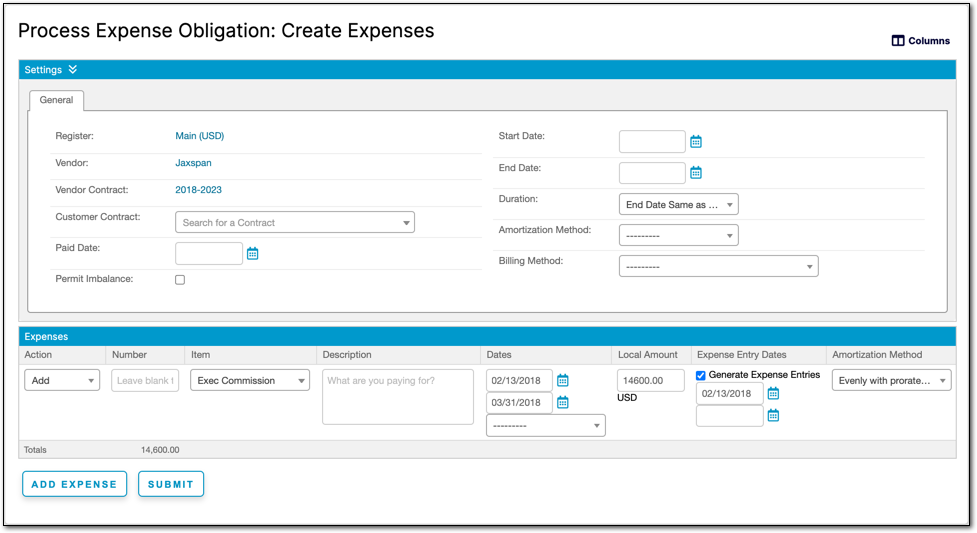
The system prompts you to create expense transactions. Maxio converts each obligation into a corresponding transaction and matches it to the correct Expense Items.
-
Configure the transactions as needed and click Submit at the bottom of the screen.
Closing dates and locked periods
Maxio checks automatically against the latest closing date when you create or edit an expense using any of the methods above:
- Expenses dated on or before the closing date join the locked set and cannot be edited.
- Deletion is also restricted: vendors or expense records that include bills or entries in the closed period cannot be removed.
- The expense form displays the Latest Closing Date so you know which periods are protected from change.
Manage Expense Records
Here is a review of the various expense pages so you know when, where, and how to use each appropriately.
Vendor Records
Vendor records let you review summary information about a vendor's expenses. The Financial Details section displays key financial information for the current month. To edit a vendor, click the Edit button in the top-right corner.
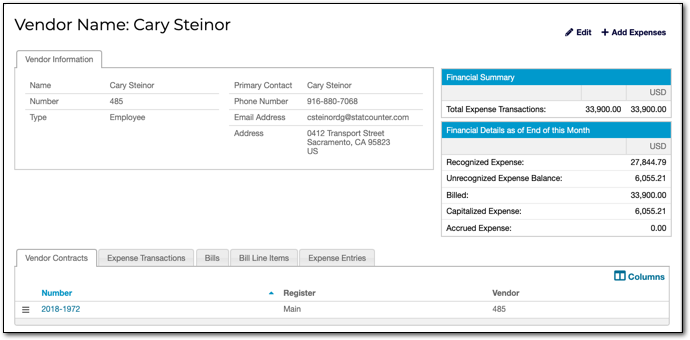
The tabs at the bottom of the screen let you view the vendor's related records: Vendor Contracts, Expense Transactions, Bills, Bill Line Items, and Expense Schedule. To view bills, open the Bills tab.
Note that the Expense Schedule tab shows the expense-recognition schedule for this vendor. It's the expense equivalent of the revenue-recognition schedule.
Expense Records
An expense record gives you a quick view of its financial details, such as the total amount and how much has already been recognized. If you linked this expense transaction to a revenue-bearing Customer Contract, you can navigate to the contract from here.
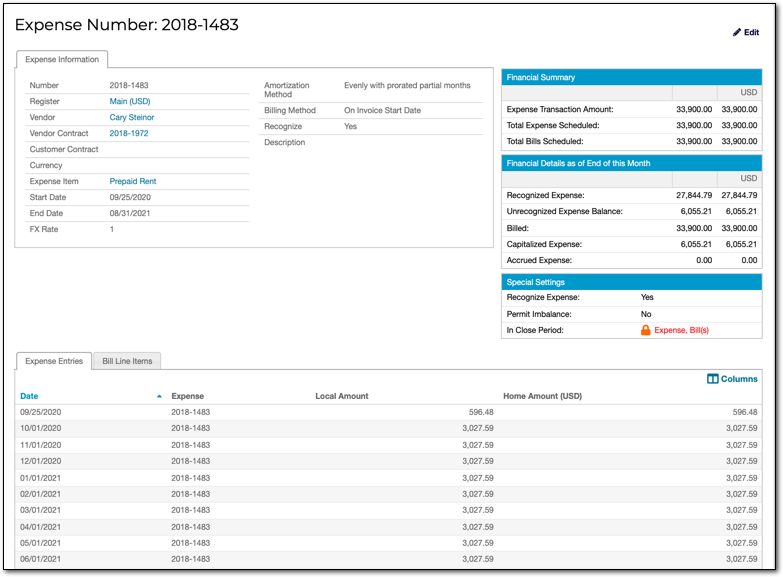
The Bill Line Items list appears in the first tab at the bottom of the screen; it is generated based on the amount, start date/end date, and billing method you selected. The expense's recognition schedule appears in the second tab, under Expense Entries, and Maxio generates it based on the amount, start date/end date, and amortization method you selected. If either schedule looks incorrect, regenerate it by editing the expense.
Mark a bill as paid
Maxio tracks a bill's payment as its own record, separate from the bill itself.
When you receive payment on a bill
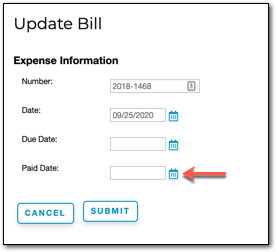
- Locate the bill either via the Bills list in the left-hand menu or by navigating to the vendor and selecting the Bills tab.
- Hover over the three-line hamburger icon next to the bill and click Record Payment.
- Enter the Date and Amount, then submit.
Related information
To learn how to sync expense obligations from QuotaPath, see Sync with QuotaPath.
Before recording expenses, make sure your Expense Items and admin settings are configured. See Configure Expenses.
For a conceptual overview of how expenses, vendors, and amortization work together in Maxio, see Understand Expenses.
To recognize an expense in the period it was incurred rather than when it was paid, see Manage Accrued Expenses.
Still need help?
Reach out and our support team will take it from here.