
Connecting QuickBooks Desktop & Integration Behavior
Last updated on Aug 24, 2026
The QuickBooks Desktop integration enables information to flow between your Maxio Platform account and your desktop version of QuickBooks. This article explains how to best maintain data integrity between the two systems and will help you understand the cause and effect of certain settings.
When integration is enabled, QuickBooks remains your primary financial management and reporting system, with Maxio Platform becoming the primary interface for entering new Customers, generating Invoices, recording Revenues, and managing Renewals.
Maxio Platform will enable you to exchange information between your Maxio Platform and QuickBooks accounts by licensing the RevenueBooks connector from Maxio Platform. With your license, Maxio Platform will enable your account and send you a QuickBooks Web Connector configuration file specifically configured to connect your desktop QuickBooks file with your Maxio Platform account. The Web Connector is a free application that ships with all PC desktop versions of QuickBooks.
To exchange information between your QuickBooks file and your Maxio Platform account, you run the Web Connector application on your PC. You can set the Web Connector up to run periodically, or you can click the "sync" icon from the QuickBooks tab in Maxio Platform to manually start the sync at any time.
Supported Microsoft Windows Versions
Microsoft Windows 10, or later, is supported.
Supported QuickBooks Desktop Versions
The following versions of QuickBooks are supported:
- QuickBooks Pro, Premier, Enterprise 2015+
- QuickBooks Canada Pro, Premier, Enterprise 2015+
- QuickBooks UK Pro, Premier 2015+
The following versions of QuickBooks are NOT supported:
- QuickBooks MAC
- QuickBooks POS
Enabling QuickBooks Integration
QuickBooks integration is available by licensing the RevenueBooks connector from Maxio Platform and can only be enabled in your Account by Maxio Support.
Instructions for Downloading the Web Connector (QWC)
Important notes before beginning the download process
- You must be logged into QuickBooks as an Administrator to complete these tasks
- Every individual in your organization running QuickBooks from their computer that needs to connect to Maxio Platform will need a unique QWC (QuickBooks Web Connector) file (you must install a unique QWC file for every instance of the Web Connector you want to sync to QuickBooks)
- Your first sync will send all of your Items, Customers, and Invoices to Maxio Platform and could take from 10 minutes to well over an hour, depending on the number of records
- The Web Connector Application Process bar may look as if it is frozen, but it will be running. Do not exit or close the Web Connector until the process completes and the Application Progress bar indicates 100%
- Do not set the Auto-Run option in the Web Connector. In addition to the significant load this can place on the Maxio Platform servers, doing so does not provide users the option to review data prior to syncing
Installation Process
-
Backup both systems! Most importantly, ensure you backup your QuickBooks File prior to the Installation of RevenueBooks. While you likely don't have any production data in your Maxio Platform account, back it up as well as this is good practice before any sync or activation of any integration application (Admin>Backup).
-
Download a unique QWC file**.** The QWC file includes information unique to your Maxio Platform account. You can have as many QWC files as you need to support as many installations of the Web Connector as are in use. Typically, any computer or user that is going to perform syncing will need a unique QWC. You cannot install the same QWC file on two computers.
If you are running QuickBooks on a remote server and users are using remote access into that server, each unique user login may need a unique QWC file set up depending on how you have set up your Windows administration and security rights.
To download Admin>Integration>QuickBooks, then select the Download QWC File button. -
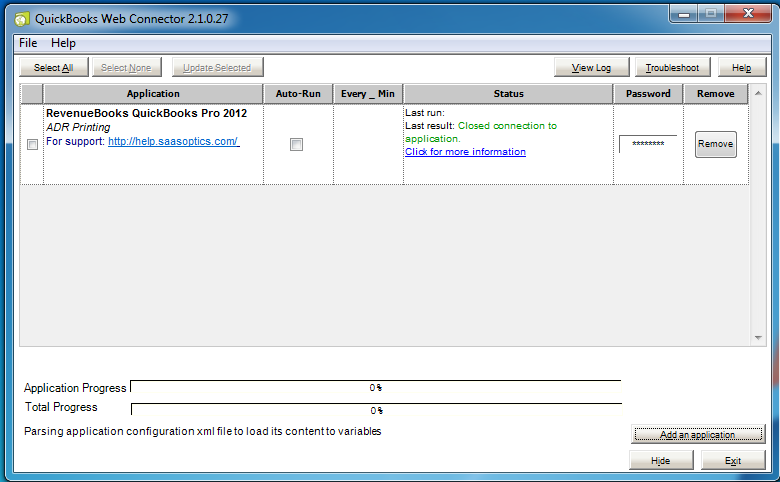
Open the QuickBooks Web Connector application that is installed with your desktop version of QuickBooks.
This application is typically installed with QuickBooks and can be found in the QuickBooks application folder. If it is not installed, download the latest version of the free QuickBooks Web Connector from Intuit and install it.
Select the Add Application button in the bottom right. Select the .qwc file you downloaded.
-
Authorize. Select "OK" in the dialog that appears:
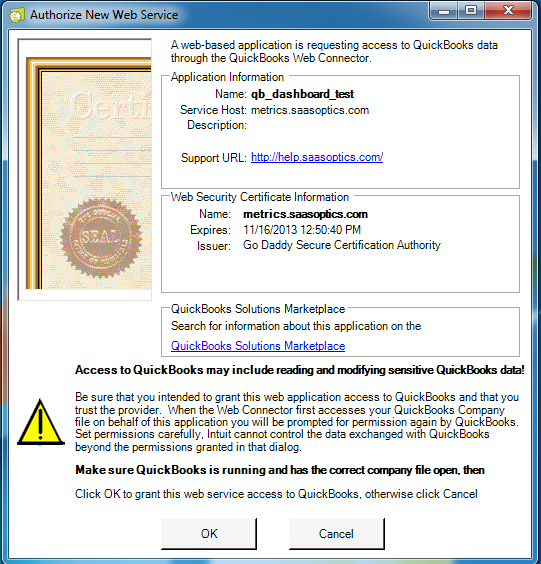
You may encounter error messages upon clicking "OK" on the above dialog box. An example is as follows - QuickBooks Preferences open, or in Edit mode. It is important that all screens in QuickBooks, whether preferences, settings, or any others, are not being edited or in edit mode. Close all screens and then press "OK".QuickBooks Web Connector failed to connect. QuickBooks returned the following error: <QBWC1053: A modal dialog box is showing in the QuickBooks user interface.>. Fix the problem and then click OK to try again. -
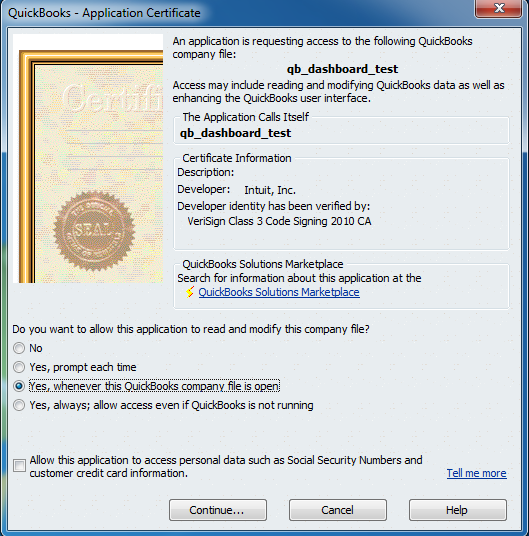
Verify Certificate. Select to permit Maxio Platform/RevenueBooks to communicate and update your QuickBooks file. Several options are available:
- Yes, whenever this QuickBooks company file is open (Preferred)
- Yes, prompt me each time (high level of control)
- Yes, always allow access even if QuickBooks is not running (for automatic sync)
-
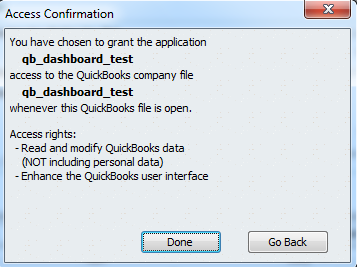
Confirm Access
-
Set the Password for the QBSYNC user in Maxio Platform**.** From Admin>Users, find the username QBSYNC and select the Change Password link. Enter a strong password and remember it or write it down as you will also have to enter this password into the QWC in the next step.
-
Sync. In the QWC,
- Select the checkbox next to the RevenueBooks entry
- Add the password you created in the previous step
- Select the Update Selected button to initiate your sync
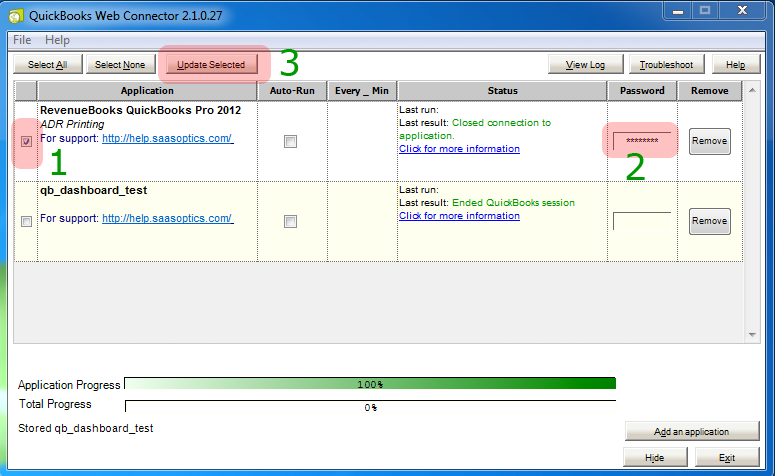
You can the Update Selected button to establish a sync at any time. Subsequent syncs will typically take a minute or two as only changed records are exchanged.
Sync Time and Important Notes
Your first sync will send all your Items, Customers, and Invoices to Maxio Platform and could take from ten minutes to well over an hour, depending on the number of records. The Web Connector Application Progress bar may look as if it is frozen, but will be running. Do not exit or close the Web Connector until the process completes and the Application Progress bar indicates 100%.
You can the Update Selected button to establish a sync at any time. Subsequent syncs will typically take a minute or two as only changed records are exchanged.
Do not set the Auto-Run option in the Web Connector. In addition to the significant load this can place on the Maxio Platform servers, doing so does not provide users the option to review data prior to syncing and review of data prior to syncing is a critical component of the QuickBooks integration architecture, especially when new to the Maxio Platform solution.
Again, we strongly recommend running a Maxio Platform backup (Admin>Backup) and a QuickBooks backup before your first few syncs, as well as any time there is likely to be significant data exchanged between the systems.
Troubleshooting the Web Connector
If your QWC is not working properly, you may need to uninstall and reinstall the latest version of the Web Connector to version 2.2.0.71. For detailed instructions on making this update and troubleshooting the installation process, please see Web Connect 2.2.0.71 Instructions (QBWC1012).
Reset the Web Connector Password
Go to Admin > Users, select qbsync, then select Change Password.
The Web Connector exchanges data between Maxio Platform and QuickBooks using a special user in your Maxio Platform account named "qbsync." This user is set-up for you in your Maxio Platform account. You cannot edit, remove or rename this user.
As with any user logging in, a password is required. This password is created and managed in Maxio Platform.
The password entered into Maxio Platform for this user is also entered into the Password column of the RevenueBooks row in the Web Connector.
You can change the password for this user as desired. If you change the password in Maxio Platform, you will need to enter the new password into the Intuit Web Connector that communicates with your Maxio Platform account.
If you have more than one Web connector set up to enable different people to sync to your Maxio Platform account, they all use the same qbsync user credentials, and therefore they all use the same password. If you change the qbsync user password, each person must update the password in his or her Web Connector.
Print and Email Queues
The Customer and Invoice To Be Printed (Print Queue) and To Be Emailed (Email Queue) settings in Maxio Platform enable queuing in QuickBooks Desktop of the Invoices sent to QuickBooks Desktop. Invoices can be queued to be email, printed, or both.
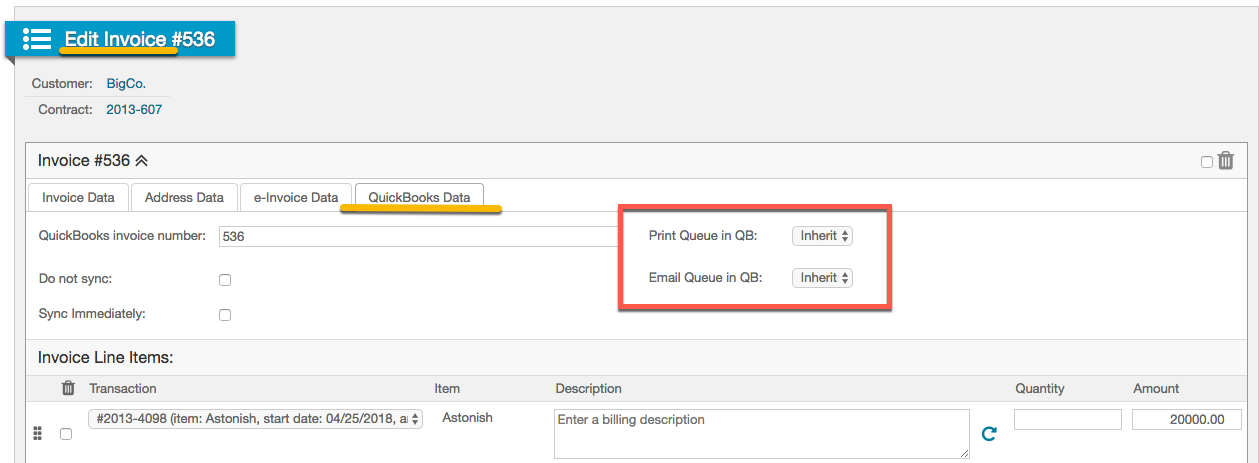
You can make the following selections to determine whether Invoices end up in the Print or Email queues in QuickBooks:
- Inherit - sets the Invoice To Be Emailed property to the Customer's To Be Emailed setting
- Yes - sets the To Be Emailed Invoice property to Yes in QuickBooks
- No - The To Be Emailed Invoice property in QuickBooks is not set even if the To Be Emailed setting of the Customer is Yes
The Maxio Platform Customer record includes two special fields:
- Invoice email preference
- Invoice print preference
The Customer record also includes an email address used when sending Invoices to the Customer via email from within QuickBooks.
These fields are set when you create a Customer record in Maxio Platform, and can be edited at any time.
Neither of these settings has an equivalent setting in QuickBooks, and therefore neither is set by editing a Customer record in QuickBooks. (Note, however, that removing the Email address field in QuickBooks will result in the Invoice email preference being turned off/unchecked in Maxio Platform.)
If checked, Maxio Platform sends to QuickBooks with each Invoice that does not have its own To Be Printed or To Be Emailed setting, instructions that the Invoice is to be emailed and/or printed. User action in QuickBooks is still required to actually email or print these Invoices.
To print designated Invoice in QuickBooks Desktop, go to the QuickBooks File menu, select Print Forms, then Invoices to Print Invoices. To email them, select Send Forms, then Email Invoices.
Information Exchanged Between QuickBooks and Maxio Platform
Data That Is Exchanged
Information Sent From QuickBooks to Maxio Platform:
- Account List - for use in creating Journal Adjustments in Maxio Platform
- Items - Used for the creation of Invoice Line Items in Maxio Platform
- Customers created or modified in QuickBooks
- Invoices, Credit Memos, created or modified in QuickBooks
- Sales Receipts - if Sales Receipts support is enabled in QuickBooks Integration Settings
- Payments recorded in QuickBooks
Information Sent From Maxio Platform to QuickBooks:
- Customers created or edited in Maxio Platform
- Invoices created in Maxio Platform
- Credit Memos created in Maxio Platform
- Payments synced from Stripe
Data That Is NOT Exchanged
Information not synced includes but is not limited to:
- Credit Card information stored in QuickBooks
- There are no credit card data fields in Maxio Platform and you are expressly prohibited from storing credit card information in Maxio Platform other than when using Stripe
- Journal Adjustments
- Bank account information and other financial transactions (deposits, checks, etc.)
- Employee and Payroll information and transactions
- Vendor information
- Expenses and expense payments
- Inventory information
Special Situation
Deleting an Invoice or Invoice Line Item in QuickBooks after the Invoice has already been synced to Maxio Platform results in the Invoice Line Items in Maxio Platform being set to zero.
QuickBooks Desktop Supported Items
The following QuickBooks Desktop Items are supported for syncing to Maxio Platform. Invoices, Credit Memos, and Sales Receipts that use these Items can sync between QuickBooks and Maxio Platform.
Supported:
- Non-Inventory Part
- Service
- Other Charge
- Inventory Part
- Discount
- Sales Tax Item
- Item Assembly
The following QuickBooks Desktop Items are NOT supported for syncing to Maxio Platform. Line Items on Invoices, Credit Memos, and Sales Receipts that use these Items will NOT sync between QuickBooks and Maxio Platform.
Not Support:
- Sales Tax Group
- Payment
- Subtotal
- Group
Syncing with QuickBooks Desktop
Note: Make a backup of your QuickBooks file before your first use of the sync**.**
In the QuickBooks Web Connector:
- If not selected, select the checkbox next to the RevenueBooks entry
- Enter your password if not saved already
- Select the Update Select button to sync
When the application Progress bar at the bottom is 100%, the sync is complete. Do not cancel or exit from the Web connector until the sync completes. Initial syncs can take from ten minutes to over an hour.
With your first sync, all QuickBooks Items will be uploaded to Maxio Platform. With each subsequent sync, new Items added to QuickBooks will sync to Maxio Platform. If the Automatically Generate Maxio Profiles function is disengaged, the QuickBooks Web Connector will provide a message in the Status section whenever Maxio Platform receives a new Item.
QuickBooks Desktop Best Practices
Top "Do Not's**"** - The following can cause significant work in adjusting records in Maxio Platform:
- Do not Move Invoices, Credit Memos, or Sales Receipts in QuickBooksIf you edit an Invoice in QuickBooks, do not change the Customer. Doing so will move the Invoice Line Items to the new Customer. The associated Transaction(s) in Maxio Platform, however, is not moved. This action will require you to change the association of the Invoice Line Item to a different Transaction. This can be complicated when the Transactions are in Contracts for different Customers
- Do not delete Invoices in QuickBooks; Void them. Not only is this best-practices record keeping, it makes it easier to spot and fix out-of-balance conditions
- Do not Merge Customers in QuickBooks. Doing so effectively moves the Invoices from one Customer to the other and deletes one of the Customers.
- Do not delete Items in QuickBooks; make them Inactive
Additional "Do Not's":
- There are two inactive settings for Items - one in QuickBooks and one in Maxio Platform. If you make an Item Inactive in QuickBooks, you should also edit the Item in Maxio Platform and make it inactive
- The Maxio Platform Item name does not need to match your QuickBooks Item/Product name. By default, they are named the same. If you need to, you can edit the Maxio Platform Item name within Maxio Platform. This will not cause the Item/Product name to change in QuickBooks
- Use your QuickBooks Closing Date, and update the separate Maxio Platform Closing Date so it is the same as your QuickBooks Closing Date. They are two separate fields. Changing one does not change the other
- Do not paste names, email address, and other information into QuickBooks or Maxio Platform. Pasting can insert extra spaces and non-standard characters that can cause syncing issues
- If you are going to email invoices from QuickBooks to customers, ensure that your email is set up and working properly before you sync
Deleting Invoices and Credit Memos
While we highly recommend NOT deleting Invoices or Credit Memos, if you do and the Invoice/Credit Memo has previously synced to Maxio Platform, deleting it in QuickBooks results in one of the following:
- If the Invoice/Credit Memo is dated after either Maxio Platform Closing Date or the QuickBooks Closing Date, the Invoice/Credit Memo is automatically deleted in Maxio Platform. A Transaction linked to the deleted Invoice/Credit Memo Line Item is not deleted, however, it will likely become out-of-balance
- If the Invoice/Credit Memo is dated on or before either Maxio Platform Closing Date or the QuickBooks Closing Date, the Invoice/Credit Memo is not deleted and appears in the Invoices Deleted from QuickBooks function within Maxio Platform. From there, you can manually delete Invoice/Credit Memo Line Item
QuickBooks Desktop Unsupported Features and Limitations
The following features and capabilities are unsupported at this time:
- Custom Fields
- Item Groups
- Credit Memos with Discount Items
QuickBooks Credit Memos with Discount Items
Due to limitations in the QuickBooks APIs, Credit Memos with Discount Line items are not permitted to be entered into Maxio Platform. A Credit Memo is simply an invoice with a negative total amount. An Invoice created in Maxio Platform with a total that is negative cannot contain a QuickBooks Discount Item.
To correct, edit an Invoice with a negative Amount to remove any Discount Items.
QuickBooks Desktop Fields Not Supported in Maxio Platform
The following QuickBooks fields are not supported in Maxio Platform and do not sync from QuickBooks Desktop to Maxio Platform:
- MI (middle initial)
- .cc Email
- Web Site
- Other 1
- Other 2
- Shipping Address (for the Customer, but can be added to an individual Invoice)
- Preferred Delivery Method
- Credit Card Information
- Credit Limit
- Price Level
- Add Online Payment Link to Invoices
QuickBooks Templates
Go to Admin > Integration > QuickBooks, then select Update Settings.
QuickBooks Desktop products include the ability to specify a Template when creating an Invoice or Credit Memo. Templates define which QuickBooks fields appear on the credit/edit Invoice/Credit Memo screens in QuickBooks and how the defined fields are displayed on Invoices/Credit Memos printed from within QuickBooks.
Invoices and Credit Memos created in Maxio Platform can include the selection of a Template. The Template assigned by Maxio Platform is based on the following chain of logic:
- If none is selected for a specific Invoice/Credit Memo, then use the default Template selected for the Customer
- If none is selected for Customer, then use the default Template selected for your Maxio Platform Account
- If your Maxio Platform Account does not have a default Template, QuickBooks will select the template
Different versions of QuickBooks may behave differently when selecting a template. In QuickBooks 2013 and beyond, QuickBooks will select the last template used by the last user that created an Invoice/Credit Memo in QuickBooks itself (as opposed to syncing an Invoice/Credit Memo from Maxio Platform).
This situation will play out as follows:
- No Customer or Account default Template is set in Maxio Platform
- In Maxio Platform, a user creates Invoice #1 and selects Template A. Upon sync, Maxio Platform sends Invoice #1 to QuickBooks using Template A
- Separately, a user in QuickBooks subsequently creates another Invoice (Invoice #2) using Template B
- Later, a user in Maxio Platform creates Invoice #3 but does not select a Template. When Invoice #3 is synced, QuickBooks creates the Invoice using Template B because it is the last template used in QuickBooks itself
QuickBooks Jobs Support
Jobs is an optional feature in your Maxio Platform account that, when enabled, will allow Sub-Customers created in QuickBooks Desktop to be created as Customers in Maxio Platform (rather than as a Contract under the Parent Customer).
The Jobs feature must be enabled in your Maxio Platform account by submitting a support request. Once enabled, it cannot be disabled. When Jobs support is enabled, there are a number of significant behavioral differences in the way information is organized in Maxio Platform.
When Job support is NOT enabled (default)
- Jobs in QuickBooks are converted into Customers in Maxio Platform. For example, the Job called "Integration Job" under Acme Supplies in QuickBooks appears as the Customer "Acme Supplies, Inc.: Integration Job" in Maxio Platform
- Contracts in Maxio Platform are not linked to QuickBooks Jobs and do not have a Billing Profile option in Maxio Platform
When Jobs support is enabled:
- Jobs created in QuickBooks are converted into Contracts under the relevant top-level parent Customer in Maxio Platform. For example, the Job called "Integration Job" under Acme Supplies in QuickBooks appears as the Contract "Integration Job" under the Acme Supplies Customer in Maxio Platform
- Contracts in Maxio Platform can be optionally identified as a Job, and if so, can have a relevant Job Billing Profile that includes a billing address. When a Contract is identified as a Job in Maxio Platform, a Job will be created in QuickBooks when the information is synced
QuickBooks supports up to four levels of sub-Jobs, but Maxio Platform only supports one level. A third-level Job in QuickBooks will display as a Contract under the ultimate parent company. All Jobs created in Maxio Platform are created as a first-level Job in QuickBooks.
QuickBooks Job Background Information
In QuickBooks, you can associate invoices and expenses with a Job. Expenses can then easily be billed out in an invoice. The QuickBooks Job architecture is a bit confusing, though. In summary:
You can have a single set of Job information associated with a Customer (QuickBooks Customer screen, Jobs tab), and the Job information is stored with the Customer record.
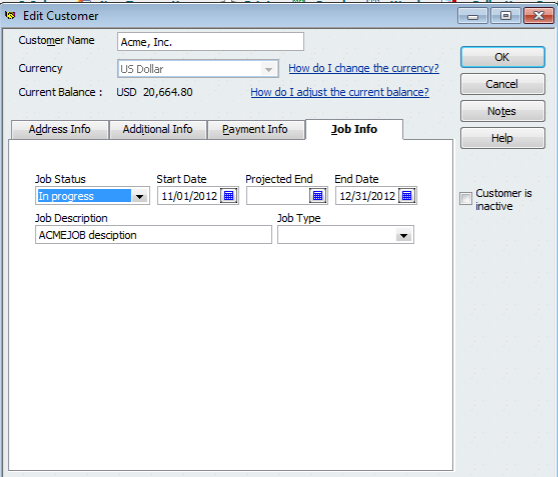
If you need multiple Jobs for a customer, you must use the Add Job function available in the menu:
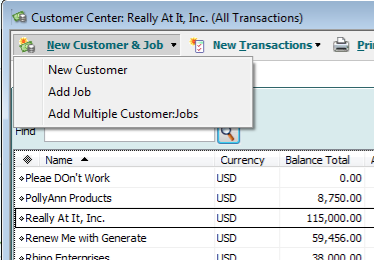
Once you use the Add Job function in the menu, the Job will appear in the Customer list:
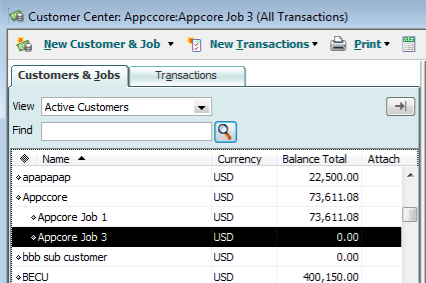
If the parent to which you added the Job had Job Information in the Job tab, QuickBooks will convert that into a sub job as shown above. Sub Jobs (not a QuickBooks term) can also have distinct billing profile information from the parent.
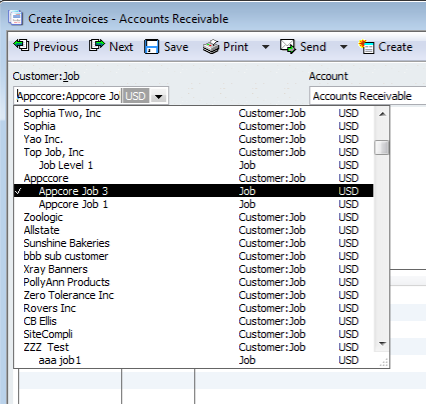
Once a sub-Job is created, you are able to create invoices and expenses for the Job:
Enabling Jobs in Maxio Platform
For Maxio Platform customers who decide to start using Jobs after their Maxio Platform implementation, we recommend following a specific procedure:
- Prepare a backup of your production QuickBooks file to be used for testing
- Request a sandbox account of your production Maxio Platform account with Jobs enabled and install a new QWC file
- Add the new QWC file to the Web Connector, the sync and test. Name conflicts could result in some sync errors and require you to rename some of your Jobs
- If you are using multiple Registers, the conversion of a Customer that is a Job into a Contract under a parent could result in the movement of information between Registers
You should also run your Finance Reports to ensure you understand the impact and implications of this change.
If Jobs are enabled after a sync has already been performed:
- Any Customer in Maxio Platform that was created from a Job in QuickBooks is converted to a Contract and becomes a Contract under the Customer parent. For example:
- The Maxio Platform Customer "Acme Supplies, Inc.: Integration Job" is migrated to a Contact for Acme Supplies. All Transactions, Revenues, and Invoice Line Items are placed in the newly created Contract
Jobs Behaviors
Moving a Job: If the Job support is enabled in Maxio Platform, you can move a Job from one Customer to another by editing the Job in QuickBooks and selecting a new Customer. Then sync and the Job/Contract with its Transactions, Revenues, and Invoices will move to the selected Customer.
Neither the QuickBooks Closing Date nor the Maxio Platform Closing Date will prevent a Contract from being moved from one Customer to another in Maxio Platform during the sync process. If you reconcile Revenues by Customer, be advised that moving a Job in QuickBooks will result in the movement of the corresponding Contract in Maxio Platform.
Merging Jobs: Merging two Jobs in QuickBooks effectively deletes one Jobs and moves all of its records into the other. Merging of Jobs should be avoided due to the implications and repercussions for Revenue reporting.
Considerations for Non-US Versions of QuickBooks
QuickBooks Canada
The Business Number field on the Additional Information tab on the Customer screen in QuickBooks maps to the Resale Number field in the QuickBooks Billing Profile section of the Maxio Platform Customer screen.
QuickBooks UK
The VAT Registration Number field on the Additional Information tab on the Customer screen in QuickBooks maps to the Resale Number field in the QuickBooks Billing Profile section of the Maxio Platform Customer screen. While this is not a required field in Maxio Platform, it is a required field in QuickBooks to be able to create an Invoice.
Still need help?
Reach out and our support team will take it from here.