
Configure Maxio Metering
Last updated on Aug 28, 2026
Set up the Streams, event properties, Meters, and Segments that turn raw activity into billable usage in Advanced Billing. Use these settings to control how Maxio receives usage events, calculates Meter results, and prepares usage for billing.
Step 1 - Metering settings
Use Metering settings to enable Metering and control billing-period timing.
Important: Metering must be enabled for your site before you begin. Contact your Customer Success Manager or Maxio Support to request activation.
-
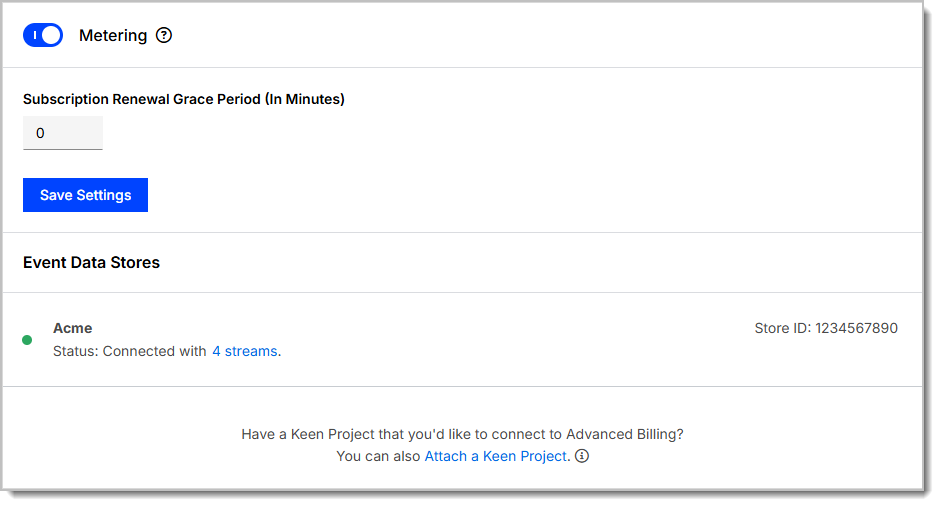
Go to Config > Settings > Metering.
-
Toggle on Metering.
-
In Subscription Renewal Grace Period (In Minutes), enter the number of minutes Maxio waits after a billing period ends before finalizing usage. Enter a value between 0 and 120.
-
Click Save Settings.
Step 2 - Subscription Renewal Grace Period
The Subscription Renewal Grace Period (In Minutes) gives Maxio extra time to receive usage events before closing a billing period.
Use a grace period when your system may send usage shortly after the billing period ends. Events received after the grace period may not be included in the closed billing period.
Step 3 - Stream configuration
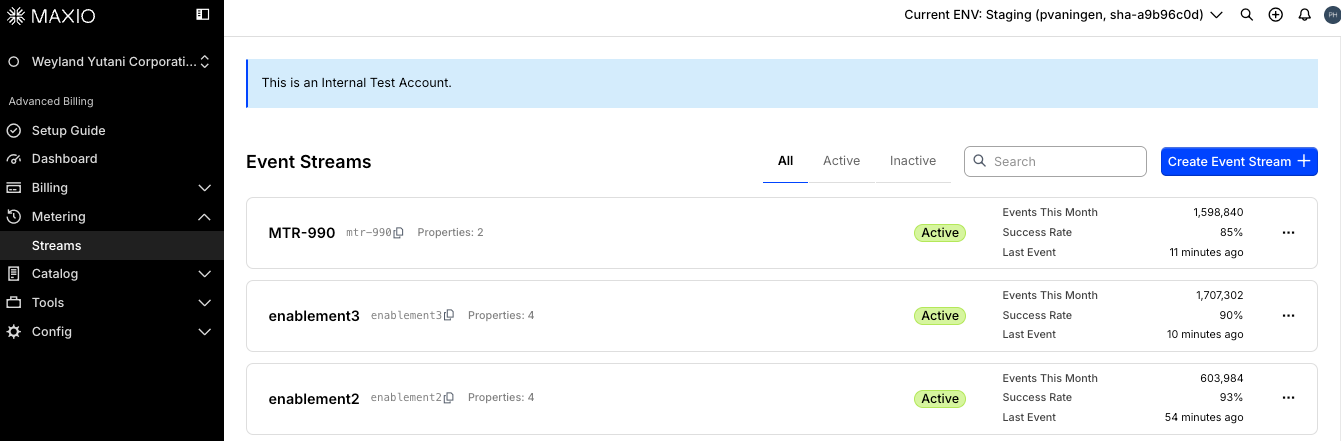
A Stream defines the schema for incoming events.
To create or update a Stream:
- Go to Metering > Streams.
- Click Create Event Stream, or open an existing Stream.
- Configure the Stream fields.
| Field | Description |
|---|---|
| Name | The display name for the Stream. Use a descriptive name your team recognizes. |
| API Handle | The system-generated handle used when sending events to the Stream. |
| Description | Optional internal context for your team. |
| Subscription Identifier | Determines how events are matched to Subscriptions. |
| Event Properties | The fields Maxio accepts in incoming events, grouped into properties used for calculations and properties used for segmenting. |
Step 4 - Subscription identifiers
A Stream can define both a Subscription ID property and a Subscription Reference property, but only one of them is used to match incoming events to a Subscription.
| Identifier | Use when |
|---|---|
| Subscription ID | Your system stores Maxio's internal numeric subscription ID. |
| Subscription Reference | Your system stores an external subscription reference. |
All events sent to a Stream must use the identifier type selected for billing on that Stream.
Step 5 - Event properties
Event properties define the fields included in incoming usage events. Every property belongs to one of two groups:
| Group | Use for | Supported data types |
|---|---|---|
| Properties for Metered Usage | Numeric properties used in Meter calculations, such as api_calls, gb_transferred, or minutes_used. | Integer, Float |
| Properties for Segmenting | Properties used to group usage, such as region, customer_tier, or feature_type. | Integer, String, Float, Boolean, Date |
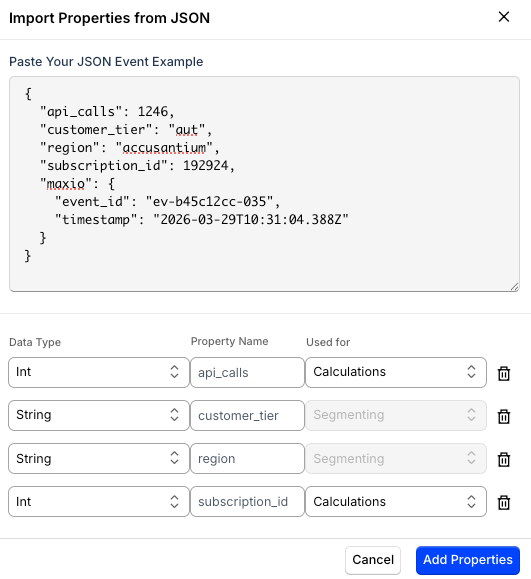
When you add a property manually on the stream creation page, you add it directly under the matching group. When you import properties from JSON, you instead select whether each detected property is used for Calculations or Segmenting.
Import properties from JSON
Use JSON import when you already have a sample event.
- On the Stream creation page, click JSON Import.
- Paste a sample event.
- Review the detected properties.
- Confirm the data type and usage for each property.
- Click Add Properties.
Meter configuration
A Meter calculates usage from Stream events.
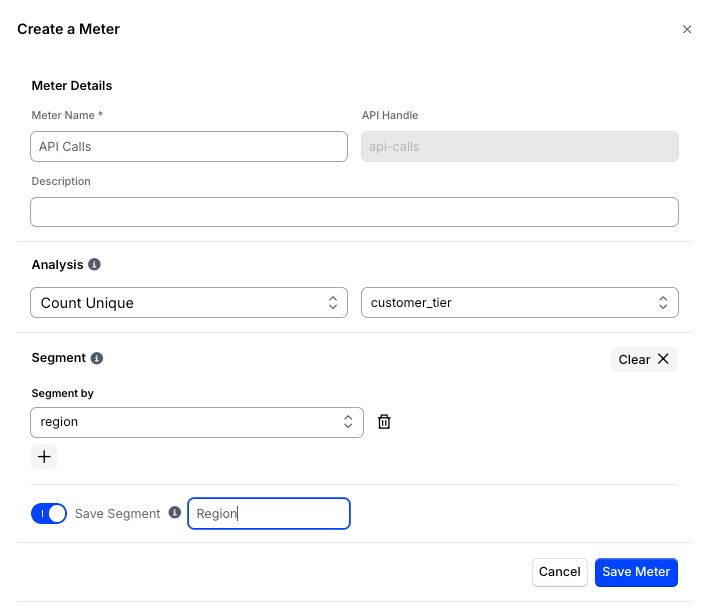
To create or update a Meter:
- Open the Stream.
- Click the Meters tab.
- Click Create Meter, or open an existing Meter.
- Configure the Meter fields.
| Field | Description |
|---|---|
| Meter Name | The display name for the usage calculation. |
| Analysis | The aggregation type used to calculate usage. |
| Property | The event property used for calculations. Required for every aggregation type except Count. |
| Segment | Optional grouping property used to split usage results. |
| Save Segment | Makes the segment reusable. |
| Exclude Events | Optional conditions that remove matching events from this Meter's usage calculation. |
Step 6 - Analysis: Aggregation types
Choose the aggregation type that matches what you bill for.
| Aggregation type | Description | Example |
|---|---|---|
| Count | Counts the number of events. | Count each API request event. |
| Sum | Adds values from a numeric property. | Sum gb_transferred. |
| Average | Averages values from a numeric property. | Average response_time_ms. |
| Minimum | Returns the lowest value from a numeric property. | Minimum latency_ms. |
| Maximum | Returns the highest value from a numeric property. | Maximum file_size_bytes. |
| Count Unique | Counts distinct values for a selected property. | Count unique user_id values. |
Step 7 - Segment configuration
Use a Segment when usage must be grouped by a property value. Segment properties support String, Integer, Float, Boolean, or Date types.
A Meter supports up to 10 Segment properties simultaneously, enabling granular usage splits by dimensions such as region, model tier, API key, plan type, and environment.
Examples:
regioncustomer_tierfeature_type
When a Meter uses a Segment, configure matching Segment pricing on the connected metered Product.
Segment value matching is case-sensitive.
Exclude Events configuration
Use Exclude Events when specific events should be left out of a Meter's usage calculation, such as internal test traffic or requests from a particular environment.
Important: Exclude Events conditions remove matching events from usage. They do not add events to usage. An event that matches your conditions is excluded from the Meter's aggregation; every other event is still counted toward usage. If you want a Meter to count only events that match a condition, set up conditions that exclude everything else instead.
Excluded events are still ingested and remain queryable on the Stream's Events tab. Exclude Events conditions only affect what counts toward billed usage, not what Maxio accepts or stores.
To add an exclude condition:
-
Under Exclude Events, click + to add a condition.
-
Select a Property from the Stream's segment or meter properties.
-
Select an Operator. Available operators depend on the property's data type:
Data type Available operators String is, is not, in, not in, is null, is not null Integer, Float is, is not, in, not in, <, >, <=, >=, is null, is not null Boolean is, is not, is null, is not null Date is, is not, <, >, <=, >=, is null, is not null -
Enter a Value to compare against, if the operator requires one.
-
Repeat to add up to 25 conditions.
When a Meter has more than one condition, choose how they combine:
- Match all (AND): an event is excluded only when it matches every condition.
- Match any (OR): an event is excluded when it matches at least one condition.
Once a condition has both a property and an operator set, Maxio shows a summary confirming the net effect: matching events are excluded from the Meter, and every other event is counted toward usage.
The Meter's read-only detail view lists the configured Exclude Events conditions, or shows No exclusion filter configured when the Meter has none.
Step 8 - Review event results
Use the Events tab to confirm that Maxio accepts incoming events.
- Go to Metering > Streams.
- Open the Stream.
- Click Events.
- Review valid and invalid events.
- Open invalid events to see validation details.
If events are missing, invalid, or producing unexpected results, see Troubleshoot Maxio Metering Issues.
Before going live, also confirm that a metered Product is connected to the Meter and added to the correct Subscriptions. See Design Your Catalog: Use Metering with Products.
Related information
To follow the first-time setup workflow, see Get Started with Maxio Metering.
For Stream concepts, see Understand Streams, Meters, and Segments.
For billing impact, see Understand Meter Results in Billing.
For Product pricing, see Design Your Catalog: Use Metering with Products.
Still need help?
Reach out and our support team will take it from here.