
Set Close and Lock Dates for Financial Controls
Last updated on Sep 19, 2026
Protect finished accounting periods by setting a closing date and a transaction lock date in the Admin > Account Settings form, and have that protected window move forward on its own rather than editing it every month.
Important: Access to these settings requires Admin permissions. Both viewing and updating Account Settings are restricted, so a Bookkeeping or Report user cannot reach this section at all.
How it works
These settings define the key dates that guide your organization's financial activity, controlling when subscriptions, invoices, and transactions can be created or modified.
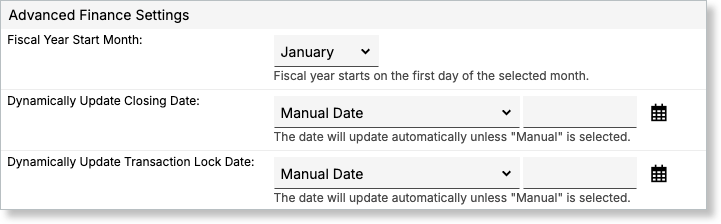
- Fiscal Year Start Month - Defines the starting month of your organization's fiscal year. The End of Previous Fiscal Quarter option below uses it to work out where your quarters fall.
- Dynamically Update Closing Date - Sets a date on or before which Maxio blocks changes to revenue entries, invoices, and contract changes. Activity dated after the closing date is permitted.
- Dynamically Update Transaction Lock Date - Sets a date on or before which Maxio blocks edits and deletions of Transactions, including Subscription details. This date is enforced separately from the closing date.
Both settings offer the same choices. Whenever you pick a dynamic option, Maxio recalculates the date against the current day, so the protected window advances automatically.
Options available for both the Closing Date and Transaction Lock Date
| Option | Description |
|---|---|
| Manual Date | Turns off the automatic calculation, so the date you type in is used. This is the default setting. |
| End of Previous Fiscal Quarter | The last day of the prior fiscal quarter, using the Fiscal Year Start Month to determine where quarters begin and end. |
| End of Previous Calendar Month | The final day of the immediately preceding calendar month. |
| 30 Days Prior to Today | Exactly 30 days before the current date. |
| 60 Days Prior to Today | Exactly 60 days before the current date. |
| 90 Days Prior to Today | Exactly 90 days before the current date. |
Configure Advanced Finance Settings
The fiscal year start month and the two date controls are set together on the Account Settings page.
To configure Advanced Finance Settings
- From Admin, go to Account Settings and click Update Settings.
- Scroll to the Advanced Finance Settings section.
- Set the Fiscal Year Start Month, Dynamically Update Closing Date, and Dynamically Update Transaction Lock Date as needed. Selecting a dynamic option fills in the calculated date and makes that date field read-only; selecting Manual Date clears the restriction so you can enter a date yourself.
- Review the inline help text for clarification on each setting's function.
- Click Save to apply your changes.
Rules and best practices
Keep the following in mind when setting these dates:
- Maxio blocks activity dated on or before the closing date, and permits anything dated after it. Entering an earlier date returns an error naming the current closing date.
- If you have connected QuickBooks or Xero, that integration carries its own closing or lock date, and Maxio enforces it in addition to yours. When the integration's date is later than your own, it is the one that governs, so check both before assuming a period is open.
- Transaction lock dates are enforced independently and are not combined with the closing date.
- Set close and lock dates in accordance with your organization's fiscal calendar and compliance requirements.
View change history
Every change to the Closing Date or Transaction Lock Date is recorded, so an Admin can see who changed one of these settings, when, and from where. That record is what you reach for when a change has to be explained during a financial audit.
To view the change history
- From Admin > Account Settings, find the Close Date & Lock Date History row and click View history.
- The list opens newest first. Each row is one field's change on one request, showing the timestamp, the acting user, their IP address, which field changed, the old and new date pick, the old and new manual date, the old and new effective date, and the request's path and method.
Viewing this history requires Admin permissions, the same as configuring the settings themselves.
Sort, filter, and export the history
The list carries the usual controls, which the export honors.
- Click any column header to sort by it, and click again to reverse the order.
- Use the filter bar to narrow the list by User, which matches on part of a name, by Field, or by a Timestamp date range. If your filters match nothing, the list says so rather than showing an empty table with no explanation.
- Use the Download menu to export the filtered, sorted list to CSV or Google Sheets. The export always includes every column, using the same display labels shown in the list, such as "30 Days Prior to Today" rather than an internal code, and ISO-formatted dates.
Related information
For the other settings on the same Account Settings page, see Configure Account Settings.
For how closing and transaction lock dates behave once they are set, see About Closing Dates and Transaction Lock Dates.
Still need help?
Reach out and our support team will take it from here.