
Configure Account Settings
Last updated on Sep 19, 2026
Set the values that apply across your whole Maxio Core account: the prefixes on generated numbers, how dates and currency are displayed, the password policy, which optional features are on, and the close and lock dates that protect finished periods.
What you can set here
The screen is divided into the sections below, each covering one area of the account. Open it from Admin > Account Settings, then click Update Settings at the top right to change anything on it.
- Set the Number prefix for Transactions or Invoices.
- Turn Projects on or off.
- Configure Advanced Finance Settings, such as dynamically updating the Closing and Transaction Lock dates.
- Improve Performance and Click Efficiency.
- Set the Locale date format.
- Tighten Security, by requiring two-factor authentication, for example.
- Configure Reports defaults, such as the chart colors.
- Manage API token settings, when the API is enabled for your account.
- View Multi-Currency settings and set the FX gain and loss parameters, when multi-currency is enabled.
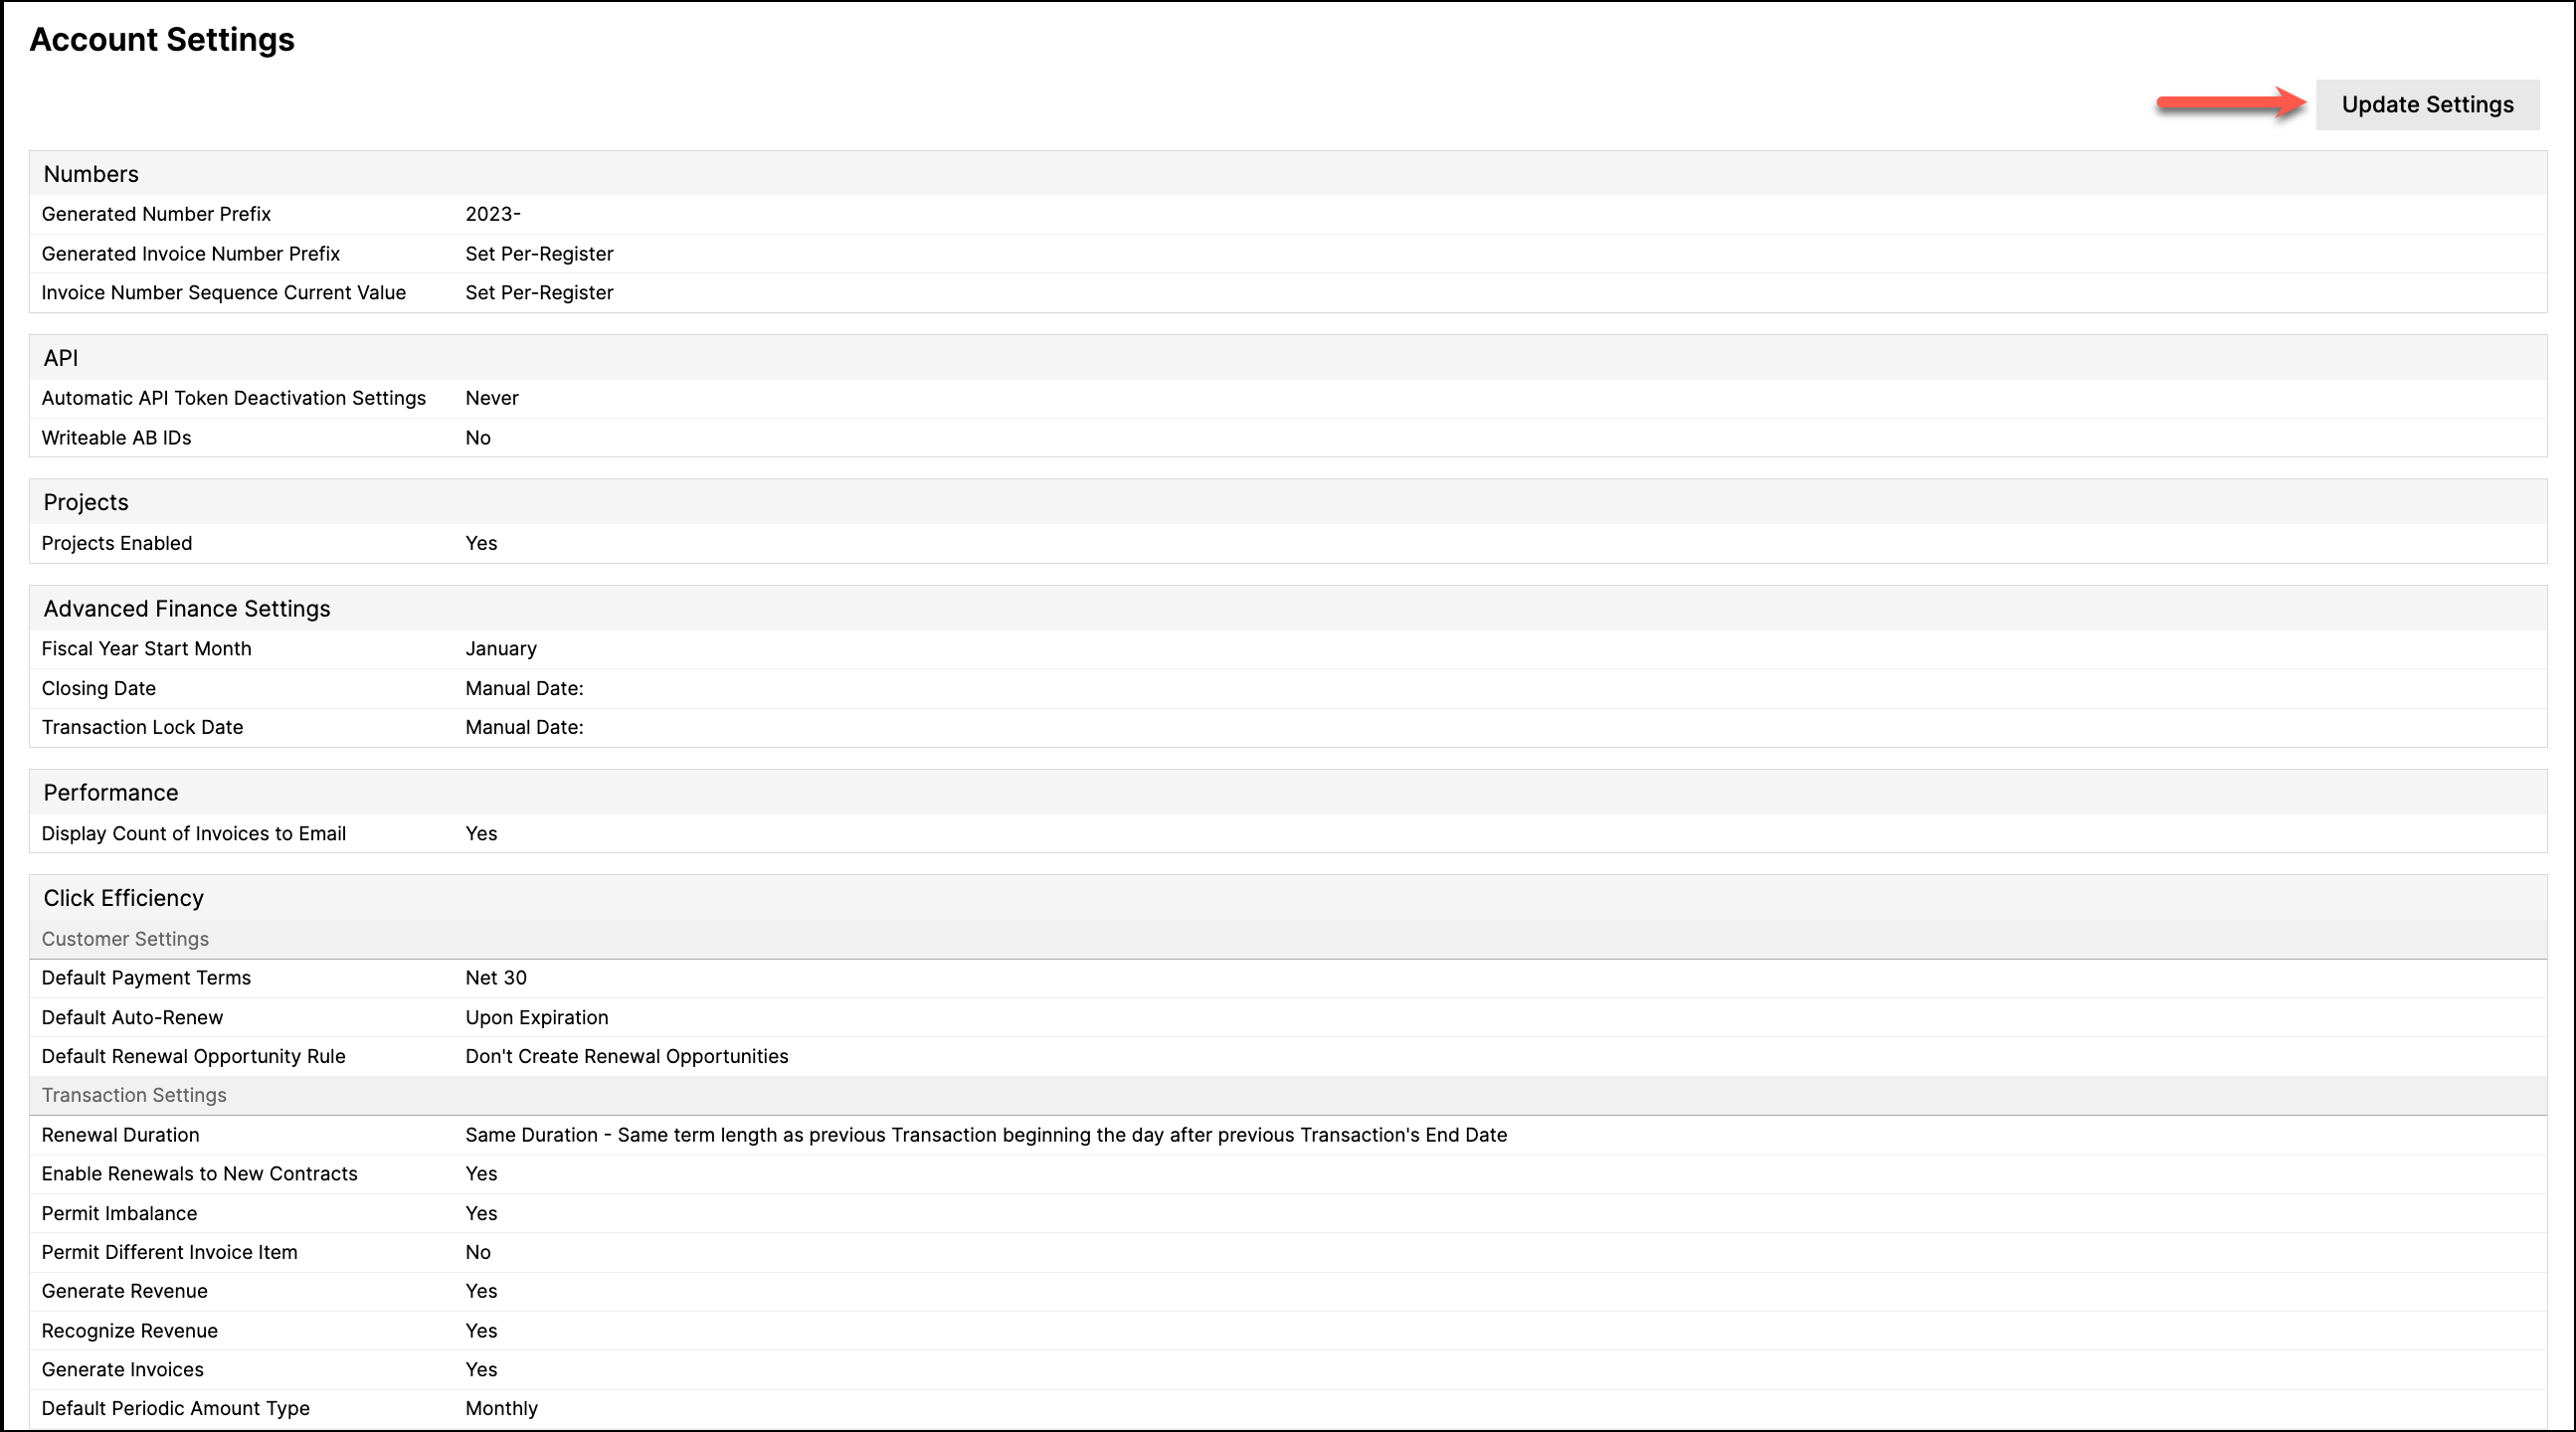
Numbers
Maxio generates a number for each new record that needs one, and these settings control the prefix it uses and the sequence it counts from.
See Configure Unique Number Prefixes for how those numbers are built.
See the article, Configure Unique Number Prefixes, for more information on how prefixes are generated.
Number prefix and sequence settings
| Setting | Description |
|---|---|
| Generated Number Prefix | Prepended to automatically generated numbers for Customers, Contracts, Transactions, and Invoice Line Items. It is not applied to Invoices, which use the Generated Invoice Number Prefix instead. Spaces are not allowed. Defaults to auto-. You cannot reset the counter for these objects, only the Prefix. However, for any individual record, you can enter your own number as long as it is unique for that object. If the number you enter already exists for that record, the system will require you to enter a unique number before it will permit you to save the record. Entering your own number has no bearing on the counter logic: if you key in a Transaction number of 405 while your counter has most recently generated a Transaction number of 404, the counter will simply skip over 405 when generating the next Transaction number and assign the next Transaction a number of 406. See also: Configure Unique Number Prefixes |
| Include Object Type in Generated Numbers | When enabled, a type identifier is inserted between the prefix and the sequence number, producing a number such as 2026-CUSTOMER-1000. Enabling this reveals the three type identifier fields below. |
| Customer Number Type Identifier | The identifier inserted into generated Customer numbers. Defaults to CUSTOMER. (Required) when Include Object Type in Generated Numbers is enabled. Spaces are not allowed. |
| Contract Number Type Identifier | The identifier inserted into generated Contract numbers. Defaults to CONTRACT. (Required) when Include Object Type in Generated Numbers is enabled. Spaces are not allowed. |
| Transaction Number Type Identifier | The identifier inserted into generated Transaction numbers. Defaults to TRANSACTION. (Required) when Include Object Type in Generated Numbers is enabled. Spaces are not allowed. The prefix and identifier combined cannot exceed 236 characters, which leaves room for the sequence number. |
| Generated Invoice Number Prefix | The Generated Invoice Number Prefix field exclusively applies to Invoices and no other record types. The system-generated Invoice numbers are constructed using a concatenation of the prefix number and a counter, called the Invoice Number Sequence. Both the prefix and the counter for generated Invoice numbers can be set or reset at will. Spaces are not allowed. You can use a single prefix and counter for all your Invoices in Maxio or designate a distinct Invoice generation Prefix and Number Sequence for each of your Registers in Maxio. Contact support@maxio.com to have this feature enabled. If you have these values set Per-Register, the field reads Set Per-Register, and you update your Prefixes and Number Sequences by editing your Registers instead. See also: Configure Unique Number Prefixes, QuickBooks Invoice Numbers |
| Invoice Number Sequence Current Value | This number indicates the most recent Invoice Number generated by the counter. For example, if you most recently created an Invoice with a (generated) number of 172, this field would show 172. Assuming that an Invoice numbered 173 didn't already exist, the next Invoice Number generated would be 173. Unlike the counters for other objects, the Number Sequence can be manually reset in Admin > Settings or in Admin > Registers if you have Set Per-Register enabled for your Invoice Number generation. On the Update Settings screen this field is labeled Invoice Number Sequence Start, the number from which the unique portion of the invoice number is generated. |
| Committed Invoice Number Prefix | Prepended to automatically generated numbers for committed Invoices. Appears only when committed Invoice sequencing is in use. Spaces are not allowed. If an Invoice already exists with the prefix you enter, Maxio rejects the change. |
Projects
Projects is an optional feature that has to be enabled for your account before it appears. These settings turn it on and set how long a subscription may sit awaiting activation before Maxio flags it.
Project enablement settings
| Setting | Description |
|---|---|
| Projects Enabled | The Projects feature is a Maxio Add-on that must first be activated in your account. Contact support@maxio.com for assistance. Once activated, enable Projects by checking this box. |
| Subscription Activation Threshold | How many days a subscription can sit awaiting activation before Maxio surfaces it as needing attention. Choose 30, 60, 90, or 180 days; the default is 90. This option is visible only if combined Sales Orders are enabled for your account. |
Advanced Finance Settings
These settings define your fiscal calendar and the two dates that protect finished periods. Setting either date to update dynamically means the protected window moves forward on its own each month.
Fiscal year, closing date, and transaction lock date settings
| Setting | Description |
|---|---|
| Fiscal Year Start Month | The Fiscal year starts on the first day of the selected month, and is then used to determine the dates in reports when using date range filters such as This Year, Last Quarter, Last Year. See also: Report Date Ranges |
| Dynamically Update Closing Date | The Closing Date prevents users from making changes to invoice line items and revenues after the selected date. You have the option to select a specific date manually or a dynamic option, which automatically updates depending on the option you select. The date updates automatically unless Manual is selected, which is the default setting. See also: About Closing and Transaction Lock Dates, Set Close and Lock Dates for Financial Controls |
| Dynamically Update Transaction Lock Date | The transaction lock date prevents users from creating new transactions with start dates or order dates before the lock date. You have the option to select a specific date manually or a dynamic option, which automatically updates depending on the option you select. The date updates automatically unless Manual is selected, which is the default setting. See also: About Closing and Transaction Lock Dates, Set Close and Lock Dates for Financial Controls |
Performance
One setting here affects how quickly the dashboard loads, by controlling whether Maxio counts a figure that is expensive to calculate.
Dashboard display setting that affects performance
| Setting | Description |
|---|---|
| Display Count of Invoices to Email | Display the count of Invoices that may be sent as e-Bills on the Maxio dashboard. This option is enabled by default. Disabling it may significantly improve performance in accounts with large numbers of Invoices. |
Click Efficiency
Click Efficiency settings pre-fill values that would otherwise be entered manually on every new record, grouped by the object they apply to.
Customer Settings
These pre-fill the Customer form, so the values you use most often are already selected when you add someone new.
Default values applied when creating a Customer
| Setting | Description |
|---|---|
| Default Payment Terms | When creating a Customer, this value is pre-selected in the Payment Terms field. The Customer's individual setting is used to set the Payment Terms on the Customer's individual Invoices. |
| Default Auto-Renew | The Auto-Renewal Profile to use by default for new Customers. This sets the default state of the Default Auto-renew drop-down when adding a New Customer. This setting is visible only if the Auto-Renew feature was enabled by Maxio Support. Contact support@maxio.com for assistance. |
| Default Renewal Opportunity Rule | The Renewal Opportunity Rule to use by default for new Customers. The Customer's individual setting is used to set the renewal rules on the Customer's individual Transactions. This setting is visible only if the Salesforce integration is enabled for your account. |
| Default Renewal Deal Rule | The Renewal Deal Rule to use by default for new Customers. This setting is visible only if the HubSpot integration is enabled for your account. |
Transaction Settings
These default values are set when using the Add Transaction, Add Transactions, and Process Orders functions and are only generally used when using Projects exclusively for managing your subscriptions. Selections of any of these options have a significant effect on the functions that monitor and govern financial integrity.
Default values applied to new Transactions
| Setting | Description |
|---|---|
| Renewal Duration | Absent the selection of a Renewal Duration for the Transaction, this setting applies when using any renewal function. Generally, it is best to select the Same Duration, which is the default setting. |
| Enable Renewals to New Contracts | When Renewal Transactions are created, prompt users to assign the Transactions to a new Contract. This option is disabled by default. |
| Permit Imbalance | Sets the default Permit Imbalance value for all new Transactions. This option is disabled by default. Unless you have a very specific reason to do so, you should not check this box. |
| Permit Different Invoice Item | Sets the default Permit Different Invoice Item value for all new Transactions. This option is disabled by default. Unless you have a very specific reason to do so, you should not check this box, as it prevents warnings that can impact financial reporting. |
| Generate Revenue | Sets the default Generate Revenue value for all new Transactions. When deselected, the Generate Revenue function is off, which results in Transactions with no revenues. This option is enabled by default. Unless you have a very specific reason to do so, typically when using Projects, leave this enabled. |
| Recognize Revenue | Sets the default Recognize Revenue value for all new Transactions. This option is enabled by default. This setting is visible only if the Recognize Revenue field is enabled for your account. |
| Generate Invoices | Sets the default Generate Invoices value for all new Transactions. When deselected, the Generate Invoices function is off, which results in Transactions with no Invoice Line Items. This option is enabled by default. Unless you have a very specific reason to do so, typically when using Projects, leave this enabled. |
| Default Periodic Amount Type | The default type of period used when entering a Transaction amount as an amount per period. Defaults to Monthly. |
Item Settings
The same idea for Items: set the defaults once here rather than choosing them on every new Item.
Default values applied when adding new Items
| Setting | Description |
|---|---|
| New Recurring Item Revenue Recognition Method | Select the default Revenue Recognition method when adding new recurring Items. Generally speaking, Daily is the preferred method for most subscription companies. Transactions that use the Item will default to use this Revenue Recognition method unless overridden at Transaction creation time. |
| New Recurring Item Default Duration | Select to set the default Duration when adding new recurring Items. Transactions that use the Item will default to use this Duration unless overridden at Transaction creation time. |
| New Non-Recurring Item Revenue Recognition Method | Select to set the default Revenue Recognition method when adding new non-recurring Items. Generally speaking, Daily is the preferred method for most subscription companies. Transactions that use the Item will default to use this Revenue Recognition method unless overridden at Transaction creation time. |
| New Non-Recurring Item Default Duration | Select to set the default Duration when adding new non-recurring Items. Transactions that use the Item will default to use this Duration unless overridden at Transaction creation time. |
Locale
This setting controls how dates are displayed and entered throughout the application.
Date display setting
| Setting | Description |
|---|---|
| Date Display Format | Select the view and input format for date fields in the system. Presently does not apply to date format for entering a date into a Report filter. Defaults to mm/dd/yyyy. |
Security
A Maxio user is locked out after ten consecutive failed login attempts, whether or not the password policy is enabled. There is no automatic password reset, so a locked-out user should contact one of their Maxio account Administrators.
Report editing, password, authentication, and user deactivation settings
| Setting | Description |
|---|---|
| Permit Any Admin to Edit All Reports | When checked, any User with Admin rights can edit reports created by other users. When de-selected, the Admin can only edit reports that they create. This option is disabled by default. |
| Enable Password Policy | Enabling this feature in your account requires all Maxio users to follow these password rules and conditions:
|
| Require Two-Factor Authentication | Requires every user in the account to complete two-factor authentication at log in. Two-factor authentication is available to all users; this setting controls only whether it is mandatory. This option is disabled by default. Refer to the Two-Factor Authentication article. |
| Automatic User Deactivation Settings | The length of time a user can be inactive before they are deactivated. Choose from Never, 3 Months, 6 Months, 9 Months, or 12 Months. Defaults to Never. |
Reports
These settings decide what a new report starts with, so you are not reapplying the same choices every time you build one.
Report default settings
| Setting | Description |
|---|---|
| Default for "Item Type" in Subscription Momentum Report | Generally speaking, the Subscription Momentum Report is used to report on recurring items. You can select to have the report default settings be recurring, non-recurring, or both. This selection is simply a default setting for what to include when creating a new Subscription Momentum Report and you can override this default and select any option when creating an individual report. Defaults to recurring. |
| Default for "Include Committed Calculations" in Report | Sets whether committed calculations are included by default when creating a new report. You can override this default when creating an individual report. This option is disabled by default. |
| Default for "Show Two Decimals in Momentum Section" on Momentum Report | The Subscription Momentum Report can display results with or without decimals. This option defines the default behavior, which you can override when creating an individual report. This option is disabled by default. |
| Default Home Page Dashboard | Select a dashboard to use as the Home page by users who have not selected a personal/user-specific dashboard. See also: Reports Dashboard |
| Default Chart Colors | Configure the colors of the charts that appear in analytics reports. Click on a color to change it using the color picker. Note that you can input the hex code directly if you have specific branding colors. There are 18 configurable slots: Primary, Secondary, Info, Warning, Success, and Danger, each available in a Light, standard, and Dark variant. |
| Prevent Further Editing and Creation of User-Owned One-Click Reports | Stops users from editing or creating their own One-Click Reports. This setting is visible only if Admins are permitted to create report templates in your account. |
| Legacy Report Export Format | When checked, legacy number formatting is retained in CSV exports of reports, so commas appear as thousands separators, and percentages include the "%" symbol. If unchecked, number formatting is removed in CSV exports of reports, so thousands separators are removed, and percentages are divided by 100 while the "%" symbol is removed (for example, 50% becomes 0.50). This option is enabled by default. |
| Export to the same file per Report name | Affects the naming of the file produced when a report is exported. It applies both to export files that are downloaded and those that are accessed on the web, for example in OneDrive or Google Sheets.
|
The following settings apply only to the Subscription Momentum Report, and appear only when that report is enabled for your account.
Subscription Momentum Report number formatting
| Setting | Description |
|---|---|
| Missing Number Format | How you would like null results displayed: with a dash ("-") or with zero ("0"). Important to note, amounts netting to zero will display as zero ("0"), even if a dash ("-") is selected. |
| Negative Number Format | Choose to display negative numbers with a minus sign or in parentheses, as is common in financial software.
|
| Thousands Separator | Choose how you want larger numbers displayed, either with commas, space separation, or neither.
|
API
These settings appear only when the API is enabled for your account.
API token settings
| Setting | Description |
|---|---|
| Automatic API Token Deactivation Settings | The length of time an API token can go unused before it is deactivated. |
| Writeable AB IDs | Shows whether Advanced Billing IDs can be written through the API. This one is set by Maxio rather than by an account Administrator, so it appears here as a read-only value. |
Multi-Currency
These settings appear once multi-currency is available for your account. They cover enabling it, choosing the home currency everything converts back to, and the accounts that realized FX gains and losses post to.
Multi-currency enablement settings
| Setting | Description |
|---|---|
| Enable Multi-Currency | Multi-Currency requires a specific license and must be enabled in your account. Contact support@maxio.com for assistance. Allows you to begin recording transactions in various currencies in which you do business. |
| Home Currency | If Multi-Currency is enabled, you will choose your home currency for your account. This is sometimes also called a functional currency. When you select Report in: Home Currency on various reports within Maxio, it will report in the selected Home Currency. |
If Multi-Currency is enabled and you update the Account Settings, the following additional options appear.
Multi-currency CTA and FX gain/loss settings
| Setting | Description |
|---|---|
| Enable CTA | The Cumulative Translation Adjustment (CTA) shows how currency exchange rate changes affect a company's assets and liabilities when combining financial statements from foreign subsidiaries. It keeps track of gains and losses from exchange rate shifts over time to align the subsidiary's numbers with the parent company's currency. CTA must be enabled in your account by Maxio. Contact support@maxio.com for assistance. |
| Cumulative Translation Adjustment Account | Select the CTA account. Required once CTA is enabled. Note, only an Admin User can configure this setting in the Chart of Accounts. |
| Enable Realized FX Gain/Loss | Enabling this option will allow you to view Realized FX Gain or Loss on the Invoice List. Realized FX Gain or Loss is the difference between your invoiced amount in Local Currency vs. the converted amount of the Local Currency to your Home Currency on the day of receipt. This option is disabled by default. |
| Enable FX Gain/Loss in Reports | Enabling this option will allow you to view Unrealized and Realized FX Gain Loss on your Payment Summary Report. Realized FX Gain or Loss is the difference between your invoiced amount in Local Currency vs. the converted amount of the Local Currency to your Home Currency on the day of payment, and will display only when Payments have been received. Unrealized FX Gain or Loss is the same calculation, but assuming that no Payments have been made, it calculates based on the ending FX Rate for the Period in the report, and is subject to changes period-over-period in conjunction with changing FX rates. |
| Unrealized FX Gain/Loss Account | This is the mapped account that you will select from your connected GL that will act as the designated account where your Unrealized FX Gain or Loss will be recorded. Generally, an income statement account is appropriate to be utilized. Required when Enable Realized FX Gain/Loss is enabled. |
| Realized FX Gain/Loss Account | This is the mapped account that you will select from your connected GL that will act as the designated account where your Realized FX Gain or Loss will be recorded. Generally, an income statement account is appropriate to be utilized. Required when Enable Realized FX Gain/Loss is enabled. |
| Hide decimals for non-fractional currencies | Check this box to hide decimals for currencies that are non-fractional or "zero-decimal," such as the Japanese Yen (JPY). When enabled, the currency amount will display as whole numbers without decimal points. Supported "zero-decimal" currencies: DJF, GNF, JPY, KMF, KRW, PYG, RWF, TWD, UGX, VND, VUV, XAF. |
Related information
For how prefixes work across each record type, see Configure Unique Number Prefixes.
To close or lock a period from this same page, see Set Close and Lock Dates for Financial Controls.
To control who can reach these settings, see Understand User Roles and Access Controls.
Still need help?
Reach out and our support team will take it from here.