
QuickBooks Integration FAQs
Last updated on Aug 28, 2026
These are the questions that come up most often about the QuickBooks integration, grouped by the part of the integration each one touches. For how the integration works end to end, see Understand the QuickBooks Integration.
If a record has not appeared in QuickBooks Online, check the connection state first — see QuickBooks Online Status.
Integration basics
Can I sync one QuickBooks file to multiple Maxio accounts?
Technically, nothing in Maxio stops you from connecting the same QuickBooks file or QuickBooks Online account to more than one Maxio account. We strongly discourage it: each Maxio account would try to sync that same QuickBooks data independently, and Maxio doesn't detect or prevent this, so doing so can corrupt data in both systems.
What types of QuickBooks Desktop Items are supported?
The following QuickBooks Desktop Item types sync to Maxio:
Supported QuickBooks Items
- Non-inventory Part
- Service
- Other Charge
- Inventory Part
- Inventory Assembly
- Discount
The following QuickBooks Item types do NOT sync to Maxio:
Unsupported QuickBooks Items
- Item Group
- Subtotal
- Payment
Where can I download the QuickBooks Web Connector?
Download the latest version of the Web Connector from Intuit's QuickBooks Web Connector page. It typically already comes installed with QuickBooks Desktop, in the QuickBooks application folder.
For the full Web Connector setup process, see Setup QuickBooks Desktop.
Setup & configuration
Can I install the same QWC file on multiple computers?
Technically, yes. Maxio doesn't tie a QWC file to a specific computer, since every install authenticates with the same account-wide qbsync credentials. That said, download a separate QWC file for each computer to keep your installs easy to track, and only run the Web Connector on one computer at a time. Maxio allows only one active sync session at a time, so running it on more than one computer at once causes sync conflicts.
For how to download a QWC file, see Setup QuickBooks Desktop.
What happens if a required QuickBooks Desktop default Template is missing or inactive?
QuickBooks Desktop has no concept of a default Invoice or Credit Memo Template. Left on its own, it just remembers the last Template you used: create an Invoice with Template B, and the next Invoice you key in directly in QuickBooks also defaults to Template B, until you pick a different one.
When Maxio syncs an Invoice or Credit Memo to QuickBooks Desktop, it sends a Template with it unless you set a default in Maxio. Maxio picks the Template to send in this order:
- The Template you select directly on that Invoice or Credit Memo in Maxio, if any.
- If you use QuickBooks Jobs, the Job's default Template.
- The Customer's default Template in Maxio, if one is set.
- Your account-wide default Template, as a final fallback.
Credit Memos follow this same order, using the Credit Memo default Template at each level instead of the Invoice one.
Setting an account-wide default Template (and a Customer-level default, if you want one) means every Invoice or Credit Memo Maxio sends has a Template attached, and none of them are vulnerable to picking up whatever Template someone last used by keying an Invoice directly into QuickBooks. See Configure QuickBooks Integration Settings to set these defaults. If the Template dropdowns are empty, sync at least once first.
To find out which Template you're currently using, open a representative Invoice directly in QuickBooks: the Template dropdown in the top right shows it. The full list of Templates is under Lists > Templates in QuickBooks.
If your account-wide default Invoice or Credit Memo Template is missing or has been made inactive in QuickBooks, Maxio shows a warning on your Home page until you select a new one. This warning only checks your account-wide default; a Customer-level or Job-level Template going inactive doesn't trigger it.

Items
Are discount items supported for QuickBooks Desktop?
Yes, you can create Discount Items in QuickBooks and use them in Maxio. Within a Contract, an Invoice Line Item that uses a Discount Item must be accompanied by one or more Invoice Line Items with the same Invoice Date, such that the total of the Line Items after applying the discount is a positive number.
Discount percentages
A Discount Item, an Item added in QuickBooks with a Type of Discount, can use a discount percentage or a discount amount. If you use a discount Line Item on an Invoice you create in QuickBooks, you can enter either a discount rate or a discount amount directly; either way, QuickBooks stores the Line Item as an Amount.
Important: If you add a Transaction in Maxio for a discount, enter it as an amount, specifically a negative amount. Maxio has no field for entering a discount as a percentage or rate.
How do I set up Discount Items to ensure proper Revenue recognition?
Different Items or Products can have different Revenue recognition schedules. For example, a solution might have a setup fee recognized over three years (the expected life of a Customer), subscription fees recognized over a one-year term, and training or consumption-based fees recognized immediately upon delivery.
If you use a single Discount Item that applies across all Products, you can't calculate Deferred Revenue correctly once those Products have different recognition schedules. Use a unique Discount Item per Revenue category instead, one for each group of Products that share a recognition schedule. Since they're separate Items, each Discount Item can also carry its own Description, making it clear to the Customer which Product a given discount applies to.
For how Discounts actually sync between Maxio and QuickBooks, including why QuickBooks Online's own Discount function isn't supported, see Sync QuickBooks Invoices.
Invoices
How is the Invoice Number generated?
Maxio sets an Invoice Number one of three ways:
- Automatically, when the Invoice is created in Maxio. Maxio generates a unique Invoice Number from a sequential counter, added to the Invoice Number Prefix (and optional Register Prefix) set in Account Settings.
- Manually, when you key one in. You can type or edit an Invoice Number yourself when creating or editing an Invoice in Maxio.
- From QuickBooks, when the Invoice is created there and synced to Maxio. Maxio adopts the QuickBooks Invoice Number as its own, as long as that number isn't already used by another Invoice in Maxio. If it is, Maxio generates its own sequential number instead.
Why do Invoice values differ between Maxio and QuickBooks?
The appearance and values of an Invoice in QuickBooks can look different from that same Invoice's representation in Maxio. Two common causes:
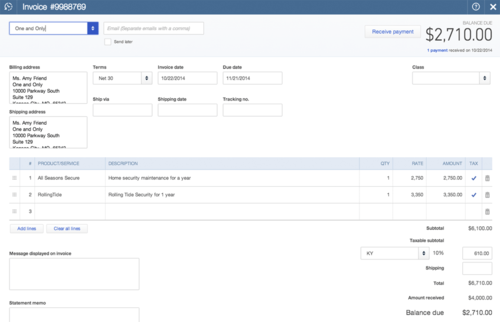
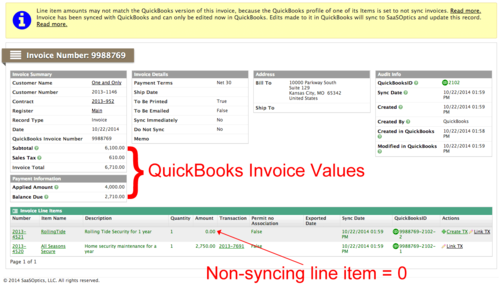
- A Line Item uses an Item that's set to not sync. Maxio still brings the Invoice in from QuickBooks, but that Line Item shows as a $0 placeholder in Maxio. The Invoice's overall Total still reflects QuickBooks' real total, so only the individual Line Item, not the Total, looks different. See Sync QuickBooks Invoices for the full behavior, including how to change it.
- A sync hasn't run yet. For example, a payment applied to an Invoice in one system doesn't appear in the other until the next sync.
Example: a non-syncing Item shown as a zero-value Line Item
This QuickBooks Invoice includes a Line Item using an Item that's set to not sync:
In Maxio, that same Line Item shows as a $0 placeholder, but the Invoice Total still matches QuickBooks:
Customers
What are the effects of merging Customers in QuickBooks Online?
Merging two Customers in QuickBooks Online, such as merging "Customer B" into "Customer A," renames Customer B to something like "Customer B - Deleted" and makes it inactive. All of Customer B's Invoices move to Customer A in QuickBooks Online.
Doing this the normal way, without following Merge QuickBooks Customers the Right Way, leaves those moved Invoices stuck on the old Customer in Maxio. That's because QuickBooks Online doesn't update an Invoice's last-modified timestamp when a Customer merge reassigns it, and Maxio's Get Invoices and Get Credit Memos sync steps only fetch Invoices QuickBooks reports as changed since the last sync. QuickBooks Online never reports these Invoices as changed, so Maxio never picks up the new Customer.
If you've already merged the wrong way
To bring the moved Invoices and Credit Memos into Maxio under the correct Customer, either:
- Open and re-save each affected Invoice or Credit Memo directly in QuickBooks Online, then sync. Re-saving it updates its timestamp, so Maxio picks it up on the next sync.
- Reset your Get Invoices and Get Credit Memos sync-step timestamps from the QuickBooks integration page in Maxio. Set them to a date before your earliest affected Invoice, or clear the field entirely for a full re-fetch with no date limit.
WARNING: Back up your Maxio account before resetting sync-step timestamps.
For how to merge Customers without causing this problem in the first place, see Merge QuickBooks Customers the Right Way.
If a merge left an Invoice and its Transaction out of balance, see Invoice and Transaction Customer Mismatch.
Sales tax
What is Automated Sales Tax in QuickBooks Online?
Automated Sales Tax is a function of QuickBooks Online. It enables QuickBooks to automatically and accurately calculate sales tax on Invoices and Sales Receipts, for all the agencies you collect sales tax for.
Whether Automated Sales Tax is turned on affects some behavior in Maxio, like whether the Tax Exemption Reason field appears on a Customer, but you can only turn it on or off in QuickBooks Online itself.
If you use Maxio's direct AvaTax integration, you likely shouldn't also use QuickBooks Automated Sales Tax: both would try to calculate tax on the same Invoice, which can create a mismatch Maxio has to flag for reconciliation. If you're unsure which to use, consult your accountant.
To set up automated sales tax in QuickBooks Online
- Open QuickBooks Online.
- From the left navigation bar, select Taxes, then select Sales tax.
- Select Use Automatic Sales Tax.
The first step is to confirm your business address, which sets up your local sales tax rate.
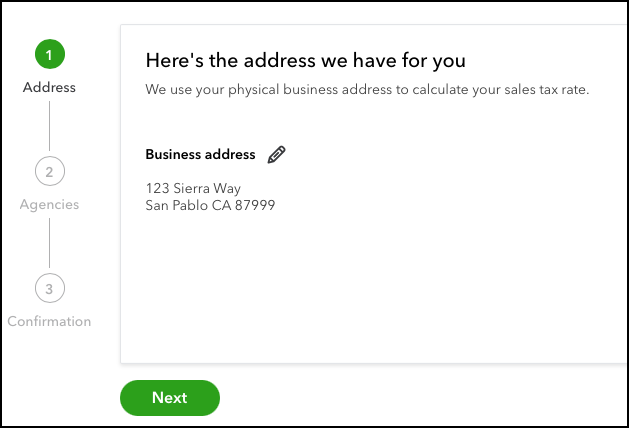
- Verify your business address and select Next. To change the address, select the pencil icon and enter the address.
- If you sell at multiple locations outside your state, select Yes. If you only sell within your state, select No.
- If you selected Yes in step 5, add every other tax agency you collect sales tax for in the supplemental options that appear at the bottom of the screen.
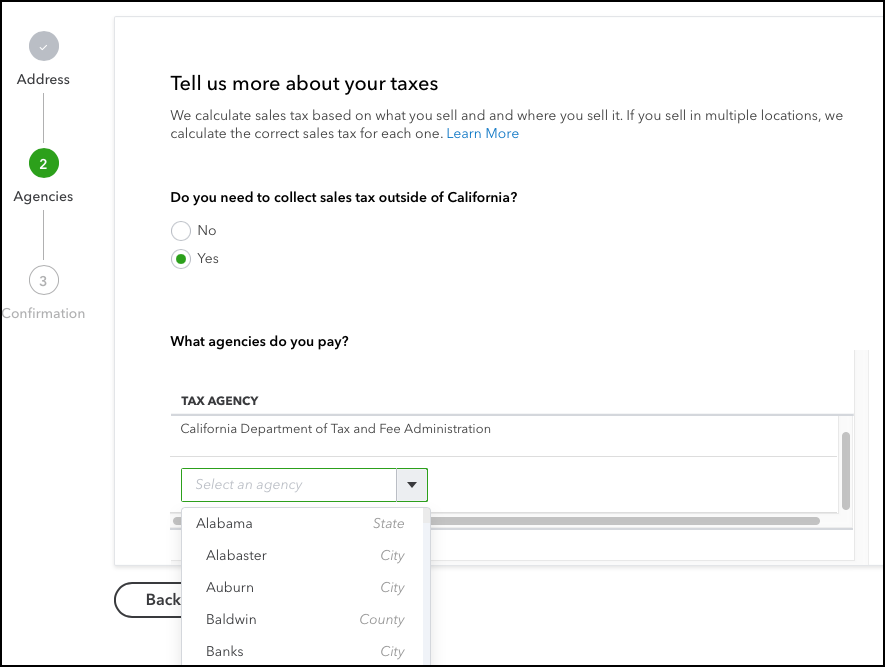
- Otherwise, select Next.
A message confirms Automated Sales Tax is set up successfully.
For more information on Automated Sales Tax and how QuickBooks calculates sales tax, see Set up and use automated sales tax in QuickBooks Online.
Still need help?
Reach out and our support team will take it from here.