
Accept Signups with Public Signup Pages
Last updated on Sep 19, 2026
Public Signup Pages (PSPs) are the fastest way to start accepting customer-facing signups, because Advanced Billing hosts the page and you only link to it. Choose the method that matches where your customer signs up, from your website, from inside your web app, or from an iframe on your own domain.
Methods Website Web App iFrame
Tools Design tools JS Widget
Summary - website
- Feature
- Public Signup Pages
- You Need
- Ability to edit your website; basic HTML experience
- Code
- Basic HTML (creating web links)
- Difficulty
- ◉◉◎◎◎
Implement a Public Signup Page on your website
Best for customers who are not logged in and who subscribe directly on your website.
1. Create a button and redirect to a PSP HTML
Create a button on your website that links to the PSP. Typically, this is done on a pricing page. Style your button when you're ready.
-
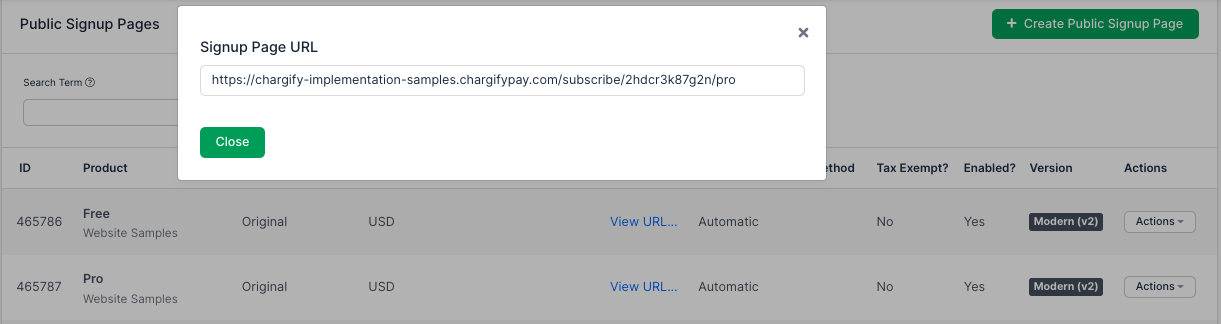
Get a PSP URL First, grab the proper link, based on the Product your Customer is subscribing to. Since your Catalog is already created, go to Catalog > Public Signup Pages > View URL.
-
Create a subscribe button Create a button, and link to the PSP.
html<a href="https://chargify-implementation-samples.chargifypay.com/subscribe/2hdcr3k87g2n/pro"> <button type="button">Subscribe Now</button> </a> -
Test After setting this up, clicking the button redirects your website to the proper PSP link.
2. Redirect to a success page
After your Customer successfully submits the form, they are redirected to either an Advanced Billing-hosted receipt page or a custom redirect URL.
Advanced Billing-hosted receipt page (default) No setup is required.
Custom thank you page
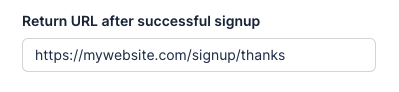
Inside Advanced Billing, open your PSP settings under Catalog > Public Signup Pages. Next to the Product you are working with, click Actions > Edit, then scroll down to Return URL after successful signup. Enter your URL, such as https://mywebsite.com/signup/thanks.
3. Test
Test your real use case, and make changes as needed. You may also want to:
- Restrict a user from signing up again. For example, block the pricing page, or hide the Subscribe Now button.
4. Configure settings Optional
Now that your PSP is implemented, configure its settings. See Configure your PSP settings below.
Summary - web app
- Feature
- Public Signup Pages
- You Need
- Ability to edit your web app; HTML experience
- Code
- Basic HTML; backend code for logged in users (if necessary)
- Difficulty
- ◉◉◉◎◎
Implement a Public Signup Page in your web app
Best for web apps where users are logged in and do not yet have a Subscription. The user may click a Subscribe Now, Signup Now, or Upgrade Now button at the top of your app, or view a pricing page in your app.
1. Create a prefilled button and redirect to a PSP HTML
-
Get a PSP URL First, grab the proper link, based on the Product your Customer is subscribing to. Since your Catalog is already created, go to Catalog > Public Signup Pages > View URL.
-
Create a subscribe button with a prefilled reference value Create a button in your app that links to the PSP. Prefill all of the Customer information you have about your user, using query parameters. The most important value to prefill is your user's ID, using the
referenceparameter.html<!-- Syntax: URL?reference={reference} --> <a href="https://chargify-implementation-samples.chargifypay.com/subscribe/vhvsbg4r5w4g/pro-webapp?reference=user_7jlqrxl517jnmbpaewk6zg&first_name=some-value&last_name=some-value&email=some-email@example.com&phone=(555) 555-5555&organization=some-company"> <button type="button">Subscribe Now</button> </a> -
Test After setting this up, clicking the button redirects your website to the proper PSP link with a reference value prepopulated.
2. Redirect back to your app
After your Customer successfully submits the form, they are redirected to a custom redirect URL in your app. Inside Advanced Billing, open your PSP settings under Catalog > Public Signup Pages. Next to the Product you are working with, click Actions > Edit, then scroll down to Return URL after successful signup. Enter your URL, such as https://mywebsite.com/signup/thanks.
3. Test
Test your real use case, and make changes as needed. You may also want to:
- Disable duplicate email signups. Go to Config > Settings > Fields, and select the Unique? checkbox on the New Email row.
- Restrict a user from signing up again. For example, block the pricing page, or hide the Subscribe Now button.
4. Configure settings Optional
Now that your PSP is implemented, configure its settings. See Configure your PSP settings below.
Summary - iframe
- Feature
- Public Signup Pages
- You Need
- Ability to edit your website; HTML/JS/CSS experience
- Code
- Basic HTML; Javascript; CSS
- Difficulty
- ◉◉◉◎◎
Implement a Public Signup Page in an iframe
Best for website or web app experiences that appear on your own domain.
Important: Before implementing iframes, review the Public Signup Page FAQ help article.
1. Create a button and link the Customer to a PSP on your domain HTML
-
Get a PSP URL First, grab the proper link, based on the Product your Customer is subscribing to. Since your Catalog is already created, go to Catalog > Public Signup Pages > View URL.
-
Create a subscribe button with a prefilled reference value Create a button in your app that links to a page on your servers, such as
/subscribe. That page iframes the PSP. Optionally, prefill any data you have about your user, especially your user's reference value in thereferencequery parameter.html<!-- Syntax: YOURURL?reference={reference} --> <a href="/subscribe?plan=pro&reference=user_7jlqrxl517jnmbpaewk6zg&first_name=This&last_name=This"> <button type="button">Subscribe to Pro</button> </a> -
Test After setting this up, clicking the button redirects your website to the proper PSP link with a reference value prepopulated.
2. Create a subscribe page that contains the iframe HTML
The /subscribe page renders an iframe. Replace PSPLINK with the actual PSP link.
Single URL Use the PSP link directly.
Dynamic URLs If you offer several plans, or you want to pass prefilled data, render the full PSP link in your backend, then pass it to your front end.
<!doctype html>
<html lang="en">
  <head>
    <meta charset="utf-8">
    <meta name="viewport" content="width=device-width, initial-scale=1">
    <title>iFrame sample</title>
    <!-- Custom styles for this template -->
    <link href="iframe.css" rel="stylesheet">
  </head>
  <body>
    <div class="container py-3">
      <main>
        <iframe src="PSPLINK"></iframe>
      </main>
    </div>
  </body>
</html>
3. Style the iframe CSS
Use CSS to blend the iframe into your page, make it full size, remove borders, and so on.
/* iframe.css */
iframe {
  position:fixed;
  top:0;
  left:0;
  bottom:0;
  right:0;
  width:100%;
  height:100%;
  border:none;
  margin:0;
  padding:0;
  overflow:hidden;
  z-index:999999;
}
4. Configure the redirect JS
With iframes, this involves two redirects. The PSP redirects to the iframe callback URL, which then redirects the user to your app dashboard.
-
Set your iframe callback URL in Advanced Billing Open your PSP settings under Catalog > Public Signup Pages. Next to the Product you are working with, click Actions > Edit, then scroll down to Return URL after successful signup. Set it to your iframe redirect link, such as
https://myapp.com/iframe-callback. This step redirects the signup to your iframe callback script, so that script can redirect the user back to your app dashboard. -
Configure your iframe callback and app dashboard This removes the iframe and redirects the user to their end destination. Create a file called
/iframe-callback, and add the following Javascript. Replace thehrefto determine where your user is redirected.html<script> //redirects away from iframe, and sends user to another page window.parent.location.href = "dashboard.html"; </script>
5. Test
Test your real use case, and make changes as needed. You may also want to:
- Disable duplicate email signups. Go to Config > Settings > Fields, and select the Unique? checkbox on the New Email row.
6. Configure settings Optional
Now that your PSP is implemented, configure its settings. See Configure your PSP settings below.
Configure your PSP settings
Two levels of settings control how your Public Signup Pages behave. Choose whichever level makes sense for your use case.
Method 1 - Configure master PSP settings
Best for settings that apply to all PSPs that are not overridden at the individual PSP level. Go to Config > Settings > Public Page Default Settings. These settings control functionality that extends to all individual PSPs, unless you override the setting at the individual PSP level. For more detail, see the Configuring Public Page Default Settings help article.
Method 2 - Configure individual PSP settings
Best for settings that apply to a single PSP. Go to Catalog > Public Signup Pages. Next to the Product of your choice, click Actions > Edit. These settings control functionality such as currency, components, price points, card icons, and custom fields. For more detail, see the Individual Page Settings help article.
Design tools
Two hosted tools help you style a PSP without writing everything from scratch.
Open the theme gallery full screen
Advanced implementation options
Each of the following options is optional.
Optional - Prefill Customer data
You may want to prefill data such as a Customer reference, first name, or last name. For the full list, see the Pre-populate a Public Signup Page via URL Parameters help article.
Example:
<!-- Syntax: PSPLINK?reference=123?first_name=Tommy&last_name=Emmanuel-->
<a href="https://chargify-sandbox-141.chargifypay.com/subscribe/yy2xt8wtsnm2/basic_plan?reference=123&first_name=Tommy&last_name=Emmanuel">
  <button type="button" class="w-100 btn btn-lg btn-primary">Subscribe to Pro</button>
</a>
Prefill custom field data using this Javascript snippet:
//Example: The URL ends with ?custom1=gold&custom2=big
const queryString = window.location.search;
const urlParams = new URLSearchParams(queryString);

//Define custom fields
const custom1 = urlParams.get('custom1'); //gold
const custom2 = urlParams.get('custom2'); //big

//Prepopulate text custom field (XXXXX is your custom field ID)
$("#subscription_metafields_XXXXX").val(custom1);
$("#subscription_metafields_XXXXX").val(custom2);
Optional - Add custom CSS and Javascript CSS JS
CSS controls design, and Javascript controls functionality and layout.
Developers Write your own code and add it to any PSP under Catalog > Public Signup Pages. Next to the Product of your choice, click Actions > Edit > CSS + Javascript. Tip: use the browser console to test and debug code before you add it.
Non-developers Use prewritten code snippets from the Customize a Modern Public Signup Page with JavaScript and CSS help article.
Optional - Add language translation JS
Change the language on your page using the snippet in the Customize a Modern Public Signup Page with JavaScript and CSS help article, then replace the text in the snippet.
Related information
To compare Public Signup Pages against every other signup method, see the Compare New User Signup Methods help article.
To build a fully custom payment page instead of using a hosted one, see the Accept Signups with Maxio.js help article.
Still need help?
Reach out and our support team will take it from here.