
Create Subscriptions Inside Advanced Billing
Last updated on Aug 29, 2026
Staff can create a Subscription directly in the Advanced Billing Admin UI, with no signup page and no code. Use this method for Subscriptions your team sets up on a Customer's behalf, whether that is a single standard Subscription, a group billed on one consolidated Invoice, or a Parent Customer paying for a Child Customer.
Summary
- Feature
- Subscriptions
- You Need
- Complete Design Your New User Signup Flow
- Code
- No
- Difficulty
- ◉◎◎◎◎
Create standard subscriptions
Standard Subscriptions are the most common Subscription type, where one Customer pays for their own Subscription on its own Invoice.
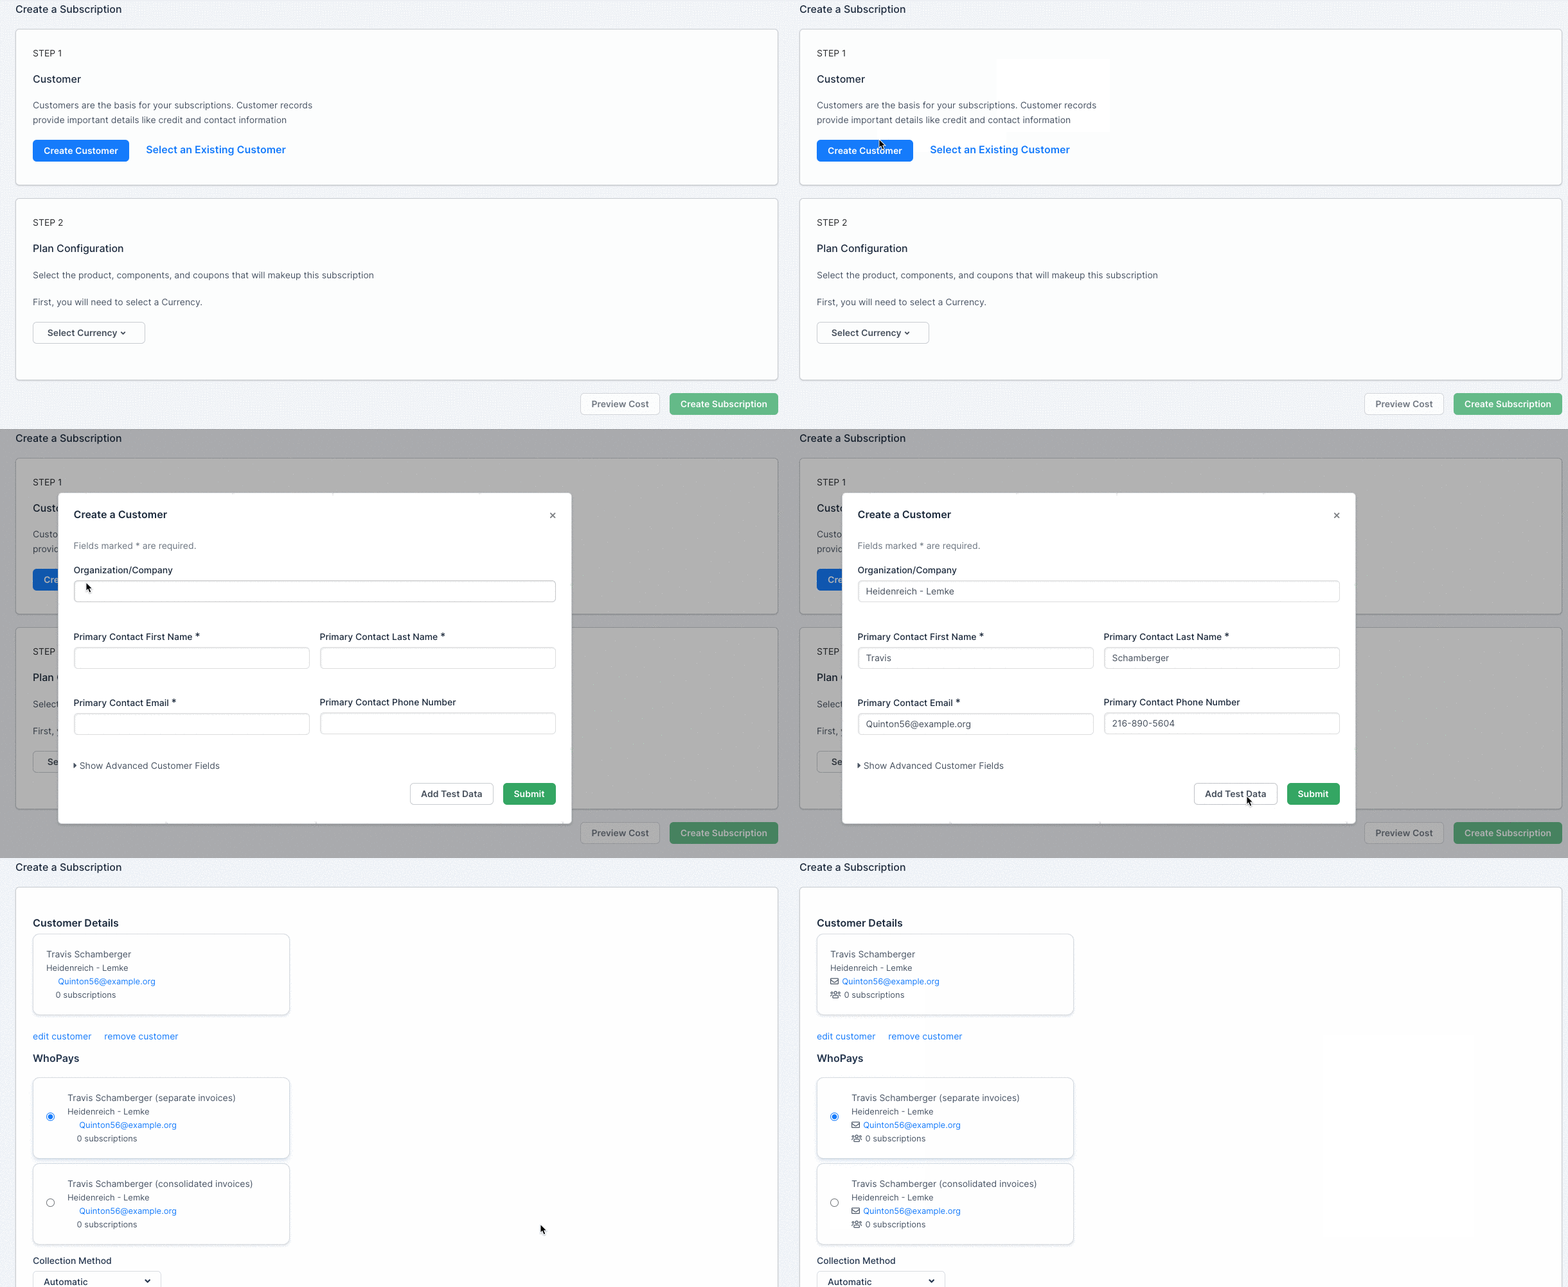
1. Set Customer and WhoPays
Create a new Customer, or select an existing Customer. Set WhoPays to Separate Invoices.
2. Set payment type
Set the payment type, and optionally set the next billing date and other fields.
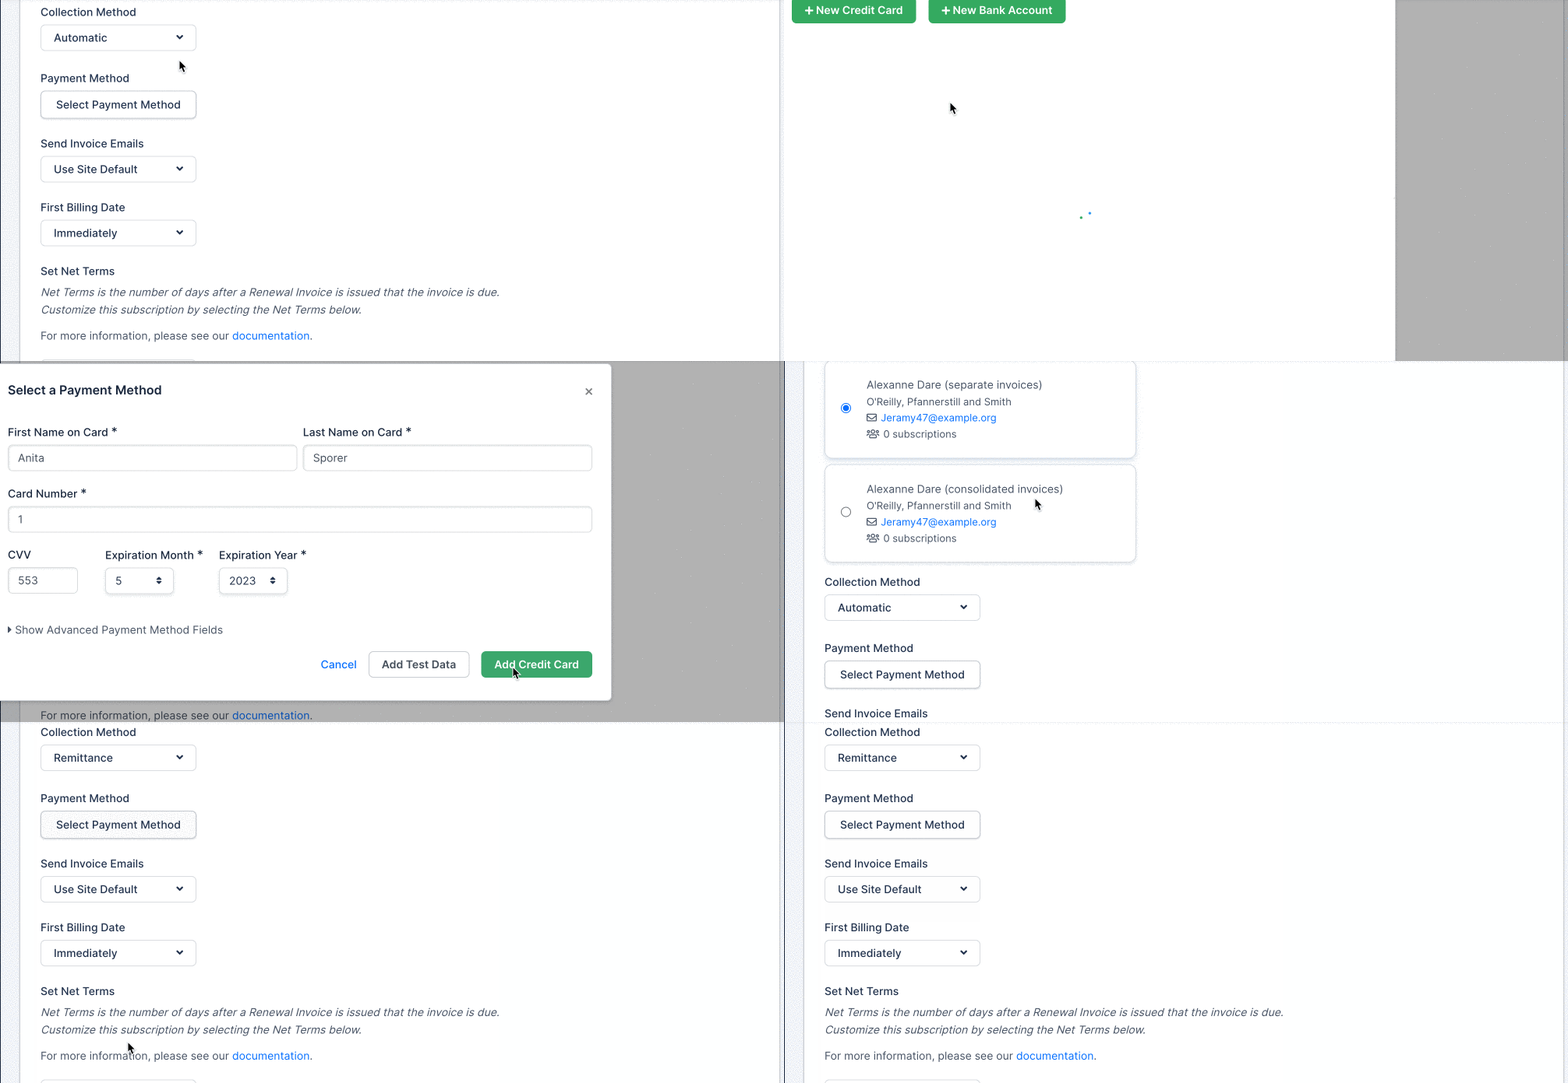
The available payment types are:
- Automatic - Credit card or bank account.
- Remittance - Payment is remitted manually after the Invoice is received. You can collect a payment method after the Subscription is created, and change to Automatic.
- Prepaid - Payments are withdrawn from a replenishing balance, like a digital wallet.
3. Configure the Subscription plan
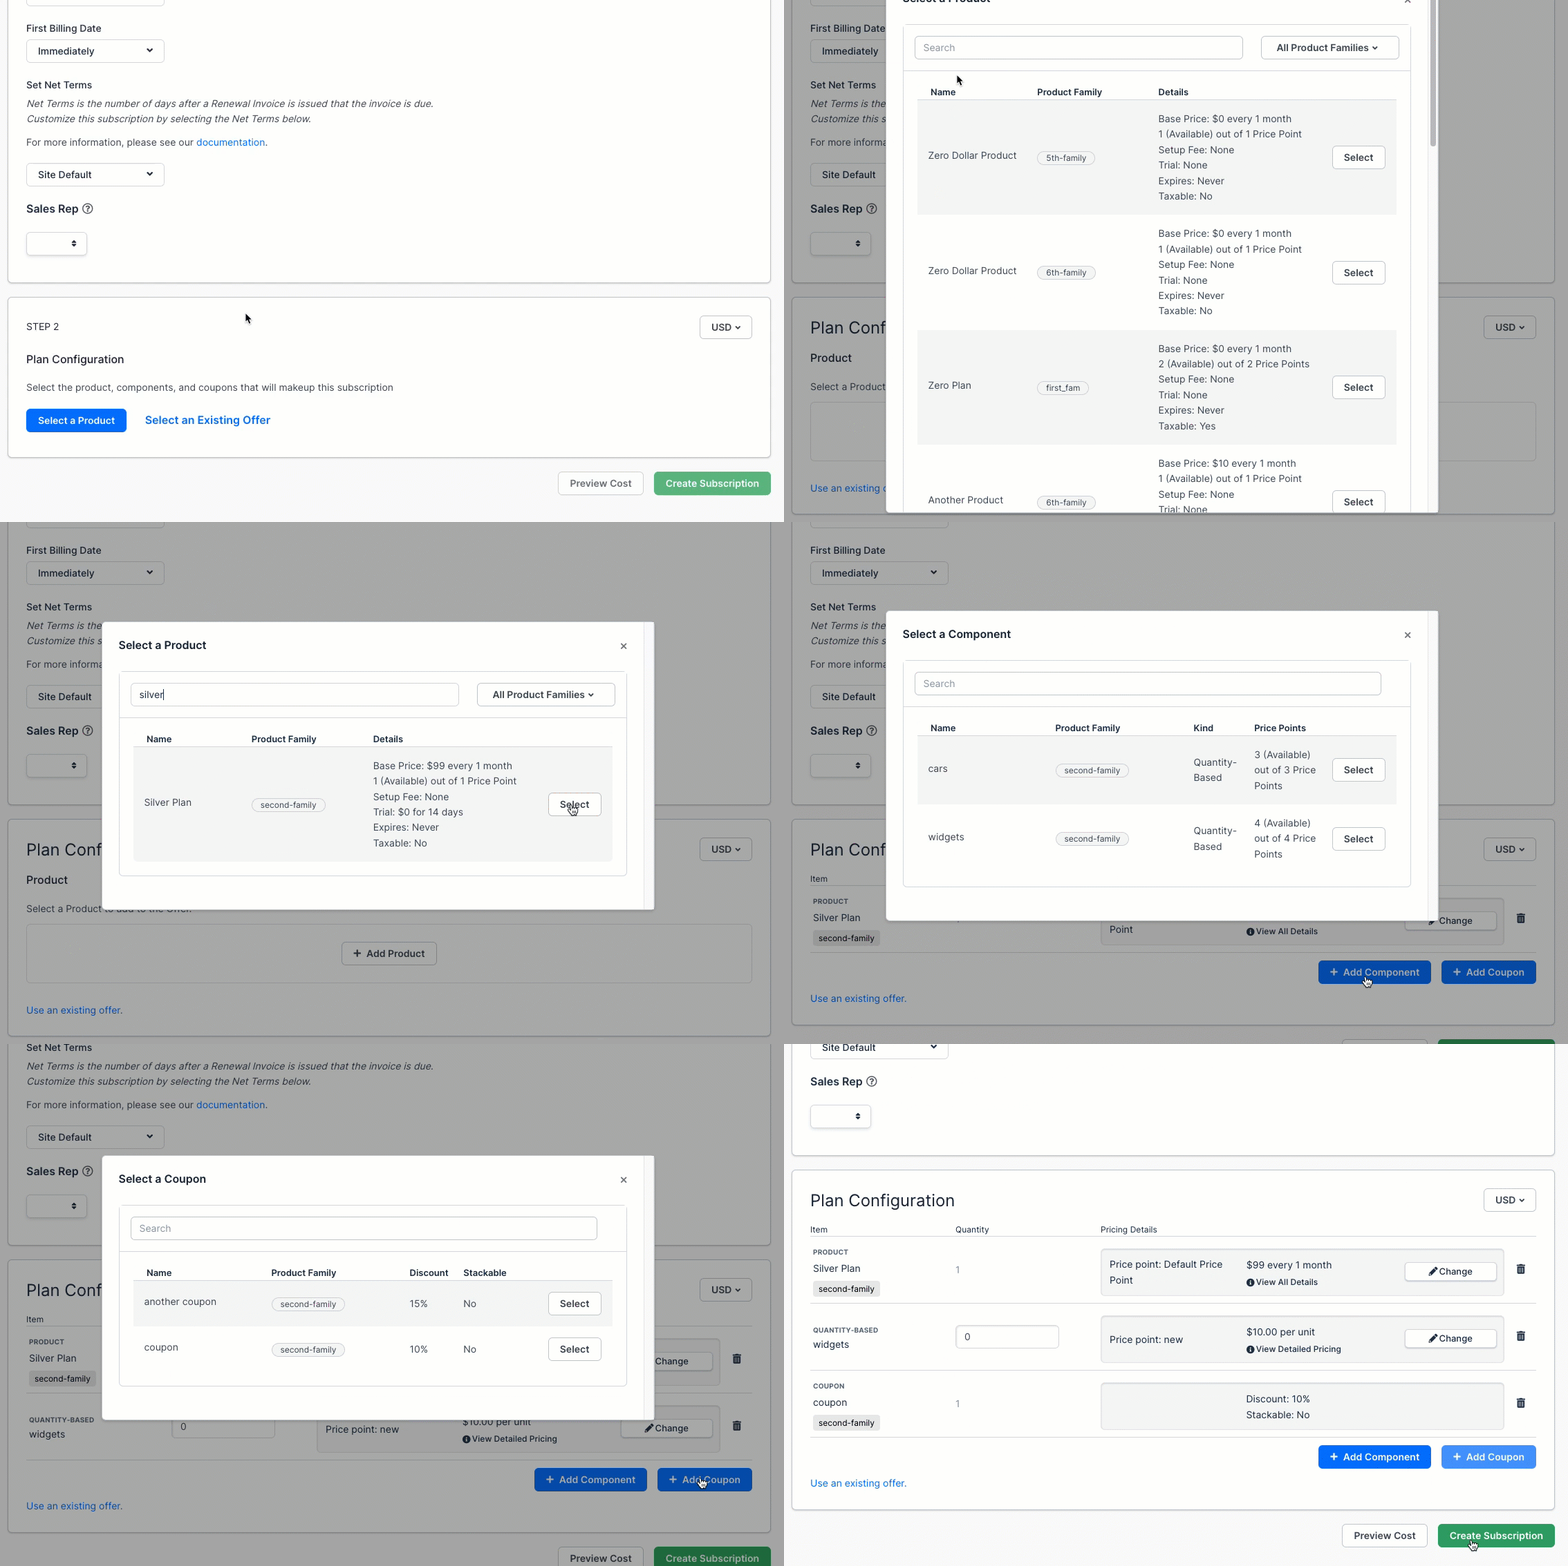
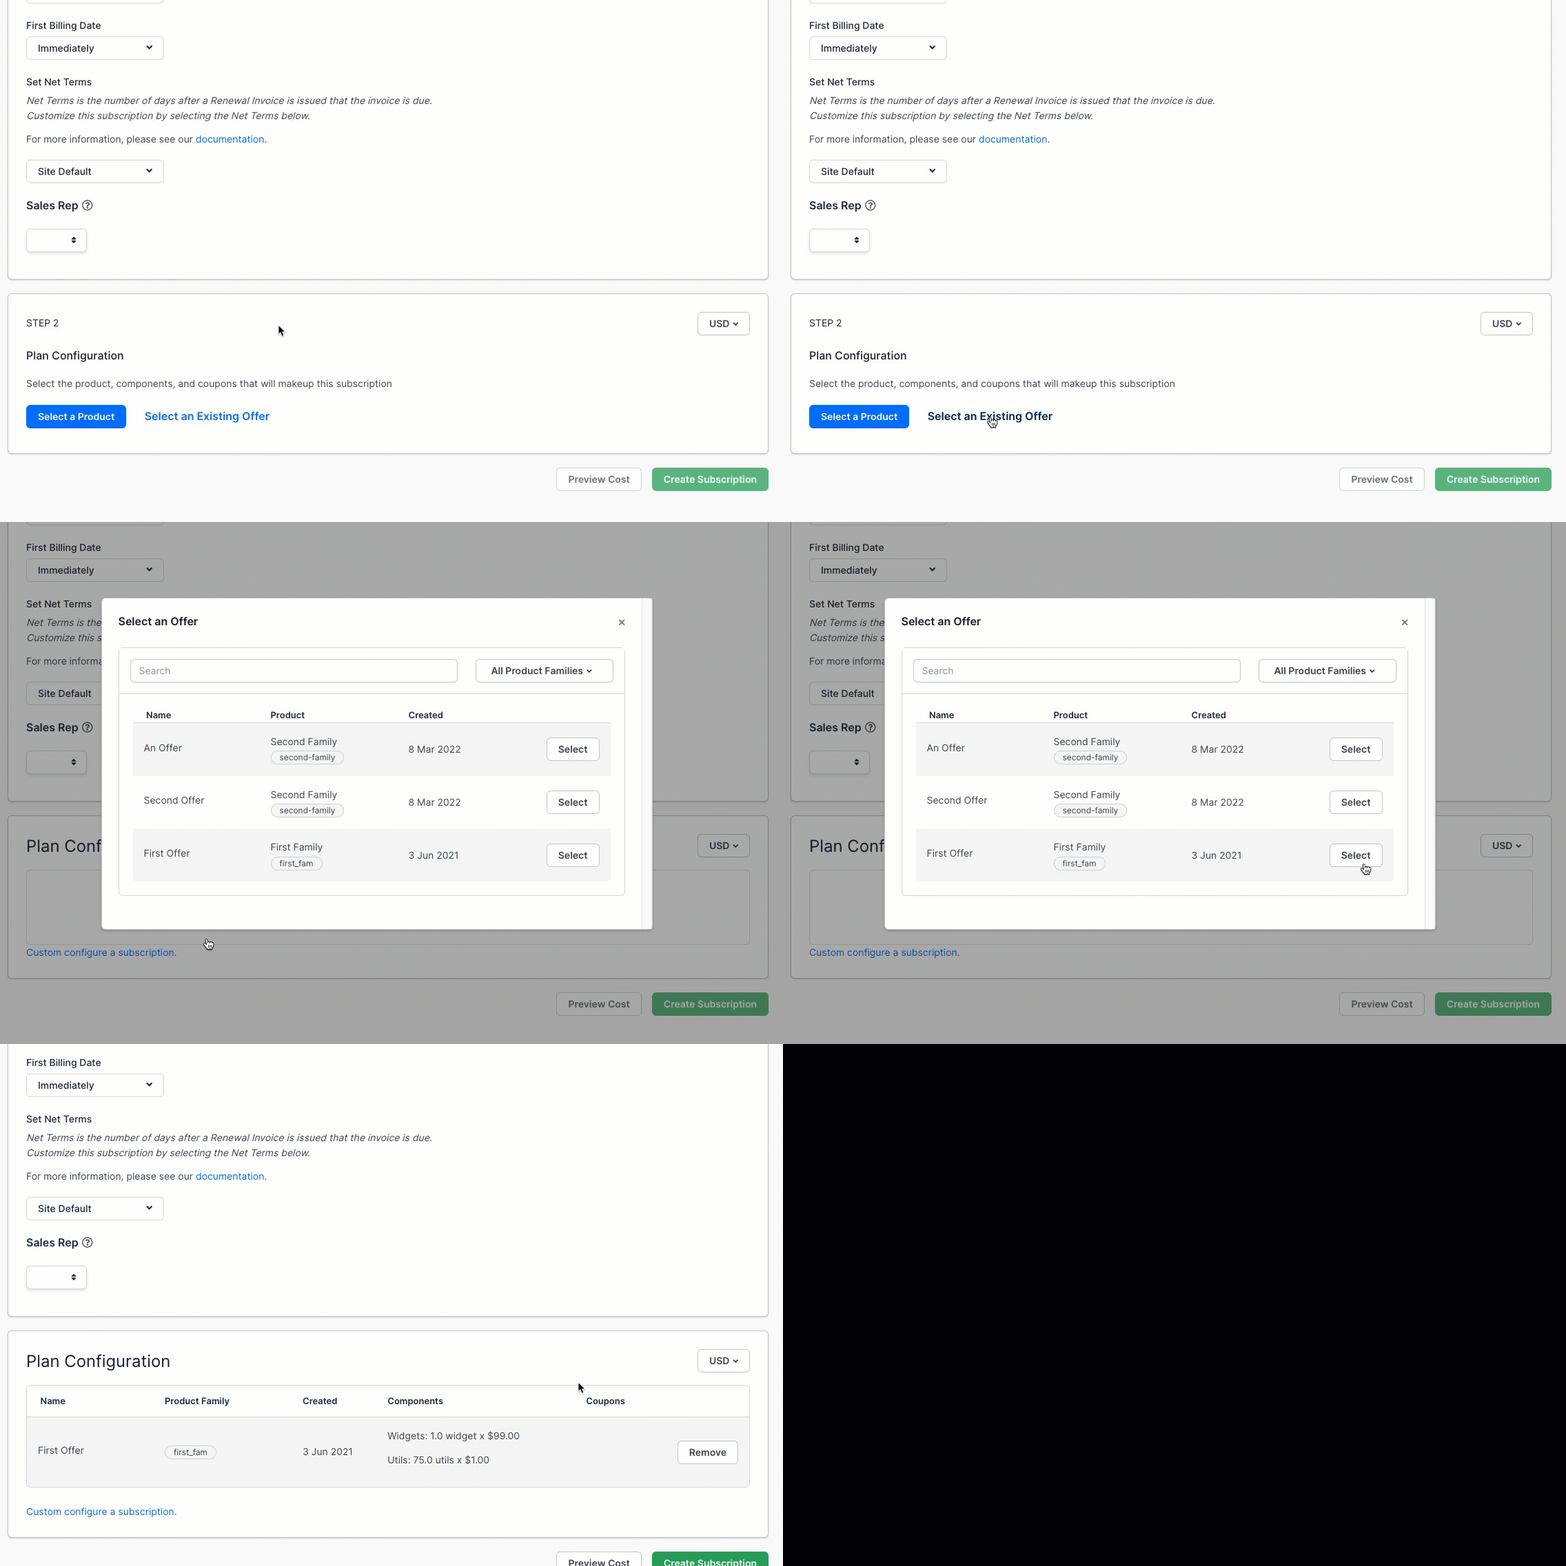
Select the currency, then either build a Subscription plan by clicking Select a Product, or choose an existing Offer (a prepackaged bundle).
To build a plan from a Product
- Add a Product.
- (Optional) Add components.
- (Optional) Add coupons.
To use an existing Offer
4. Preview the cost and create the Subscription
Preview the cost and confirm everything is correct. When ready, click Create Subscription.
Create grouped subscriptions
Grouped Subscriptions use consolidated Invoices to bill one Customer for multiple Subscriptions. Before getting started, go to Config > Settings > Customer Hierarchies, and enable both Customer Hierarchies and WhoPays.
1. Create a new Customer with consolidated Invoices
Create a new Customer. Set WhoPays to Consolidated Invoices. This becomes the first Subscription in a group.
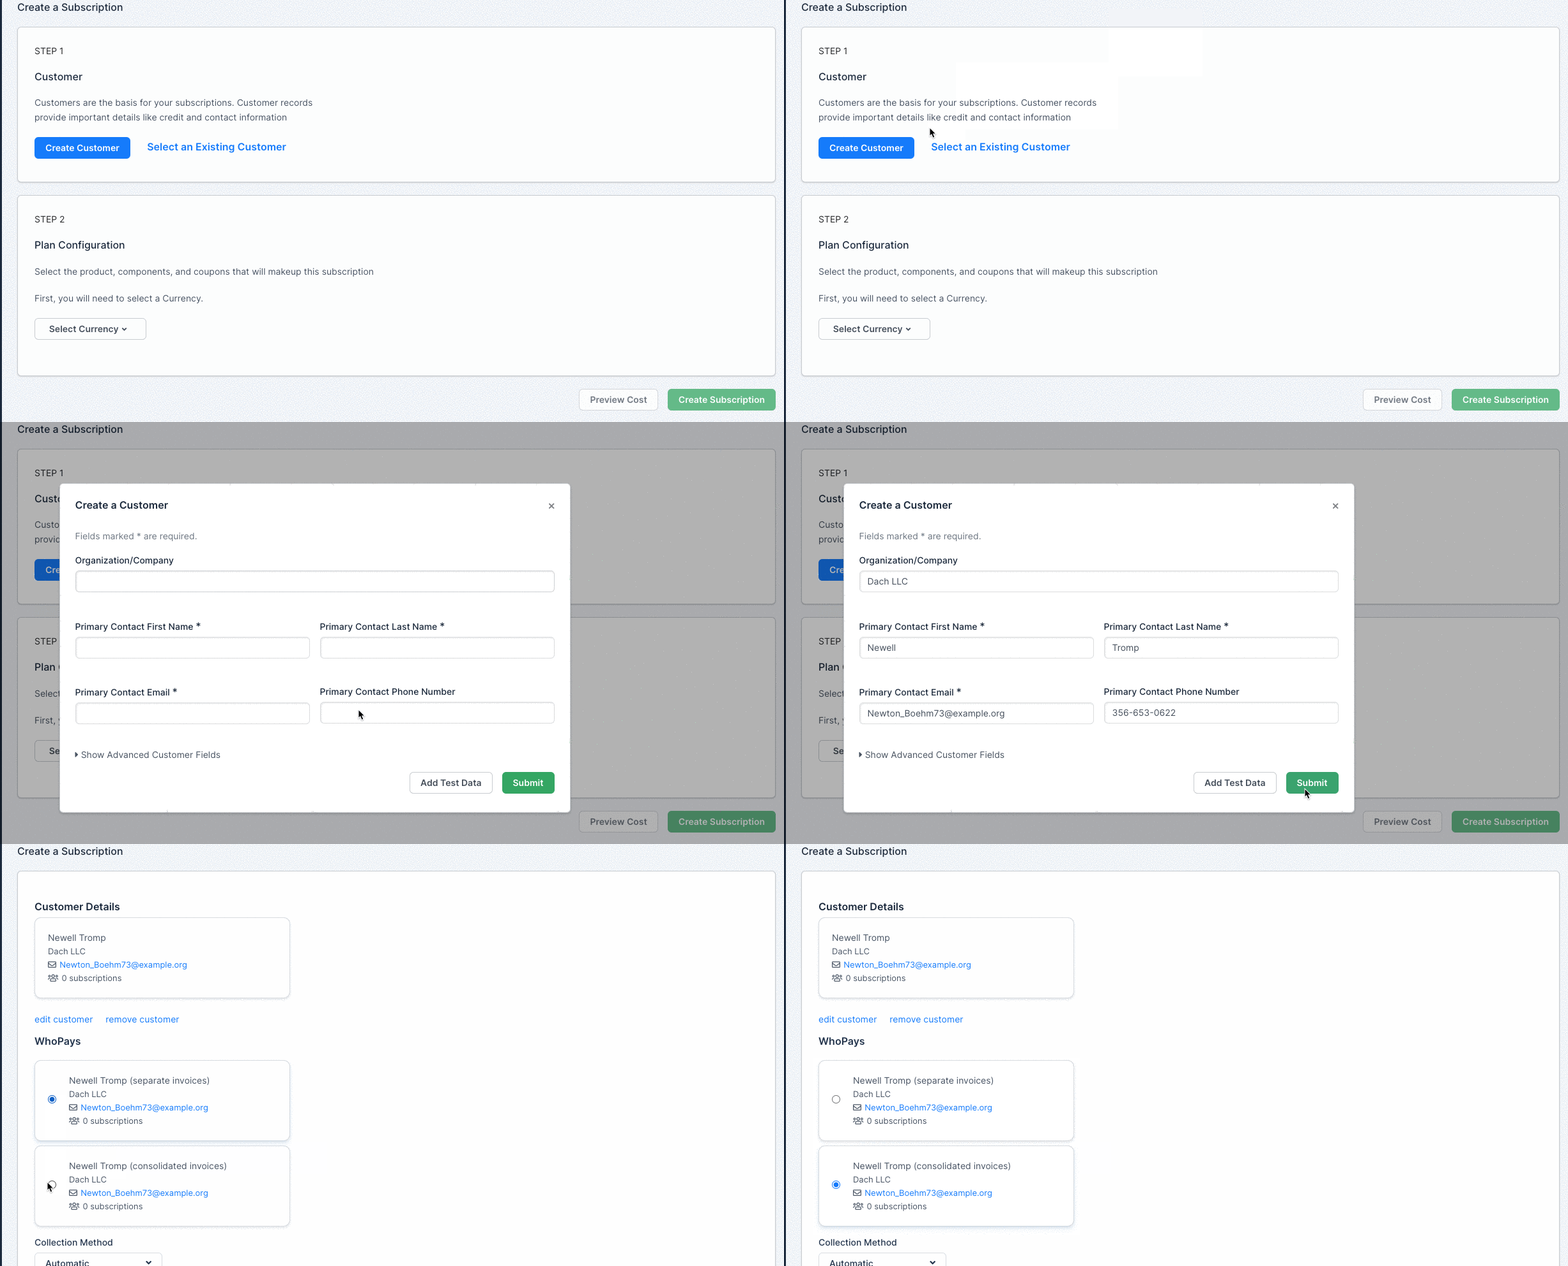
2. Set payment type
Set the payment type, and optionally set the next billing date and other fields.
The available payment types are:
- Automatic - Credit card or bank account.
- Remittance - Payment is remitted manually after the Invoice is received. You can collect a payment method after the Subscription is created, and change to Automatic.
- Prepaid - Payments are withdrawn from a replenishing balance, like a digital wallet.
3. Configure the Subscription plan
Select the currency, then either build a Subscription plan by clicking Select a Product, or choose an existing Offer (a prepackaged bundle).
Important: If you are creating a group with two Subscriptions that have different billing intervals, make the first Subscription the smallest billing interval. For example, for a yearly Subscription with monthly usage, the first Subscription is the monthly one.
To build a plan from a Product
- Add a Product.
- (Optional) Add components.
- (Optional) Add coupons.
- (Optional) Add custom fields.
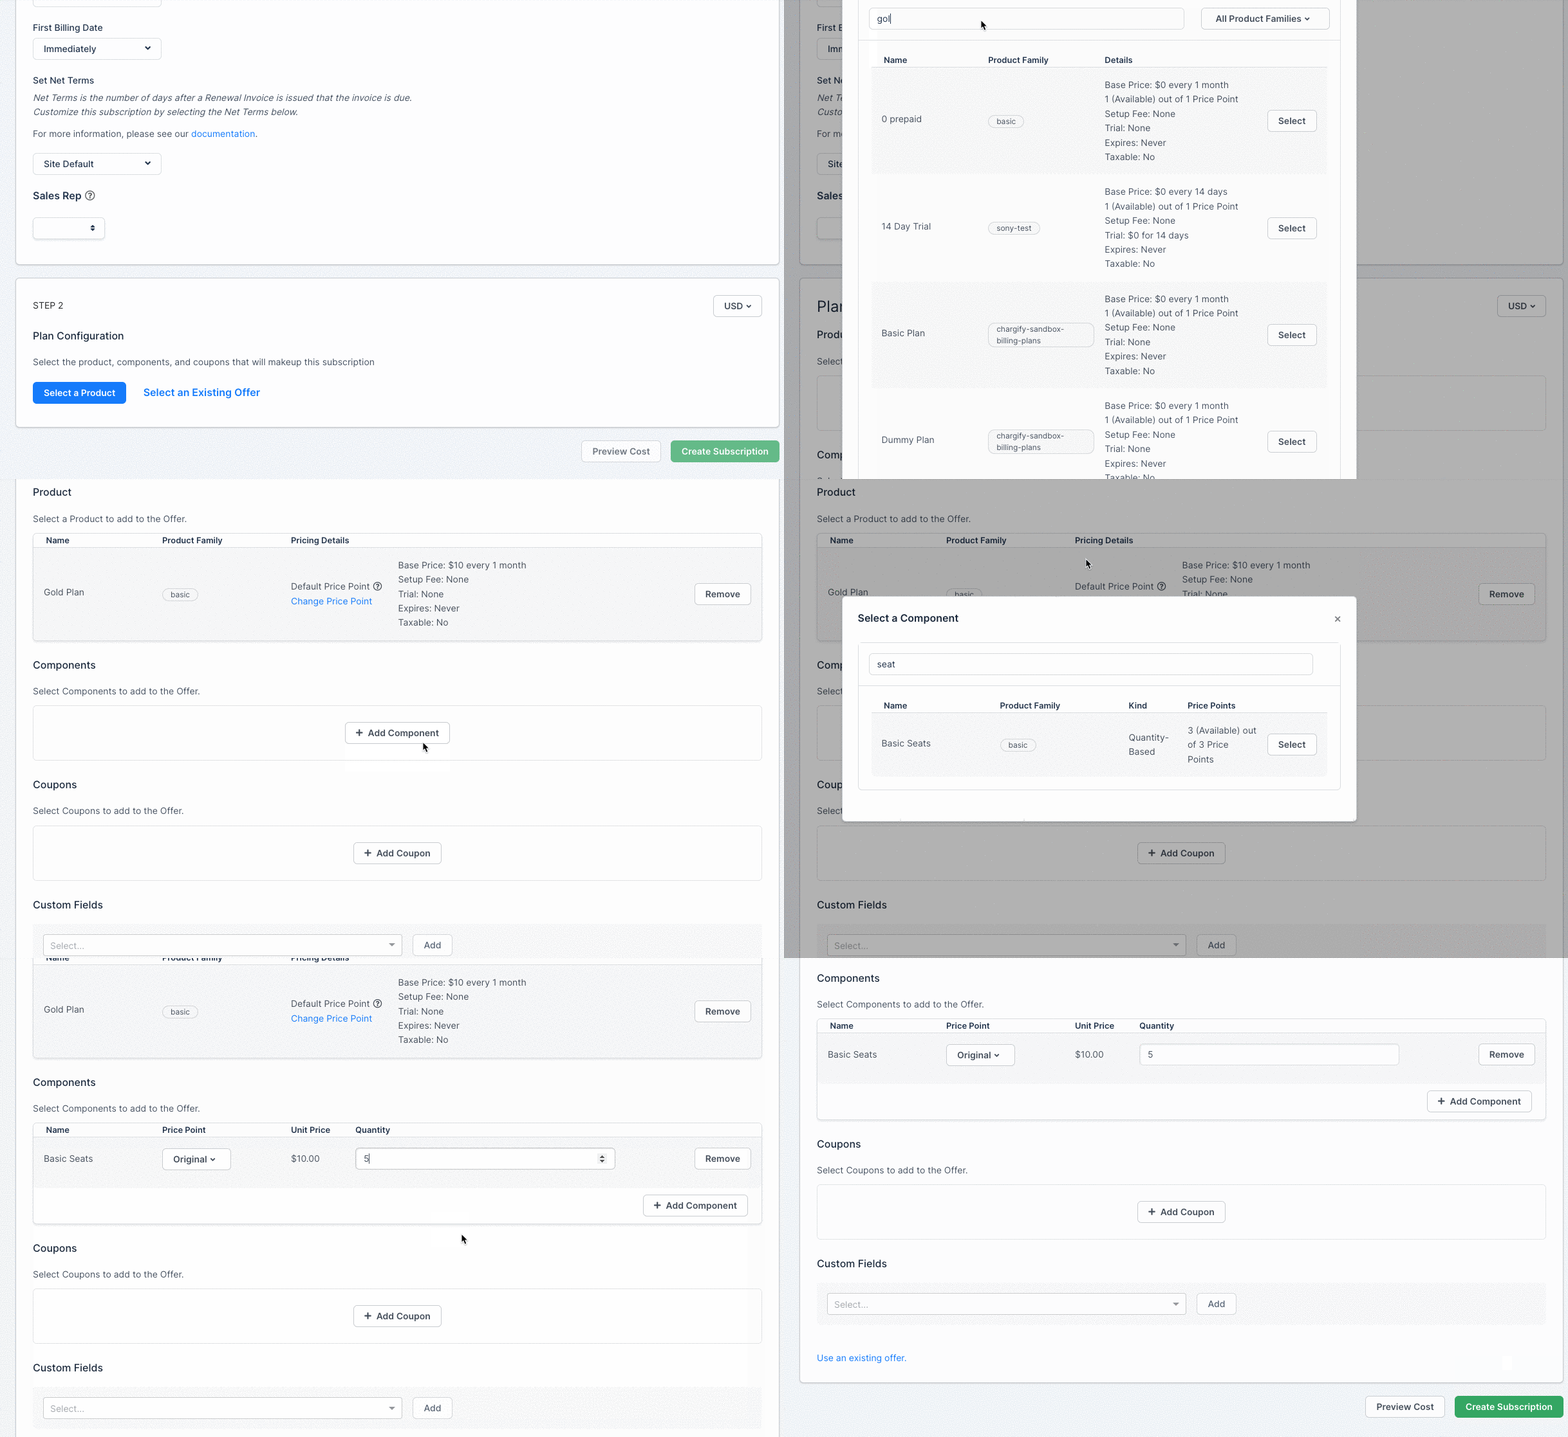
To use an existing Offer
- Add the Offer.
- (Optional) Add custom fields.
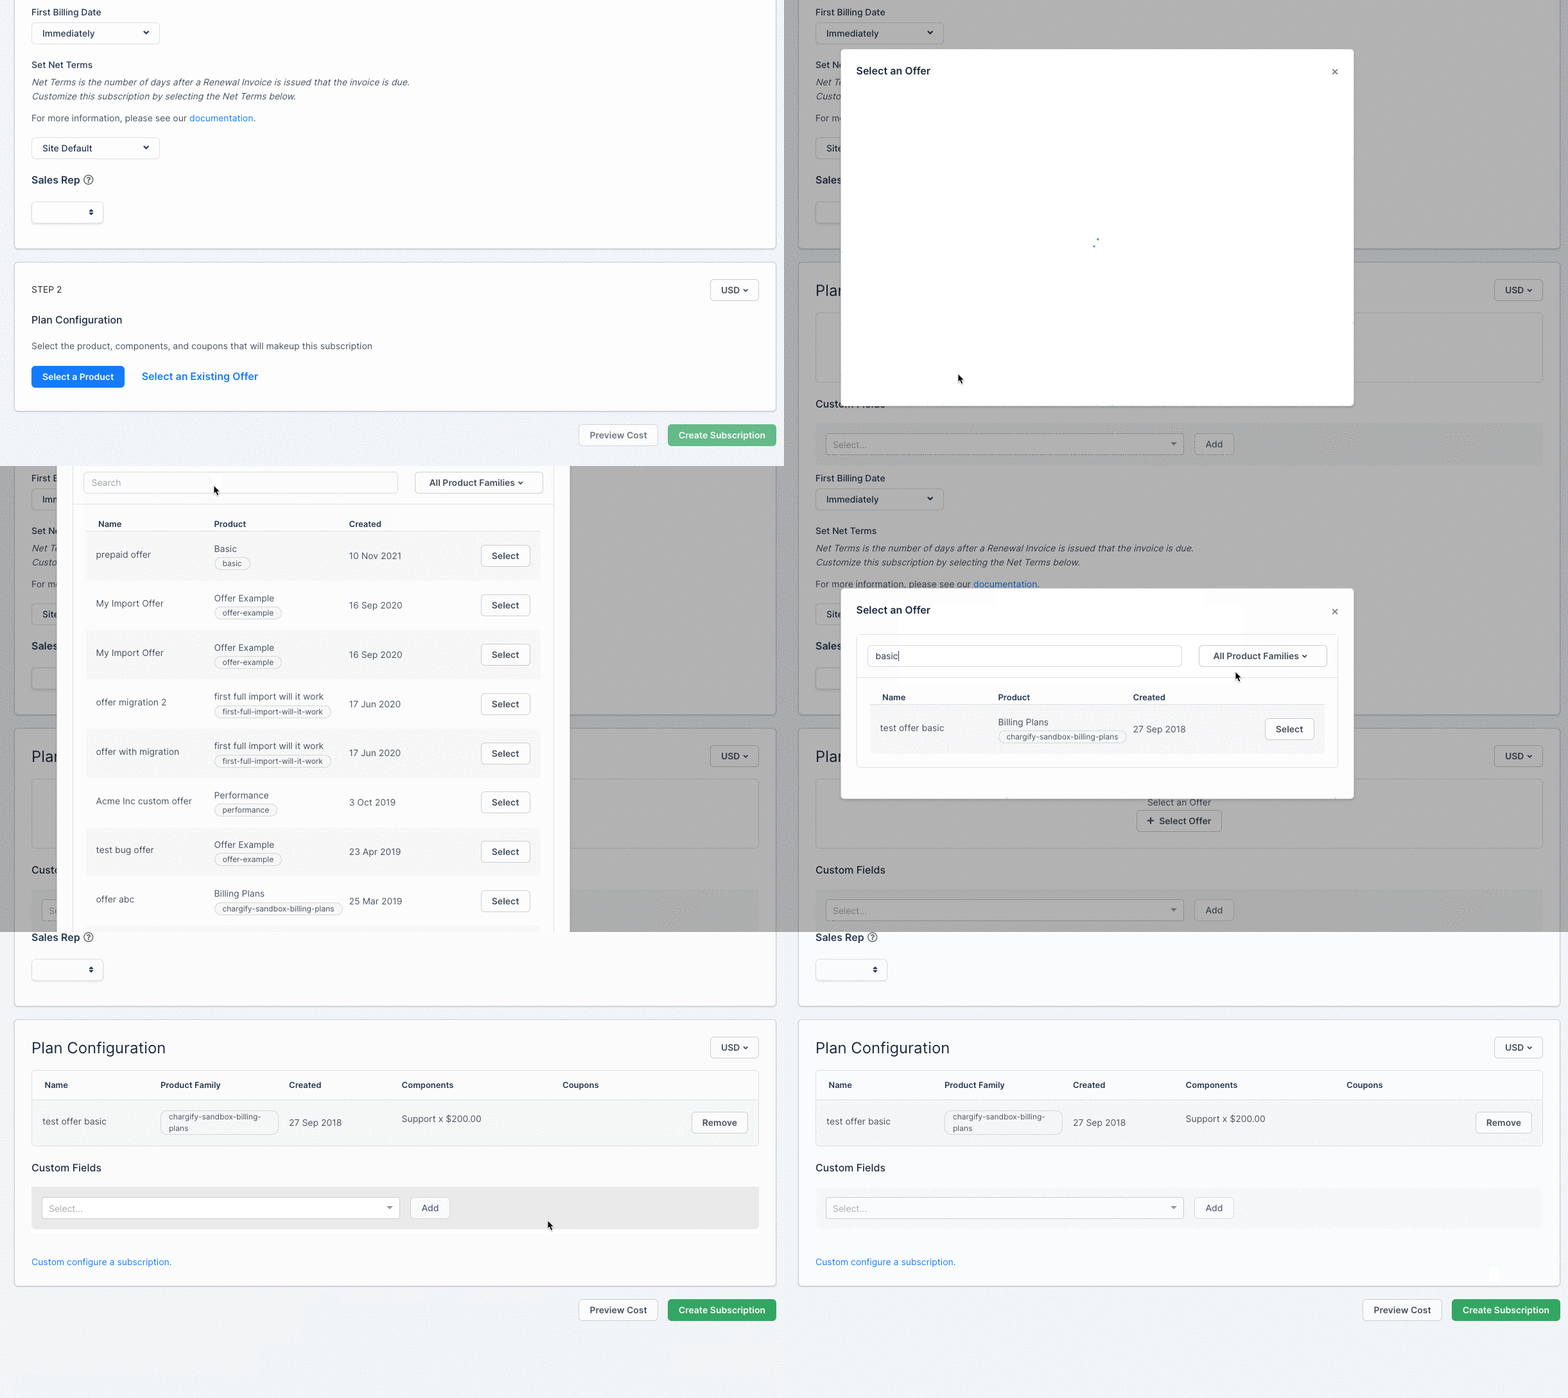
4. Preview the cost and create the Subscription
Preview the cost and confirm everything is correct. When ready, click Create Subscription.
Optional - Create the second and later Subscriptions in a group
Select the existing Customer, then select Consolidated Invoices.
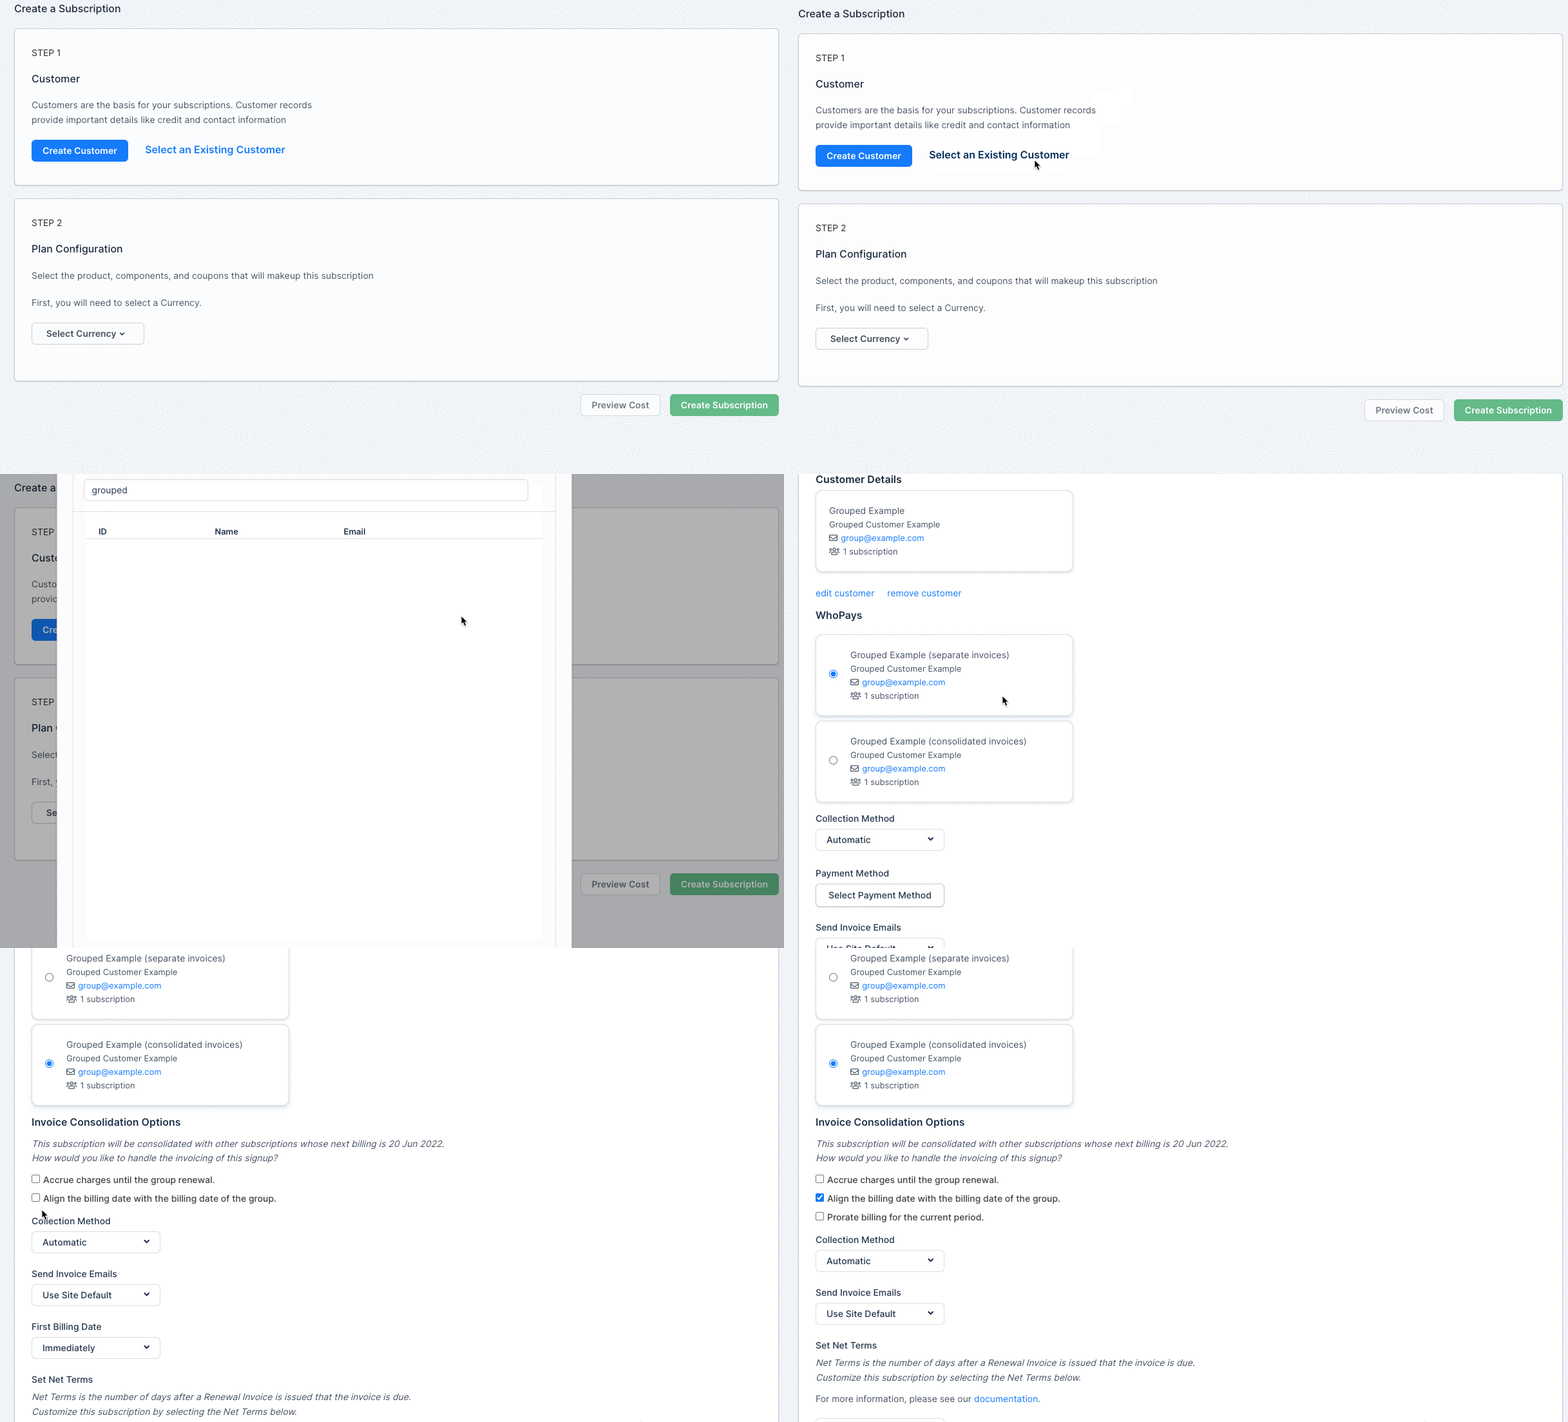
Three Invoice consolidation options then appear.
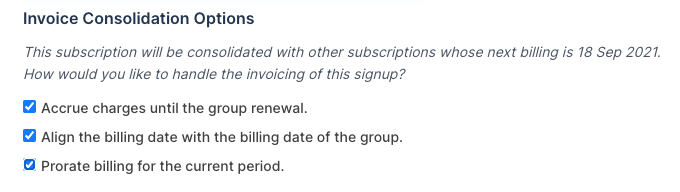
Six configurations are possible. Your use case very likely has only one configuration you actually use. In the table below, the Product is $100/mo, so you can see how much is charged at signup and at the first group renewal.
| Configuration option | Description | At signup | At group renewal |
|---|---|---|---|
| 1. None | Not recommended. Always use some form of the Align setting. | n/a | n/a |
| 2. Accrue only | Not recommended. If you need to accrue, use Accrue + Align instead. | n/a | n/a |
| 3. Accrue + Align | The amount owed is not charged today. Instead, it accrues to the next renewal. | $0 | $200 ($100 accrued + $100 normal renewal) |
| 4. Accrue + Align + Prorate | The amount owed at signup is prorated and accrued to the next renewal. | $0 | $200-300 ($100 accrued + $100 normal renewal + $0-100 prorated) |
| 5. Align only | Nothing is charged today. The renewal is the normal amount. | $0 | $100 |
| 6. Align + Prorate | The amount owed at signup is prorated and charged today. The renewal is the normal amount. | $0-100 | $100 |
Create parent/child subscriptions
Parent/child Subscriptions let a Parent Customer pay for multiple Child Subscriptions. Before getting started, go to Config > Settings > Customer Hierarchies, and enable both Customer Hierarchies and WhoPays.
1. Create a Parent Customer
If you already have a Parent Customer, skip this step. In the top right corner, click Create > Create Customer, then click Parent Customer.
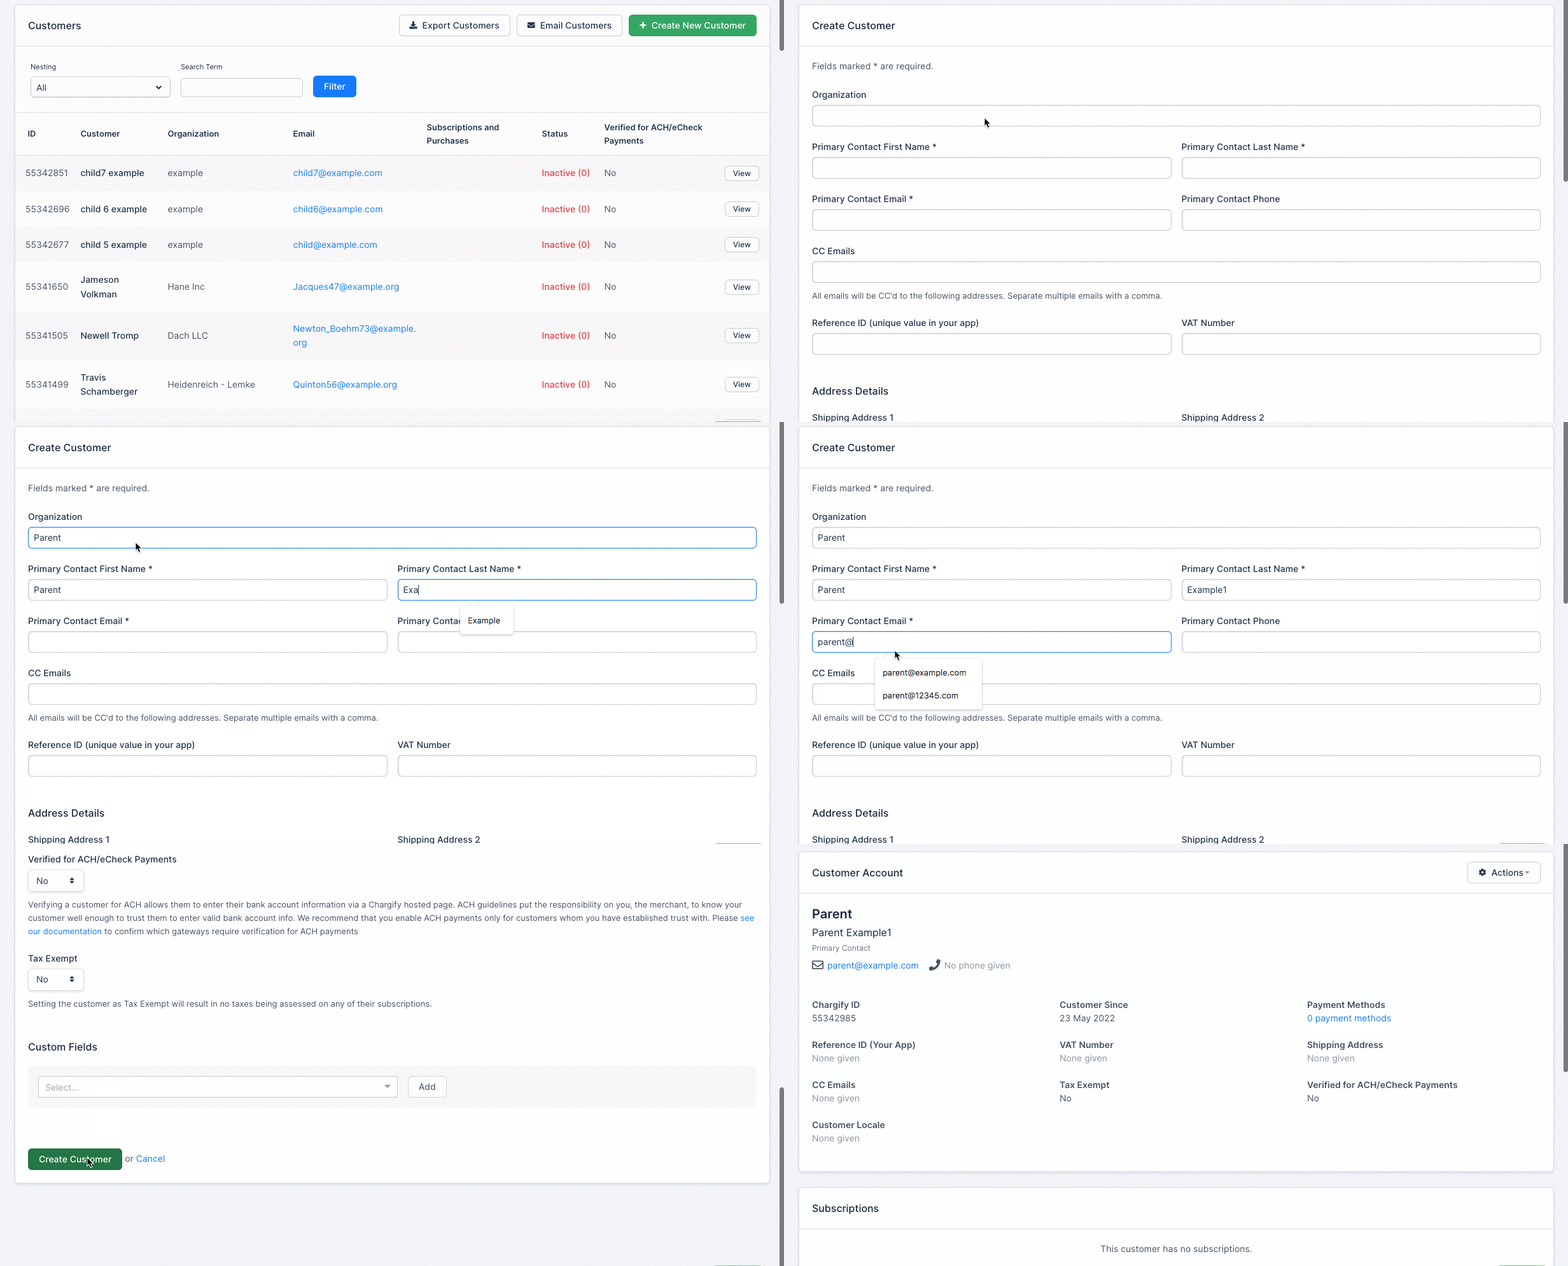
2. Create a Child Customer under the Parent
Click Billing > Customers, and search for your Parent Customer. Click into their Customer profile, scroll to the bottom, and click Add new customer as Child. Add the Child, and click Submit. The Child is now associated with the Parent.
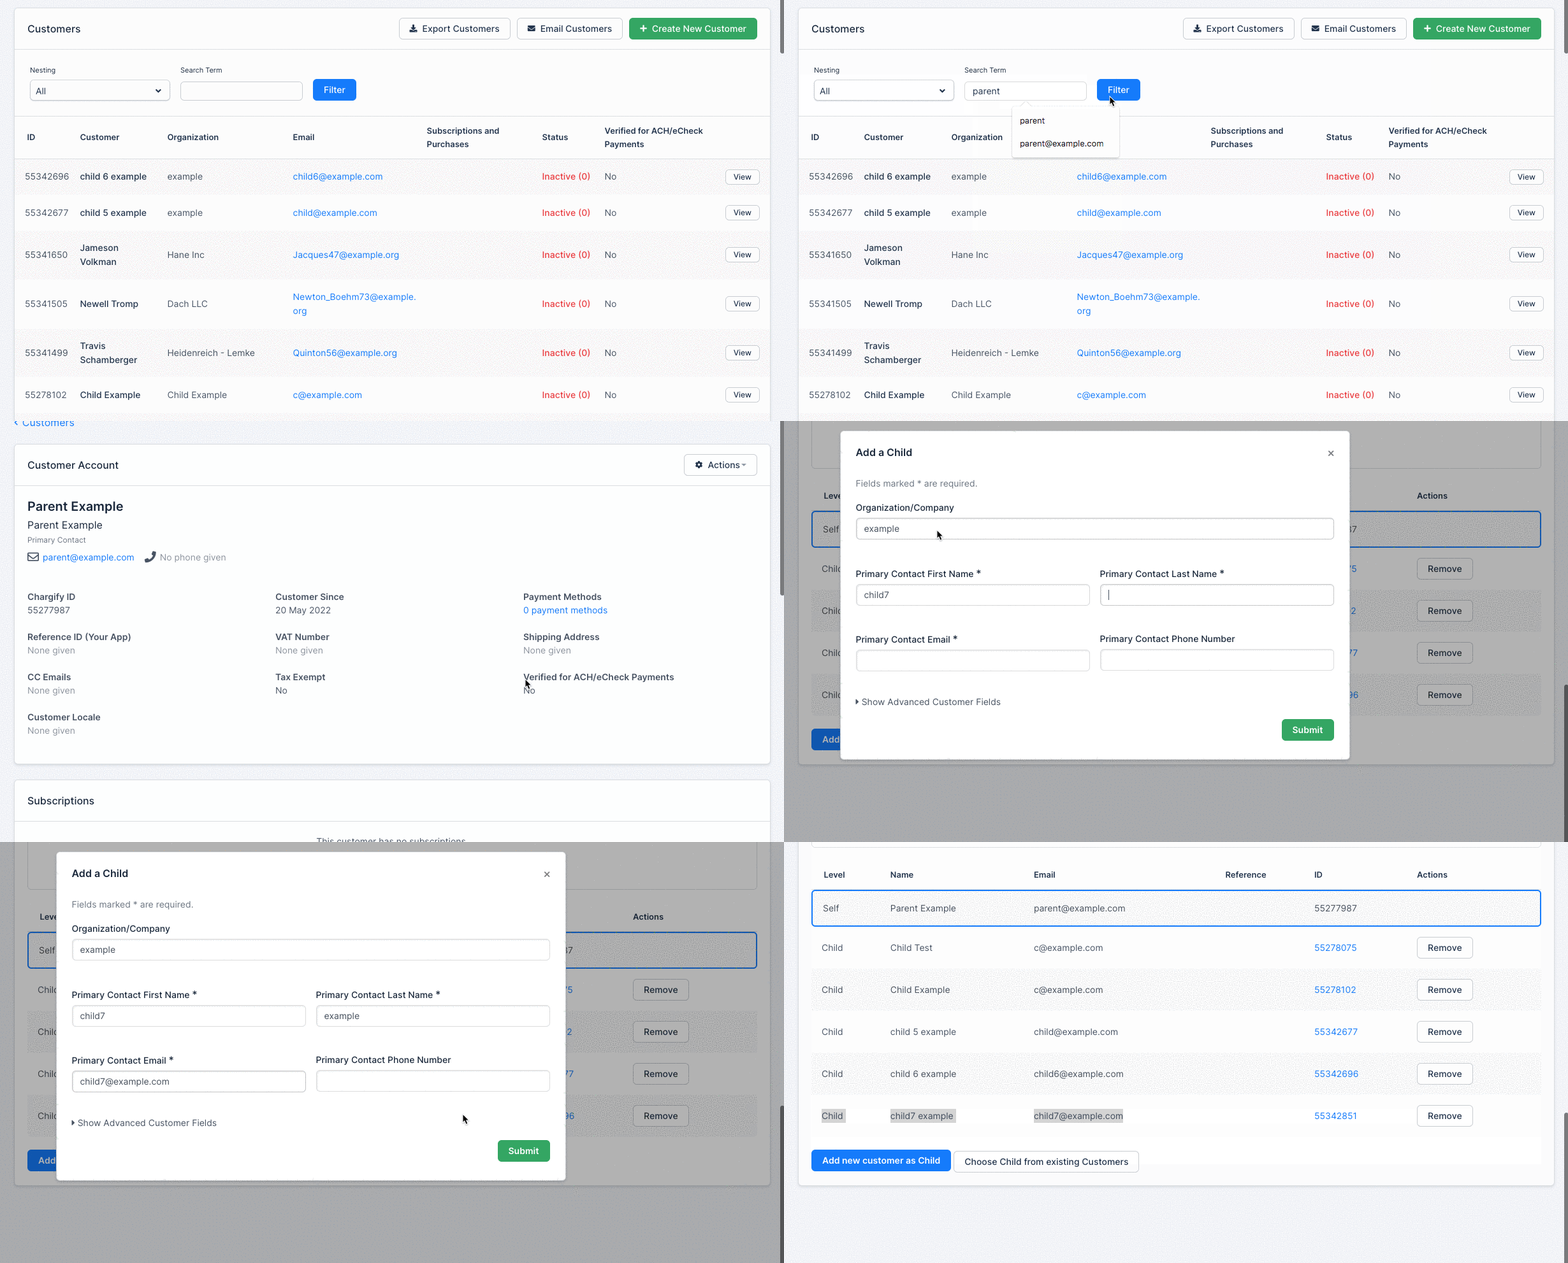
3. Create a Subscription for the Child
In the Parent Customer profile, scroll to the bottom and click the Child's Customer profile link, or search for the Child directly. On the Child's profile, click Create a Subscription, set WhoPays to the Parent, and complete the Subscription creation process.
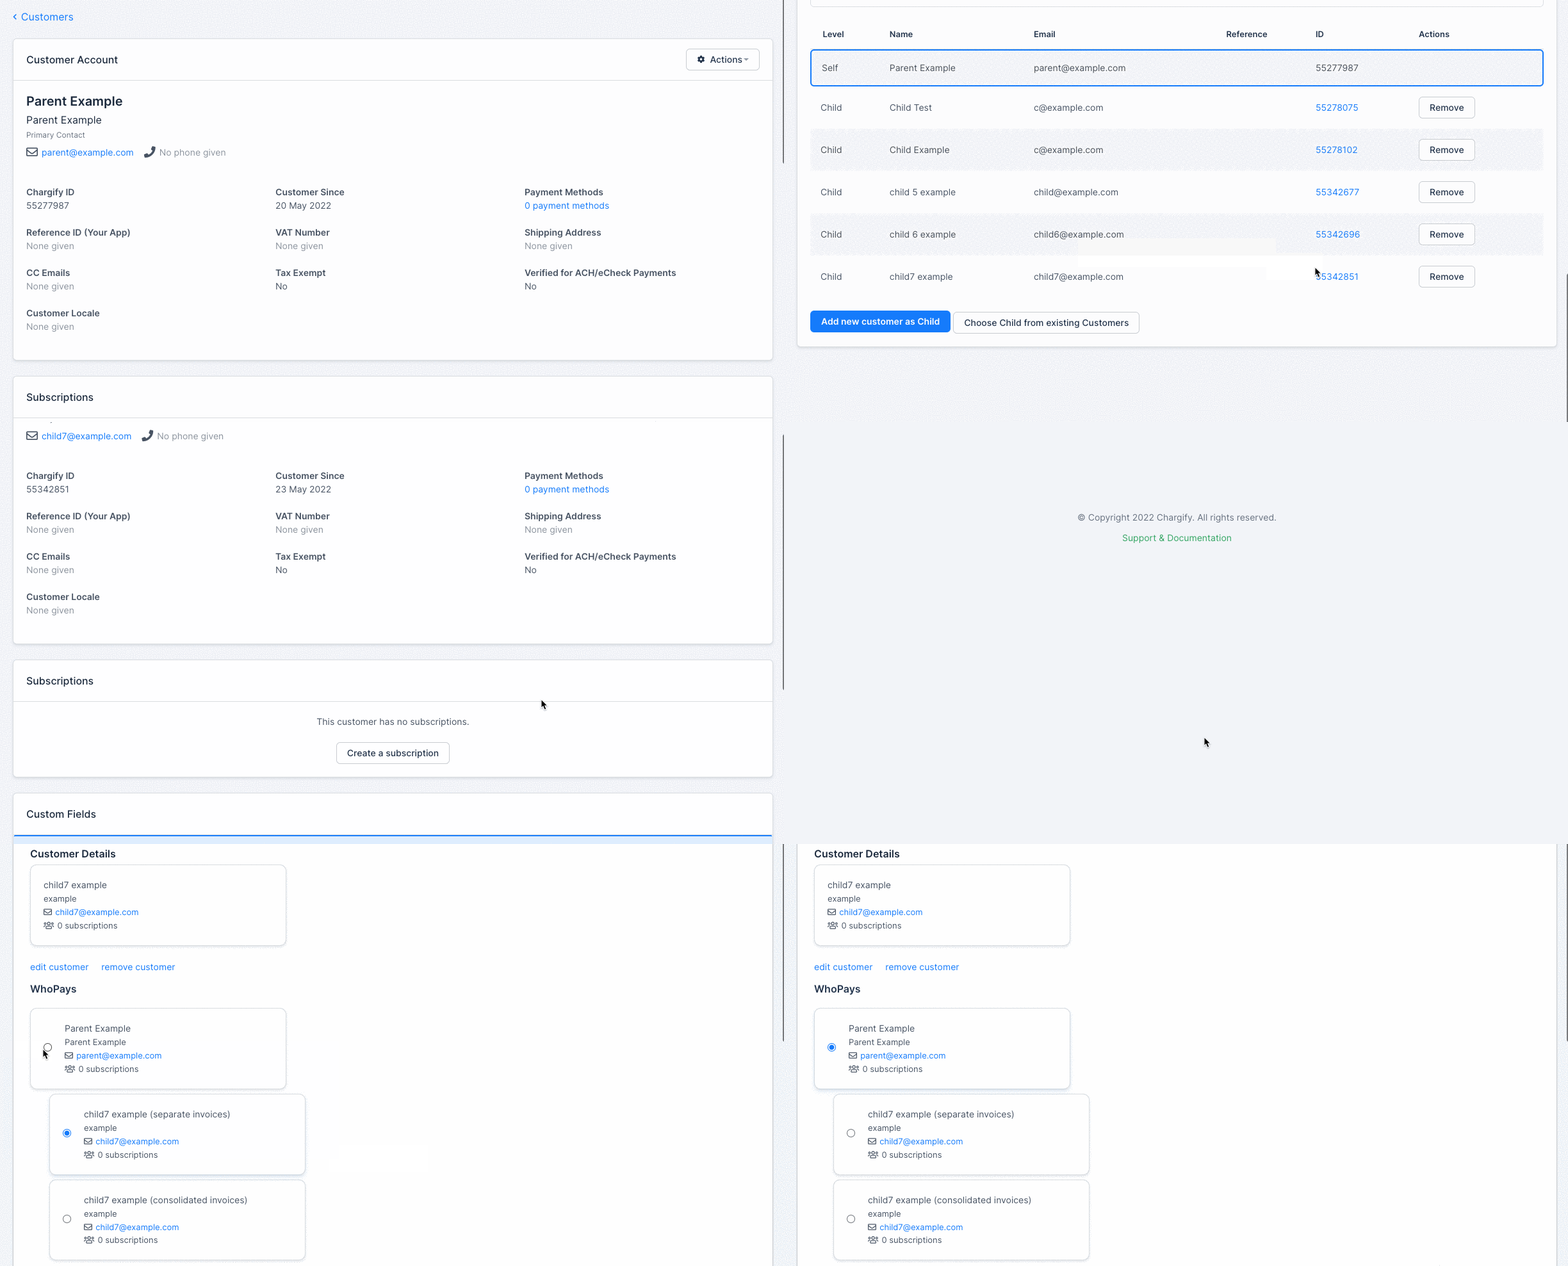
Optional - Create a second or later Child Subscription paid by the Parent
In the Parent Customer profile, scroll to the bottom and click the Child's Customer profile link, or search for the Child directly. On the Child's profile, click Create a Subscription, set WhoPays to the Parent, and set the three Invoice consolidation options. Once you know the combination that is right for you, repeat it each time. Then complete the Subscription creation process.
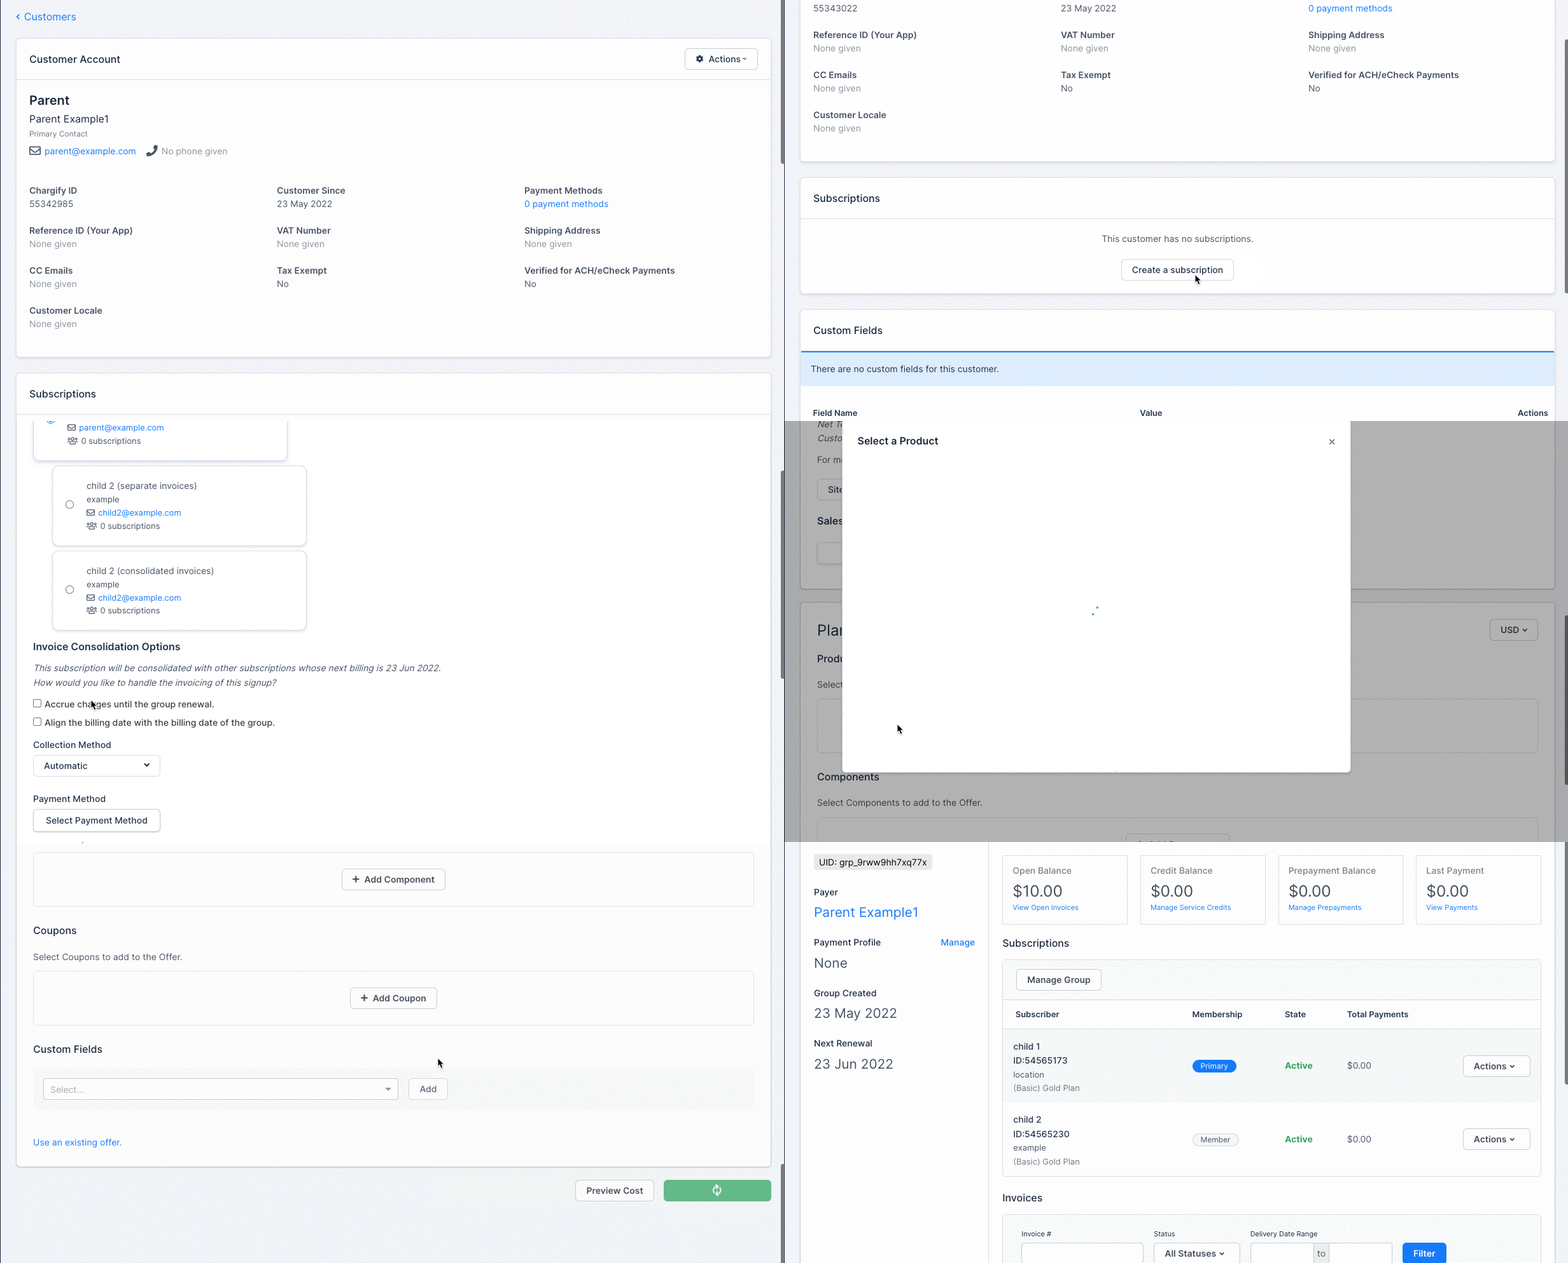
Optional - Create a standalone Parent Subscription
A standalone Parent Subscription is one where a Parent Customer, who is in a hierarchy, pays for their own Subscription.
Open the Parent Customer profile, scroll down, and click Create a Subscription. Set WhoPays to Separate Invoices, then complete the Subscription creation process.
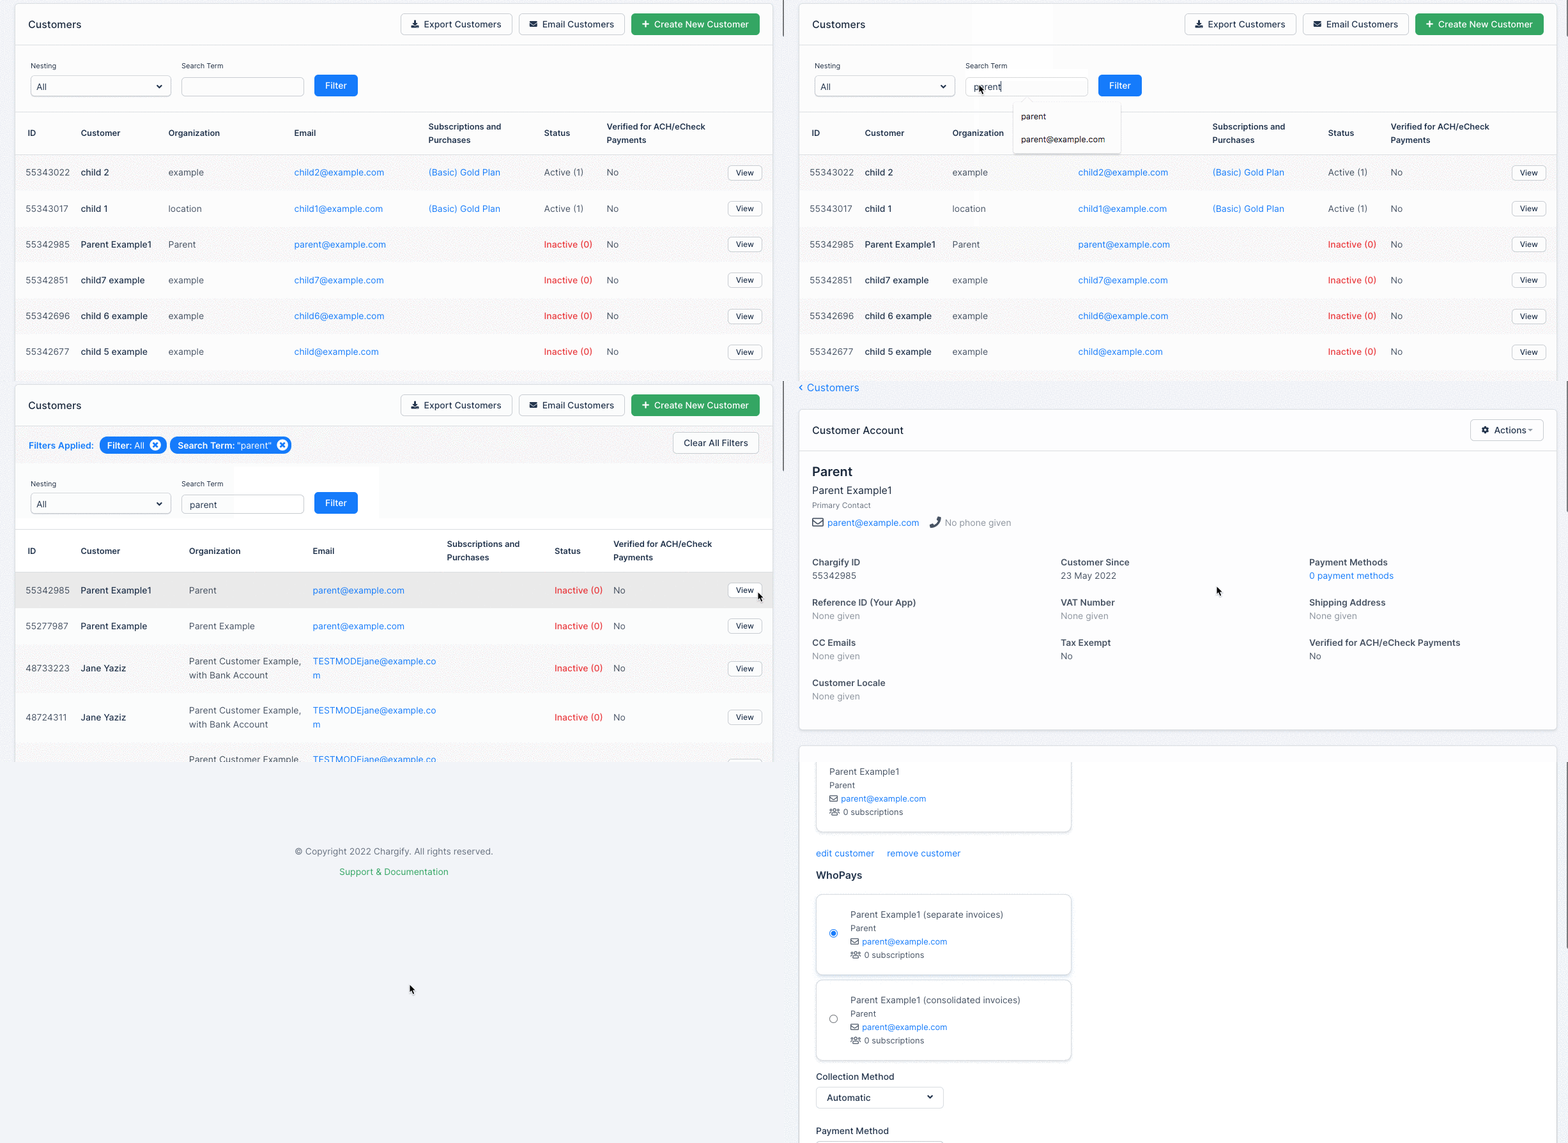
Optional - Create a standalone Child Subscription
A standalone Child Subscription is one where a Child Customer, who is in a hierarchy, pays for their own Subscription.
Open the Child Customer profile, scroll down, and click Create a Subscription. Set WhoPays to Separate Invoices, then complete the Subscription creation process.
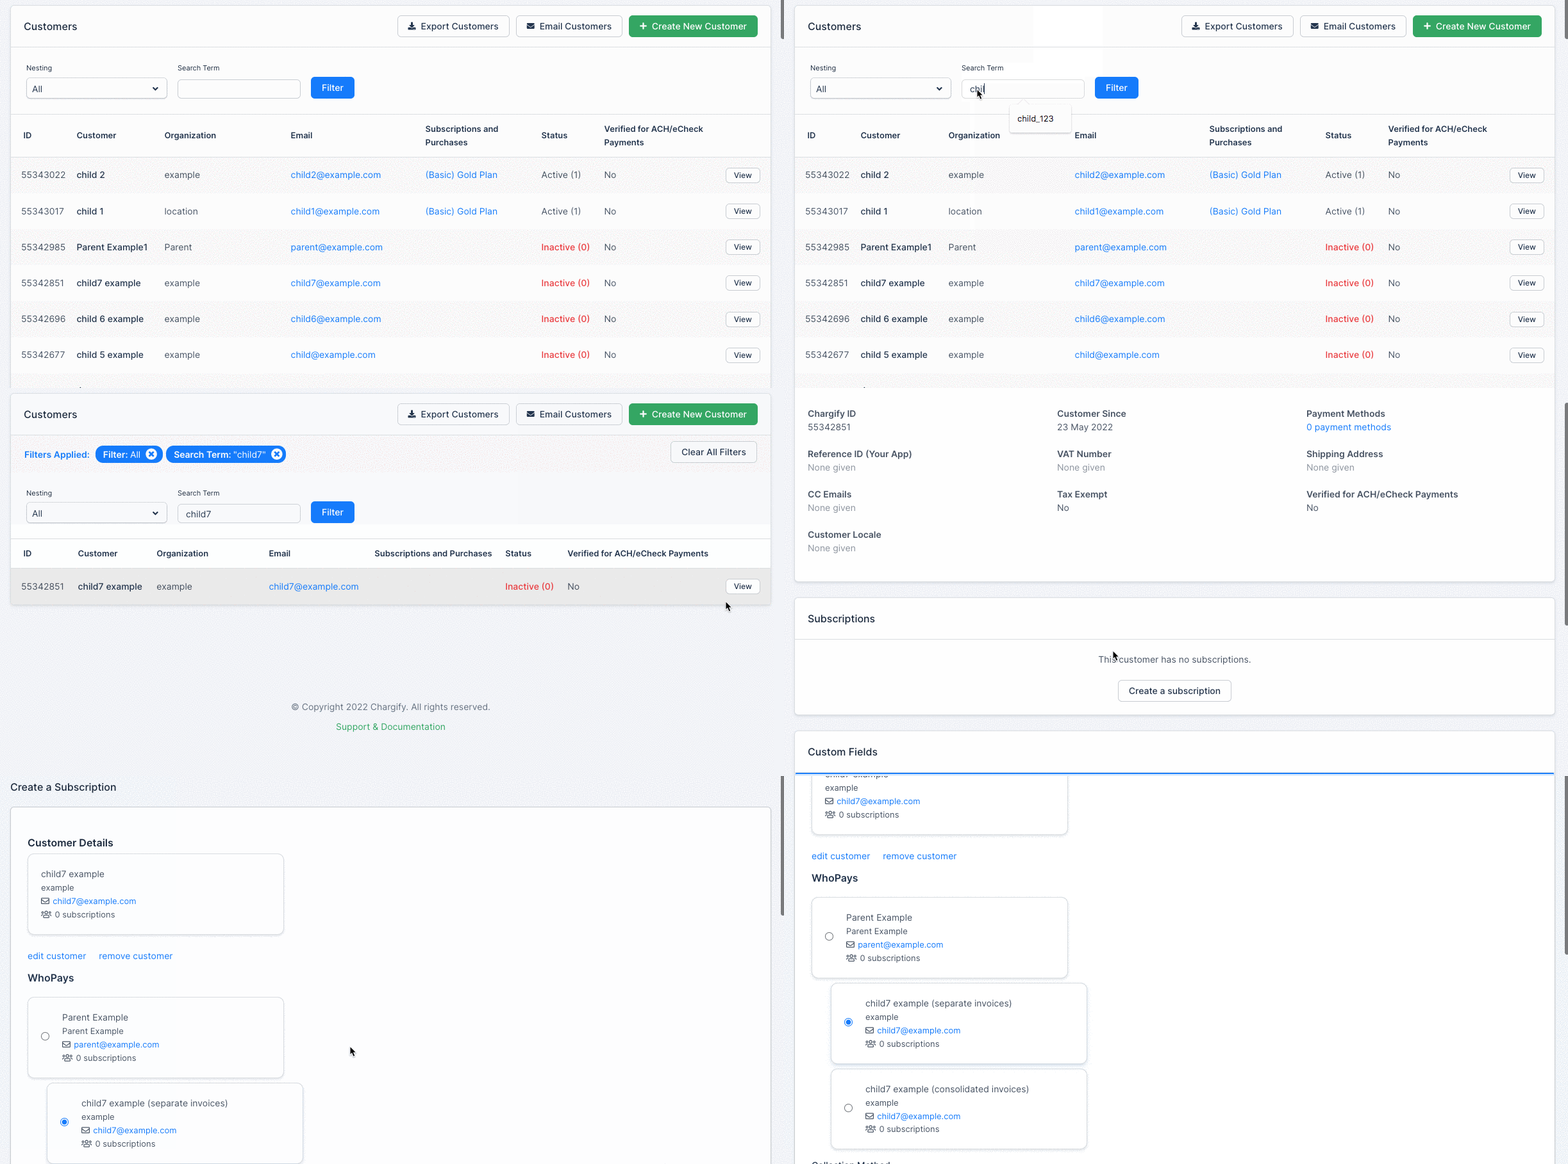
Related information
To compare creating Subscriptions in the Admin UI against the customer-facing signup methods, see the Compare New User Signup Methods help article.
Still need help?
Reach out and our support team will take it from here.