
Set Up Enterprise SSO
Last updated on Sep 19, 2026
Connecting Maxio to your identity provider takes two pieces of work in two places: an administrator creates the connection in Maxio, then someone with access to your identity provider adds the callback URL Maxio gives back. Sign-in keeps failing until both halves are done.
Before you begin
Confirm all of the following before you start:
- Enterprise SSO is enabled on your Maxio account. Maxio turns this on, not an administrator on your side, so contact Maxio if Enterprise SSO does not appear under Admin.
- You are working in the root entity. A multi-entity account cannot configure Enterprise SSO from a child entity.
- You have administrator access in Maxio.
- Your account does not already have a connection. An account holds one Enterprise SSO connection at a time, so Maxio rejects a second one until you delete the existing connection.
Gather your credentials
Which credentials you need depends on the connection type you plan to use. Collect them from your identity provider before you open the form, or have someone from your identity or security team on hand.
Credentials required by each connection type
| Type | Fields to complete |
|---|---|
| Okta or Google Workspace |
|
| SAML |
|
Create the connection
The form starts with a single field, Type. The credential fields appear once you choose a type, and which ones appear depends on the type you pick, so choose the type first.
To create an Enterprise SSO connection
-
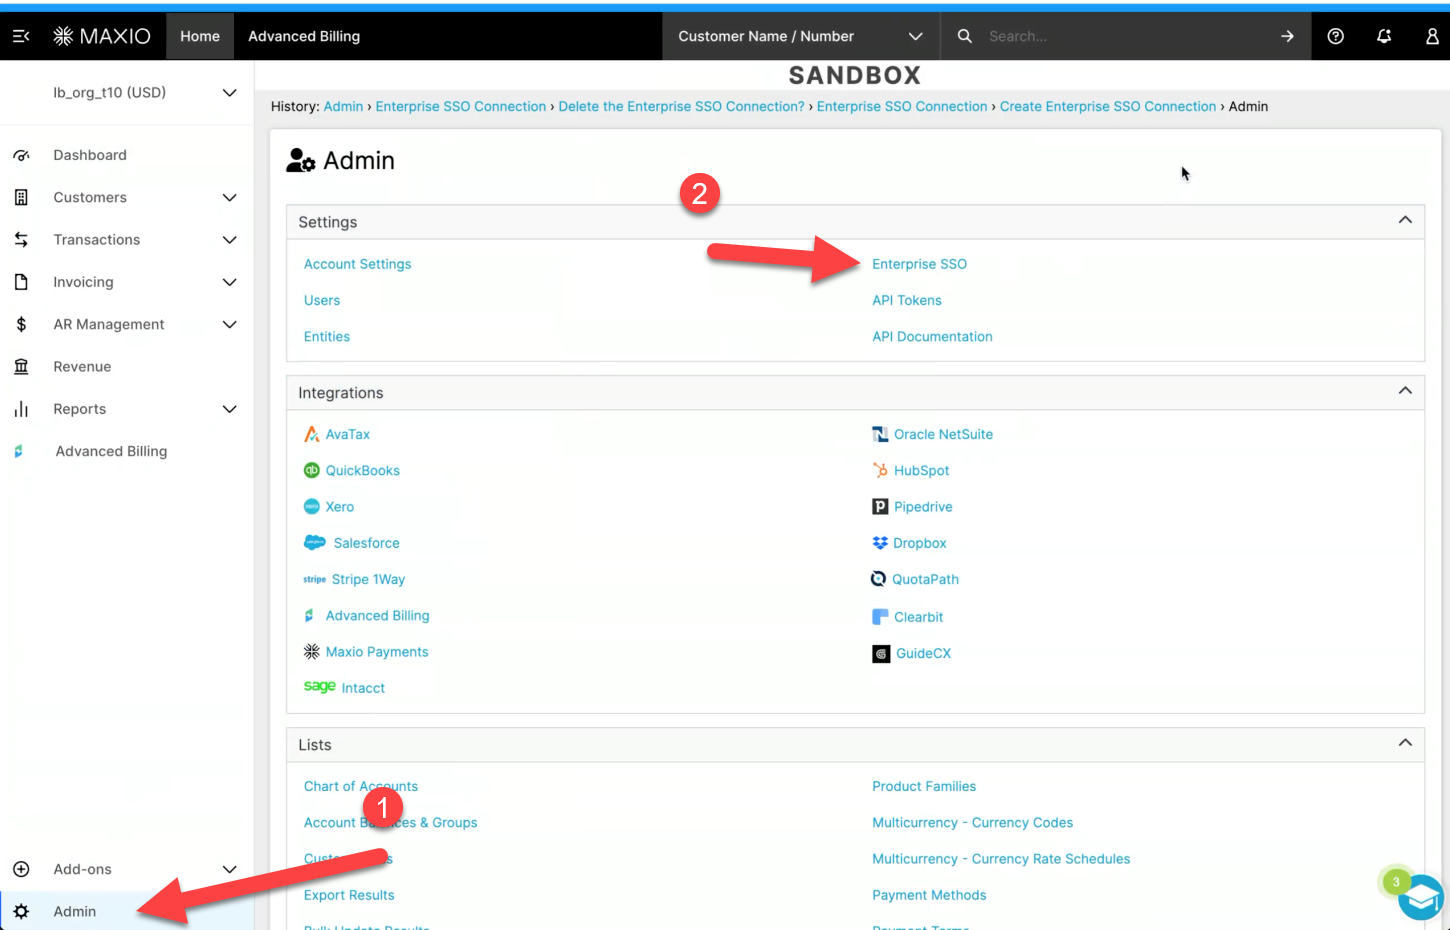
Go to Admin > Settings > Enterprise SSO.
-
Select Click here to create an Enterprise SSO Connection.

-
Choose a Type.
-
Complete the credential fields that appear, using the values you gathered above.
-
Select Save.
Set the callback URL in your identity provider
Creating the connection is only half of setup. Maxio displays the values your identity provider needs, and nobody can sign in through SSO until you add them there.
To finish setup in your identity provider
- On the Enterprise SSO Connection page, copy the callback URL Maxio displays.
- In your identity provider, set that address as the callback URL for the application you configured.
- For a SAML connection, also copy the Entity ID from the same page and set it in your identity provider. Maxio generates this value, so it appears only after you save the connection.
After setup
Maxio routes users to your identity provider by the email address they enter at sign-in, so nobody has to choose a different sign-in option. Your identity provider's own policies then govern them, including whether a second factor is required.
Set up SAML with Okta
Okta supplies the sign-in URL and certificate that the Maxio connection needs.
To connect Okta using SAML
- In Okta, create a new SAML 2.0 application.
- Set Single sign-on URL to
https://login.maxio.com/login/callback. - Set Audience URI (SP Entity ID) to a placeholder value for now. You replace it in a later step.
- Set the attribute statements to map
emailtouser.emailandemail_verifiedtotrue.
- Set Single sign-on URL to
- In Okta, open the application's sign-on details and copy the Sign on URL (this is your ACS URL), then download the certificate.
- In Maxio, follow Create the connection above using the ACS URL as your Sign In URL and the downloaded certificate as your Signing Certificate.
- Copy the Entity ID Maxio displays after you save the connection.
- In Okta, set Audience URI (SP Entity ID) on your SAML application to that Entity ID.
- Sign in through Okta to confirm the connection works.
Set up SAML with Google Workspace
Google Workspace supplies the same two values under different names.
To connect Google Workspace using SAML
- In Google Workspace, create a new SAML 2.0 application and copy the SSO URL it provides, then download the certificate.
- In Maxio, follow Create the connection above using the SSO URL as your Sign In URL and the downloaded certificate as your Signing Certificate.
- Copy the Entity ID Maxio displays after you save the connection.
- In Google Workspace, on your SAML application:
- Set ACS URL to
https://login.maxio.com/login/callback. - Set Entity ID to the value from Maxio.
- Set Name ID Format to
EMAIL. - Map your primary email attribute to both
emailandemail_verified. - Turn on user access for the application.
- Set ACS URL to
- Sign in through Google Workspace to confirm the connection works.
Set up SAML with another identity provider
Okta and Google Workspace aren't the only SAML identity providers Maxio supports. Any SAML 2.0 provider works the same way:
- In your identity provider, create a new SAML 2.0 application, using
https://login.maxio.com/login/callbackas the callback or ACS URL. - Map an
emailattribute to the user's email address, and anemail_verifiedattribute set totrue. - Copy the sign-in URL and certificate your provider generates, then follow Create the connection above using those values.
- Copy the Entity ID Maxio displays after you save the connection, and set it as the Audience URI or Entity ID on your identity provider's application.
- Sign in through your identity provider to confirm the connection works.
Related information
To learn what Enterprise SSO changes for your users and what your team stays responsible for, see the Understand Enterprise Single Sign-On (SSO) help article.
To learn how Enterprise SSO fits into Maxio's wider sign-in experience, see the Understand Universal Login help article.
Still need help?
Reach out and our support team will take it from here.