
Set Up and Collect ACH Payments with Stripe
Last updated on Sep 19, 2026
Accept ACH bank transfers from your customers through the Stripe gateway. Every Stripe ACH customer is pre-approved to use ACH, though a bank account you collect from them must still be verified through Stripe's microdeposit process before it can be used to pay for a subscription. A bank account imported from an existing gateway vault token is handled differently — see Importing an already-vaulted bank account.
Allowing customer ACH payments
Once you have your Advanced Billing site set up for ACH payments, your customers can enter ACH information as their primary payment method for a subscription.
Enable ACH settings
Your Stripe account must be ready for ACH processing before you continue. If you're using the Stripe (Legacy) gateway, update your account to the newer integration before ACH works. You may have seen ACH/eCheck in previous ACH documentation; eCheck refers to Authorize.Net usage, not Stripe ACH.
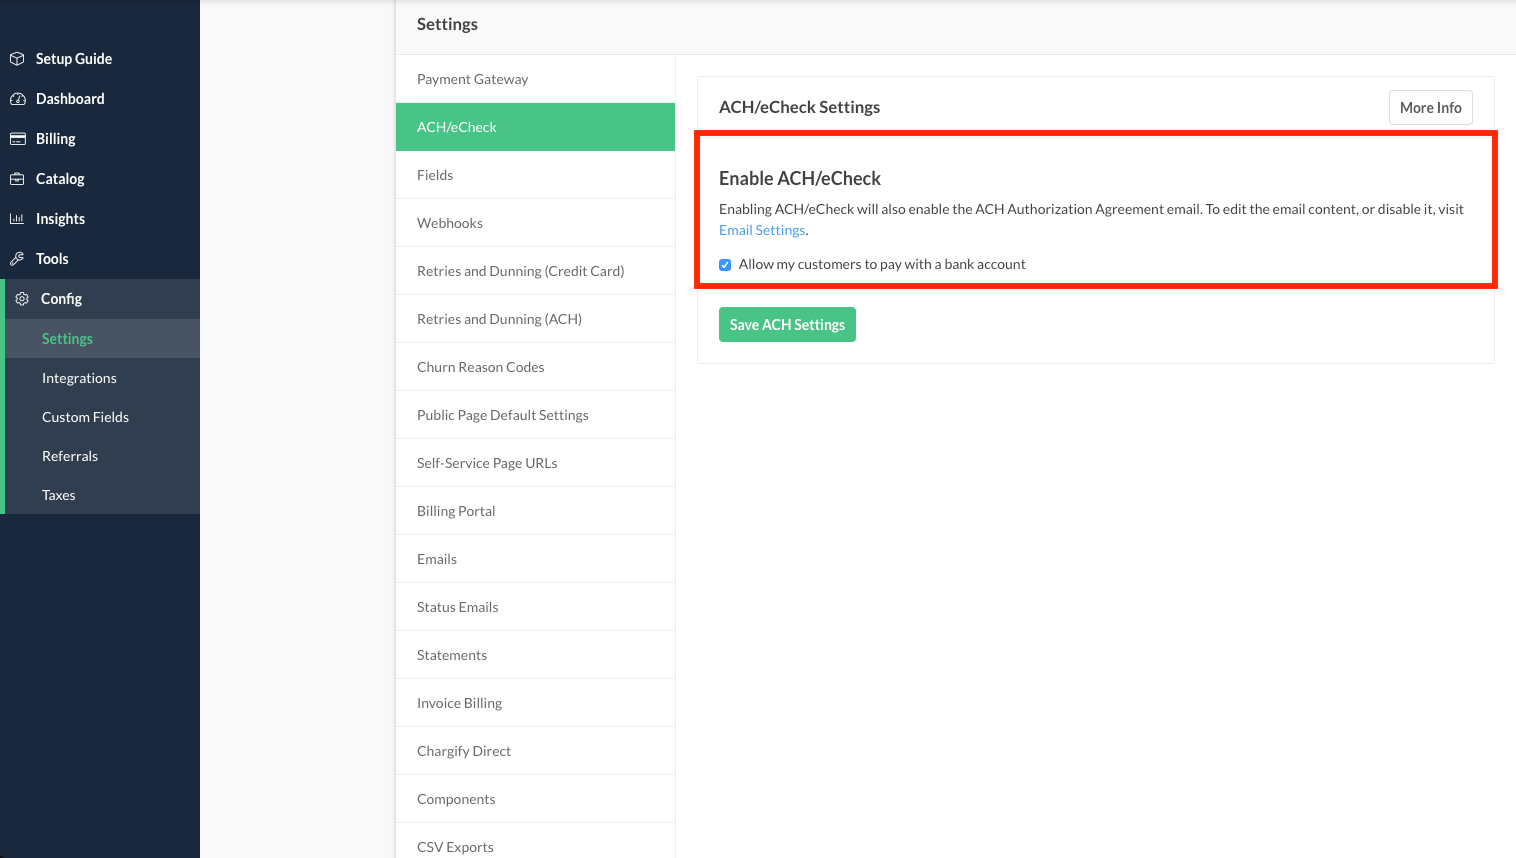
Enable ACH in your settings for your site
Enabling ACH also enables two emails in your Advanced Billing site:
- ACH Authorization Agreement email
- Bank Account Verification email
Both emails are triggered when bank account information is entered via a Self-Service Page.
Enter ACH information
You can't add ACH information via a Public Signup Page. This lack of functionality is on purpose to protect you as the merchant. Each subscriber must be verified, using Stripe's microdeposit system, before they can begin using their bank account to pay for subscriptions.
So how do you get ACH information into your Advanced Billing account? After a subscriber signs up, they can enter their ACH information into Advanced Billing. This begins the process to verify their bank account before it can be used to draft funds for subscription costs. Merchants use one of the paths below.
Public Signup Pages
This is the most common path for getting bank account information into a subscription:
- A subscriber signs up via a Public Signup Page using a credit card to cover any costs if needed.
- They update their payment method to ACH via a Self-Service Page.
- They receive two microdeposits that must be verified.
- Once the verification step is complete, the ACH method becomes active in Advanced Billing.
Advanced Billing API / Maxio.js (formerly Chargify.js)
This path collects bank account information directly through your own signup form or the API:
Method 1
Use a credit card at signup, then switch the customer to ACH:
- A subscriber signs up via API, using a credit card if needed (Maxio.js).
- They update their payment method via a card update action (API) or Self-Service Page.
- They receive two microdeposits that must be verified.
- Once the verification step is complete, the ACH method becomes active in Advanced Billing.
Method 2
Collect ACH information directly during signup:
- A subscriber signs up via API, using ACH information in the request (Maxio.js).
- A billing date in the future must be provided via
next_billing_at. - They receive two microdeposits that must be verified.
- Once the verification step is complete, the ACH method becomes active in Advanced Billing.
The following JSON represents a valid ACH-based signup set to start in the future.
{
    "subscription": {
        "product_handle": "bronze-product",
        "next_billing_at": "2019-02-02",
        "customer_attributes": {
            "first_name": "John",
            "last_name": "Doe",
            "email": "john.doe@example.com",
            "reference": "123",
            "organization": "Acme Widgets"
        },
        "bank_account_attributes": {
           "chargify_token": "tok12345"
        }
    }
}
bank_account_attributes may be passed directly through the API if your business is PCI compliant. If not, we strongly recommend using Maxio.js to first securely tokenize the bank account information, as demonstrated in the example above.
If ACH information is sent via API for a signup without a future billing date, the following error is received:
{
  "errors": [
    "Bank Account must be verified before a Subscription with an initial charge can be created."
  ]
}
Importing an already-vaulted bank account
If a bank account is already tokenized with the gateway — for example, when migrating customers from another billing system — pass the existing vault_token in bank_account_attributes (or in a standalone request to create a payment profile) instead of a Maxio.js chargify_token. Advanced Billing treats this as an import: because the account already exists on the gateway, Advanced Billing doesn't send the Bank Account Verification email for it and doesn't start the microdeposit flow described above. Whether the account is usable for payment depends on the verification state it already carries at the gateway, which Advanced Billing doesn't change.
This applies only to a bank account created from an existing vault_token. A bank account created from raw routing and account numbers, or tokenized through Maxio.js, still goes through microdeposit verification and still receives the Bank Account Verification email.
Manually in the admin UI
If you have your subscriber’s bank information, you may add it manually by selecting Add New Bank Account.
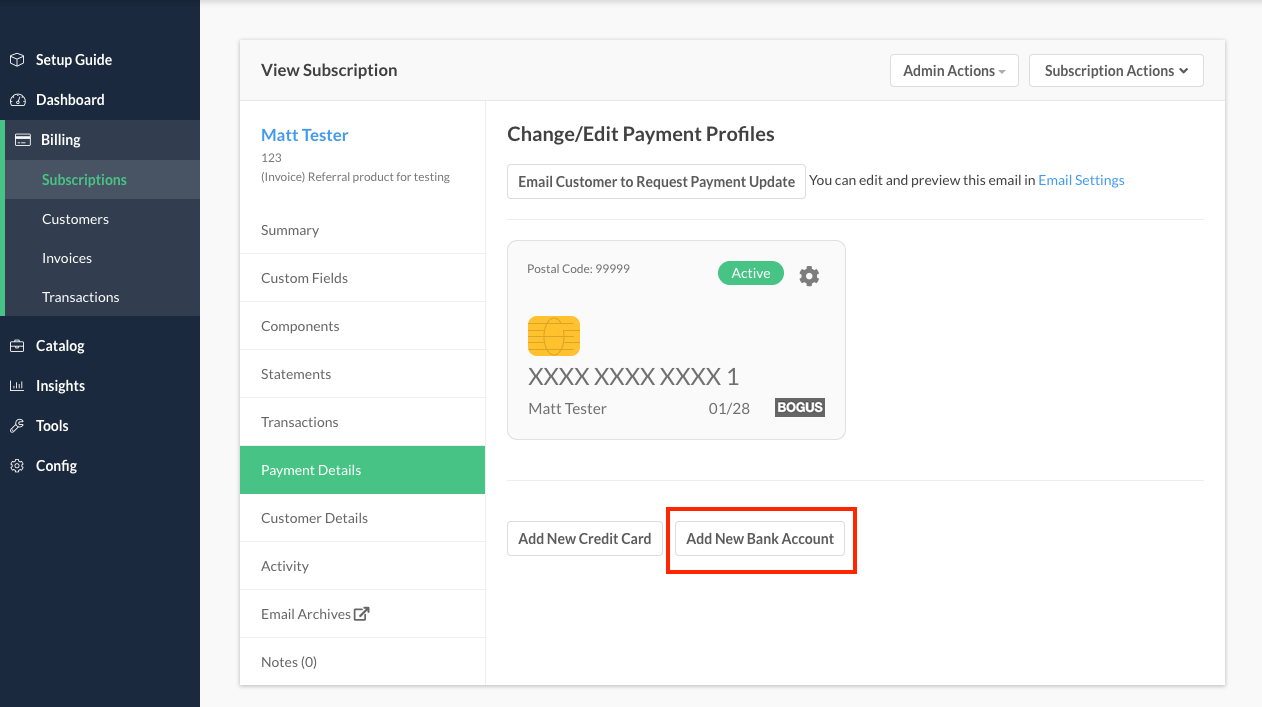
Add a new bank account to a customer entry
You then enter all of the data required for the customer’s future ACH payments. The following fields are required:
- First Name
- Last Name
- Bank Name
- Bank Account Holder Type
- Routing Number
- Account Number
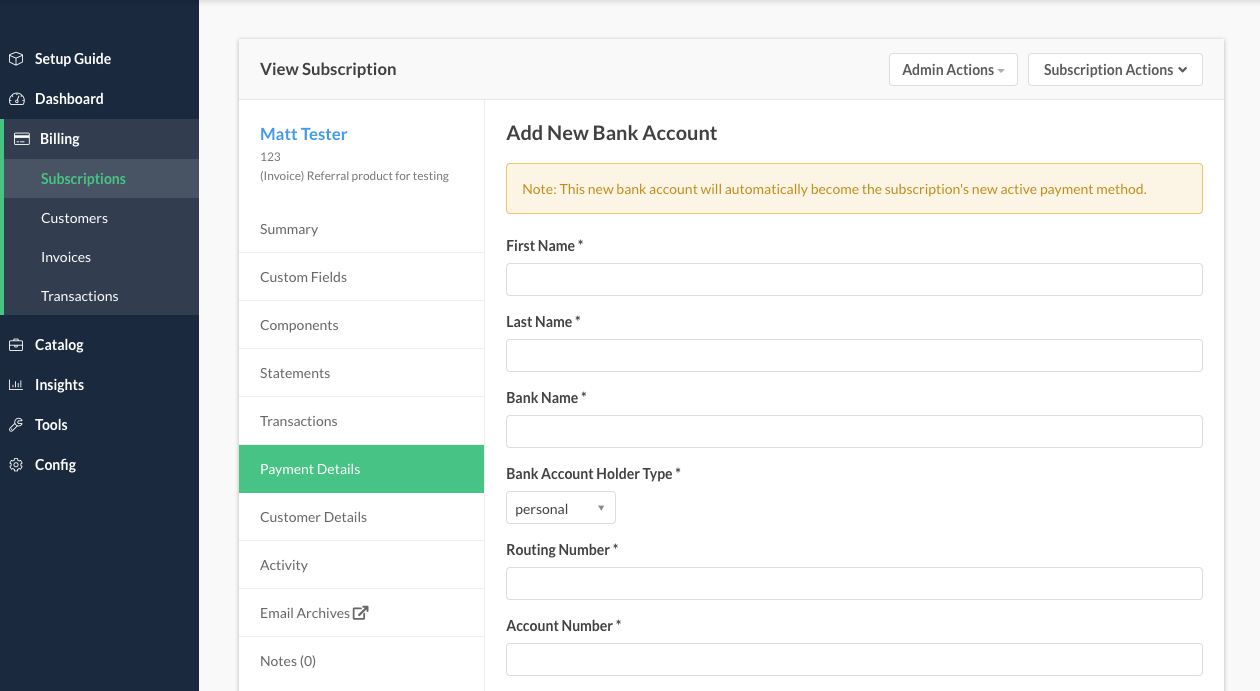
Enter complete bank account information for payment
Collecting ACH information via Self-Service Page
Select Email Customer to Request Payment Update to send your customer a link to update their payment information:
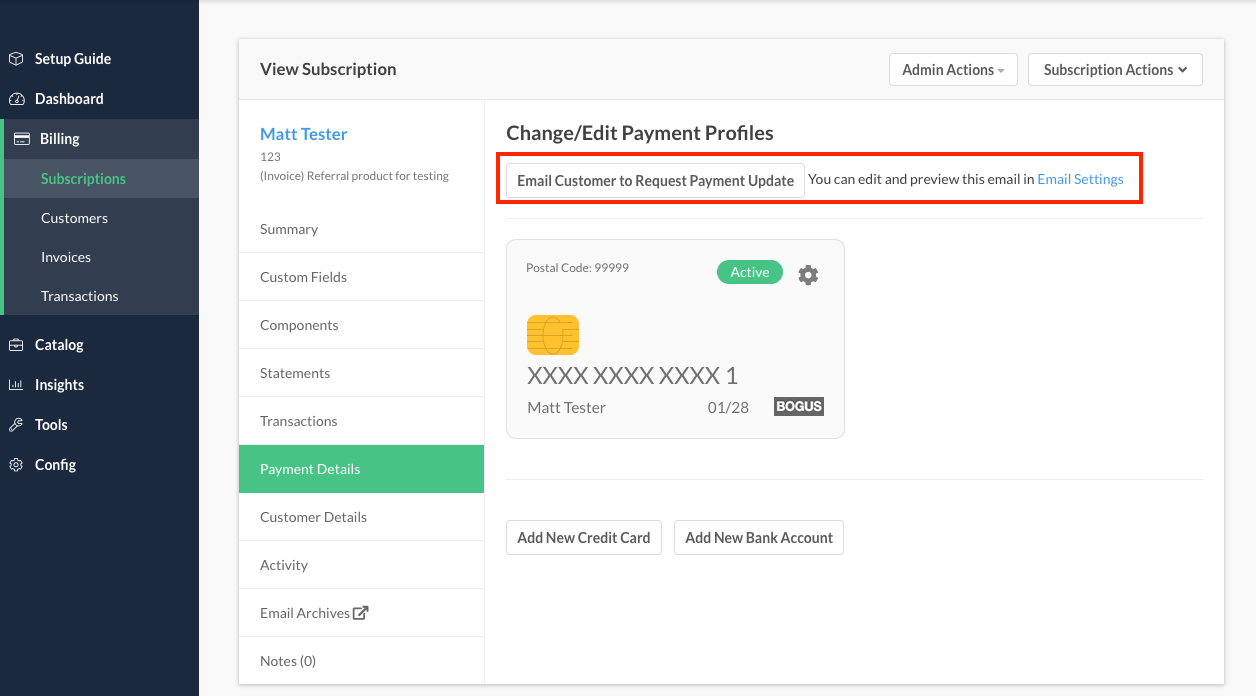
Email your customer directly with a link to a self-service page to update the payment method
Your customer receives the email/form, clicks “Change Payment Method” to switch the form to a bank account, and enters their bank account info here:
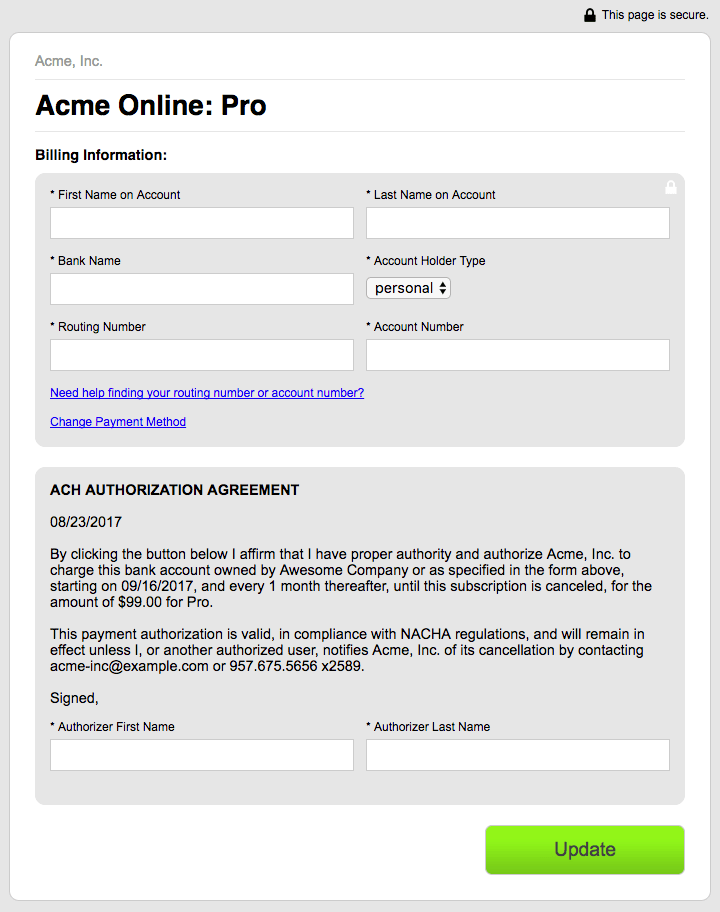
Self-service page: customers may enter bank account information
This bank account information still must be verified before it can be used to collect payments.
Verify bank accounts with Stripe
Since bank accounts in Stripe must be verified, bank accounts stored with Stripe cannot be edited. Create a new bank account for the customer to change any of the details.
Stripe has many rules surrounding ACH deposits and timing. We encourage you to familiarize yourself with Stripe’s current ACH documentation, which covers the timing of microdeposits and other limitations in detail.
When you enable ACH in a site that is using Stripe, the bank account verification email is automatically enabled. Visit Configure Email Settings to modify the email content or turn it off. The email provides a link to an Advanced Billing-hosted public page where the customer can enter the amounts of the two small deposits that appear in their checking account.
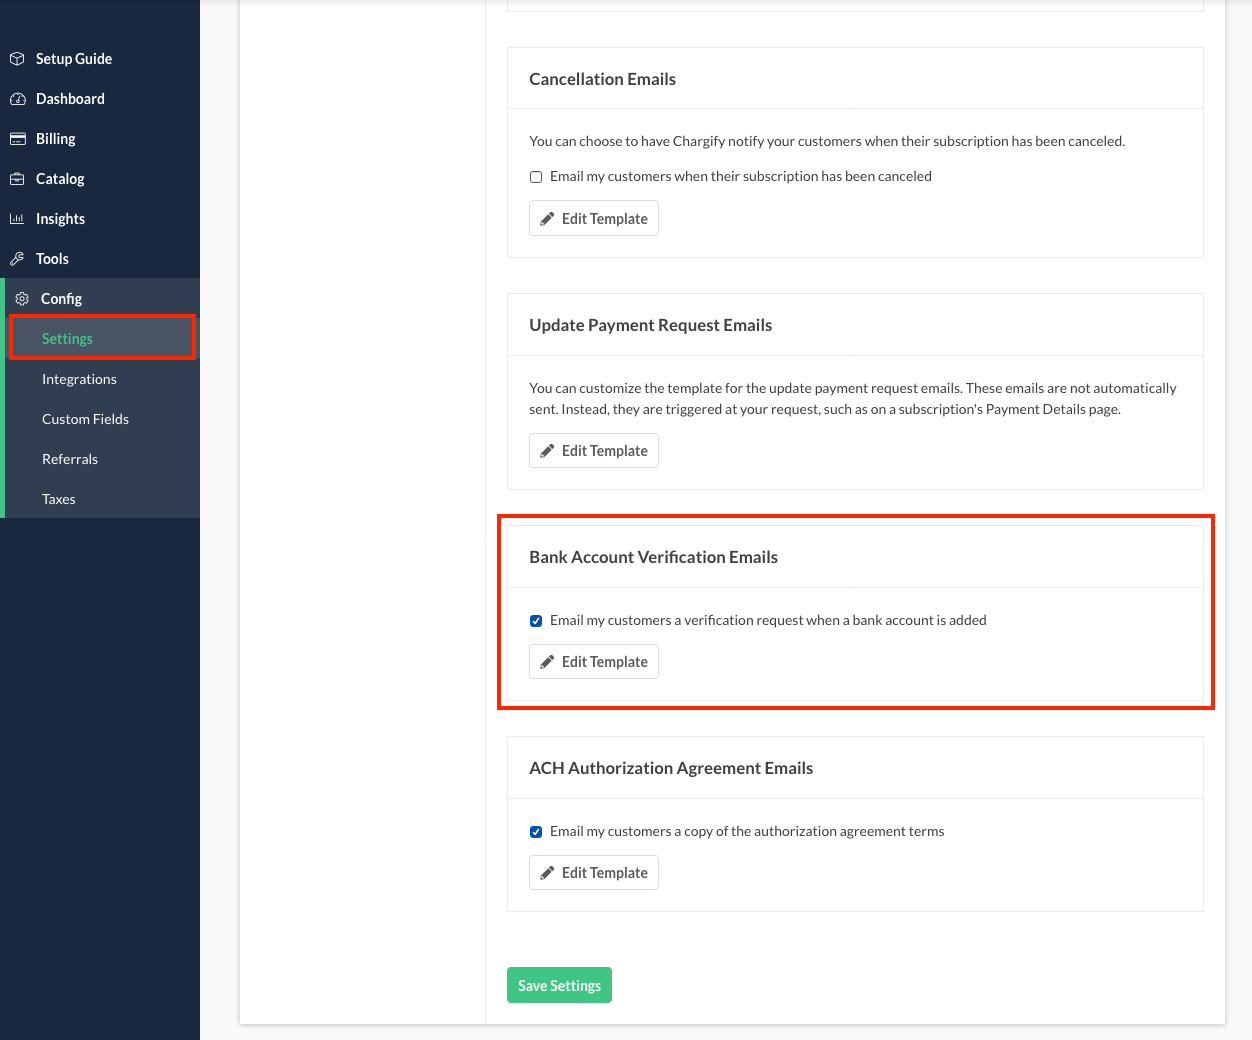
Modify the bank account verification email in Advanced Billing
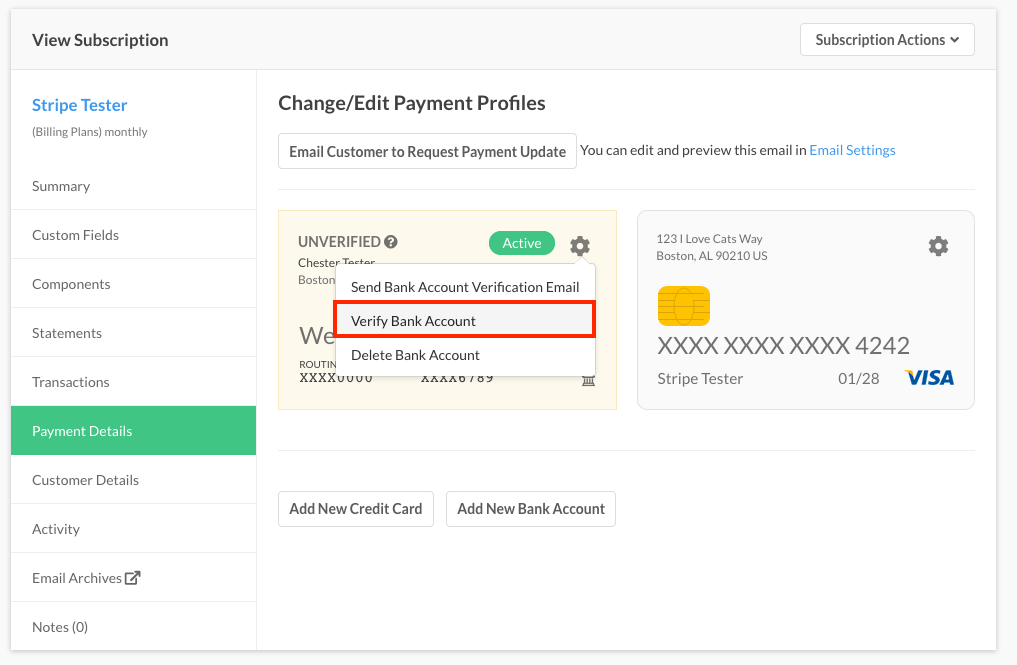
To re-send the bank account verification email, view the payment profile, click the gear icon, and choose Send Bank Account Verification Email.
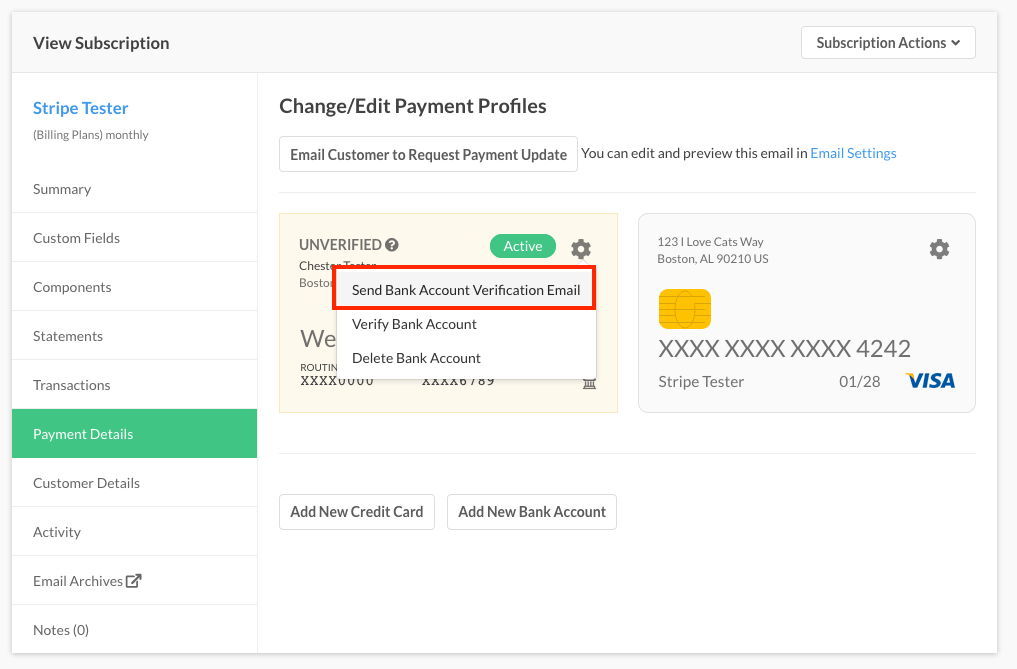
Send bank account verification email from the payment profile for a subscriber
Once a bank account is created in Advanced Billing and stored in Stripe’s vault, Stripe initiates two small (less than $1.00) deposits into the account. Before the bank account can be charged, the customer needs to enter the amounts to confirm that they own the bank account. This can be done on the public bank account verification page, or within the application by clicking the gear icon and choosing Verify Bank Account.
After the test amounts are verified, the payment profile automatically updates from Unverified to Verified, and no further action is needed. You only need to complete verification in the portal or the admin menu, not both.
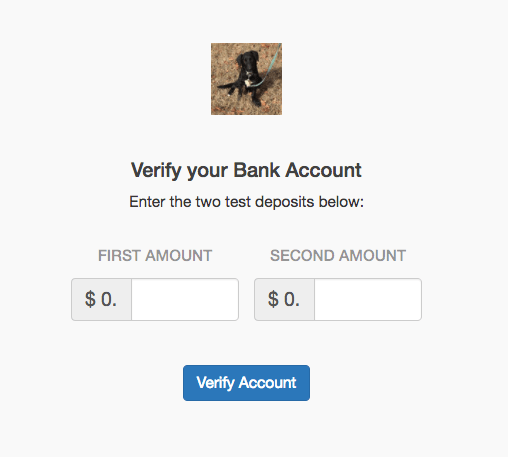
Enter the two test amounts from your bank
Or, verify test amounts within Advanced Billing
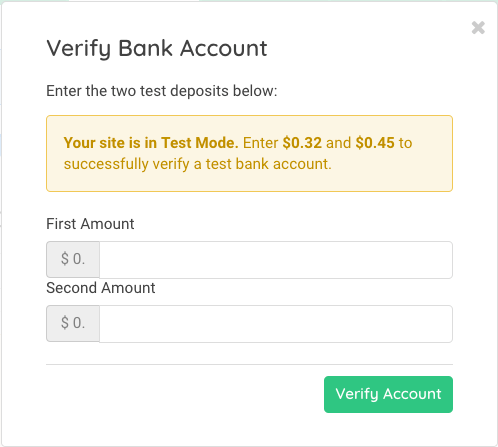
Enter test deposit amounts in Advanced Billing
Until the bank account is verified, any charges that are attempted fail. For this reason, you may want to add a new bank account for the customer ahead of time, then later make it the active payment profile for a subscription.
Past due subscriptions
If an existing subscription has gone into the past due status, updating the payment profile information immediately attempts a payment. With this in mind, the Self-Service Page should not be used to add or update a bank account for a subscription in dunning, because the bank account must first be verified before a payment can be collected.
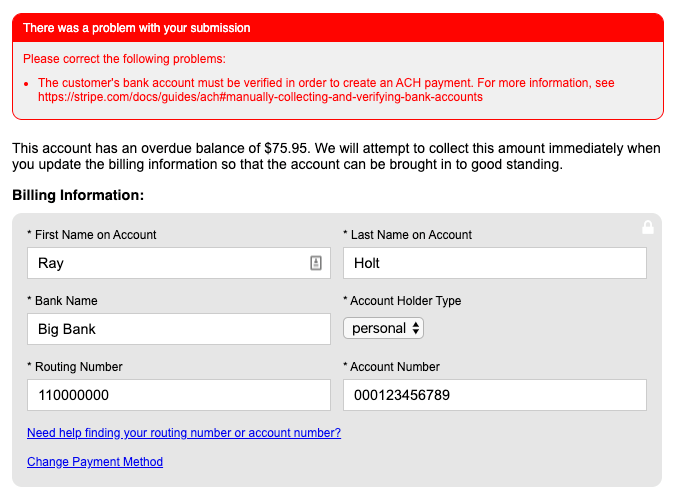
Bank account updates can't be completed on past due subscriptions.
In this situation, the customer needs to pay with the existing profile on file, or alternatively pay with a credit card if a new bank account must be added.
Failed payments
In the event of a payment failure during a subscription billing attempt, the subscription status promptly transitions to past_due, initiating the dunning process to collect the overdue payment.
It is important to note that a notification of the failed ACH payment is sent to your Stripe account, several days after the initial payment was successfully submitted to the gateway by Advanced Billing. Advanced Billing’s sync with Stripe is one way and does not receive a notification from Stripe regarding ACH payment failures.
To rectify a failed ACH payment, see Configure ACH Dunning.
Testing ACH payments
Advanced Billing recommends during the testing phase to use Stripe’s suggested ACH routing numbers, accounts & verification process. Stripe’s ACH documentation contains accurate information on test data for Advanced Billing merchants to use.
ACH validation failures in Stripe
We’ve chosen to outline a particular situation regarding a failed verification of an ACH account, and how to resolve it.
If microdeposits are entered incorrectly more than 10 times, the bank account can no longer be verified. The ACH payment profile must be deleted. If you’ve reached this limit, the following error is received:
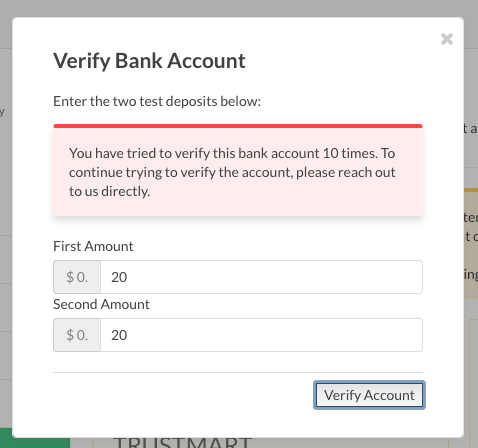
Failed ACH verification for Stripe
If you encounter this error, delete the payment profile from the subscription, then add a new bank account and begin verification again.
Related information
For general eCheck (ACH/EFT) concepts, gateway eligibility, and other supported gateways, see Understand eCheck (ACH/EFT) Payments.
Still need help?
Reach out and our support team will take it from here.