
Configure Salesforce Layouts for Advanced Billing
Last updated on Aug 24, 2026
Add Advanced Billing action buttons and fields to your Salesforce page layouts so your users can see and manage Subscriptions without leaving the record they're on. These layout changes are recommended, but you can decide which fields and buttons to add based on your own workflow.
Set up the Account layout
Add an Advanced Billing section and action buttons to the Account layout so users can see and manage Subscriptions from an Account record.
To configure the Account layout
-
From the Setup screen, navigate to Object Manager > Account.
-
Select Page Layouts, then select the Advanced Billing Accounts Layout.
-
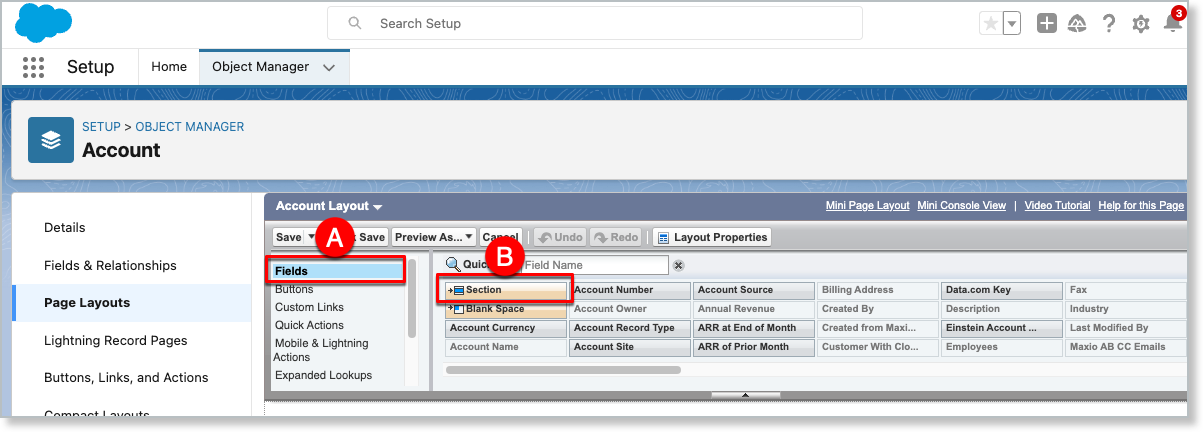
Create an Advanced Billing section: open the palette list, select the Fields view (A in the image below).
-
Drag the Section field (B) into the page layout and name the section Advanced Billing.
-
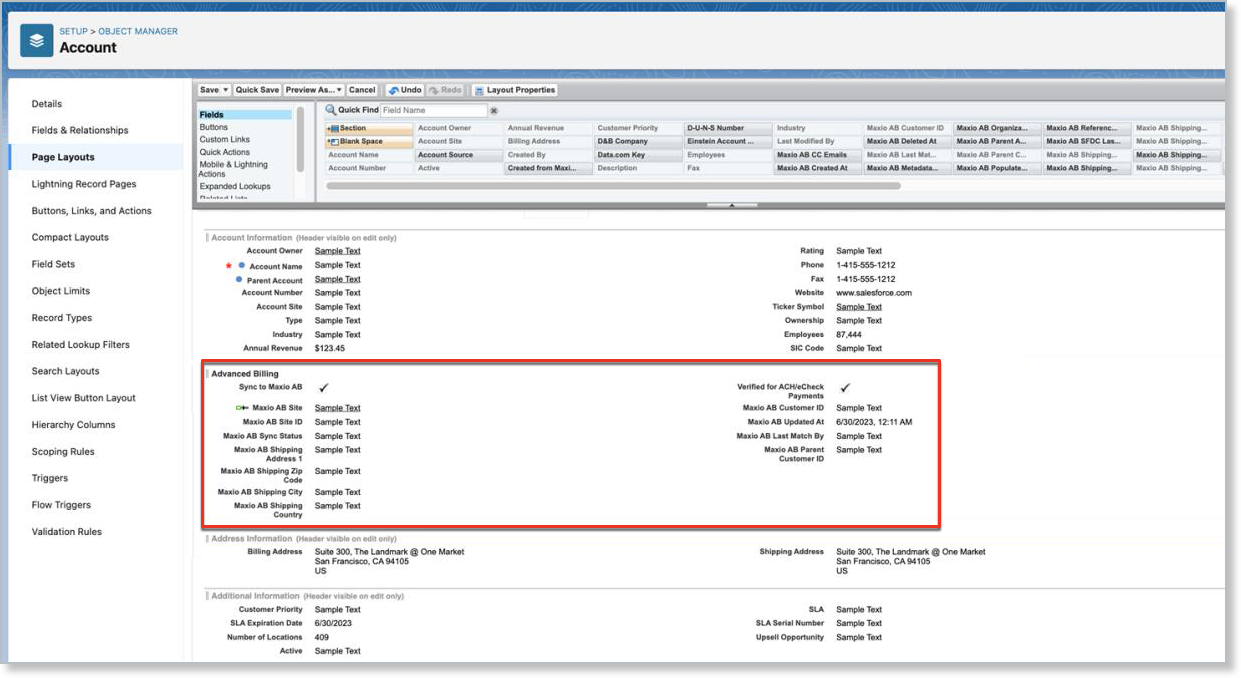
Select and place the fields you want into the Advanced Billing section.
-
From the palette list, switch from Fields to the Buttons view.
-
Drag the Create Subscription button to Custom Buttons in the Contact Details section of the layout.
-
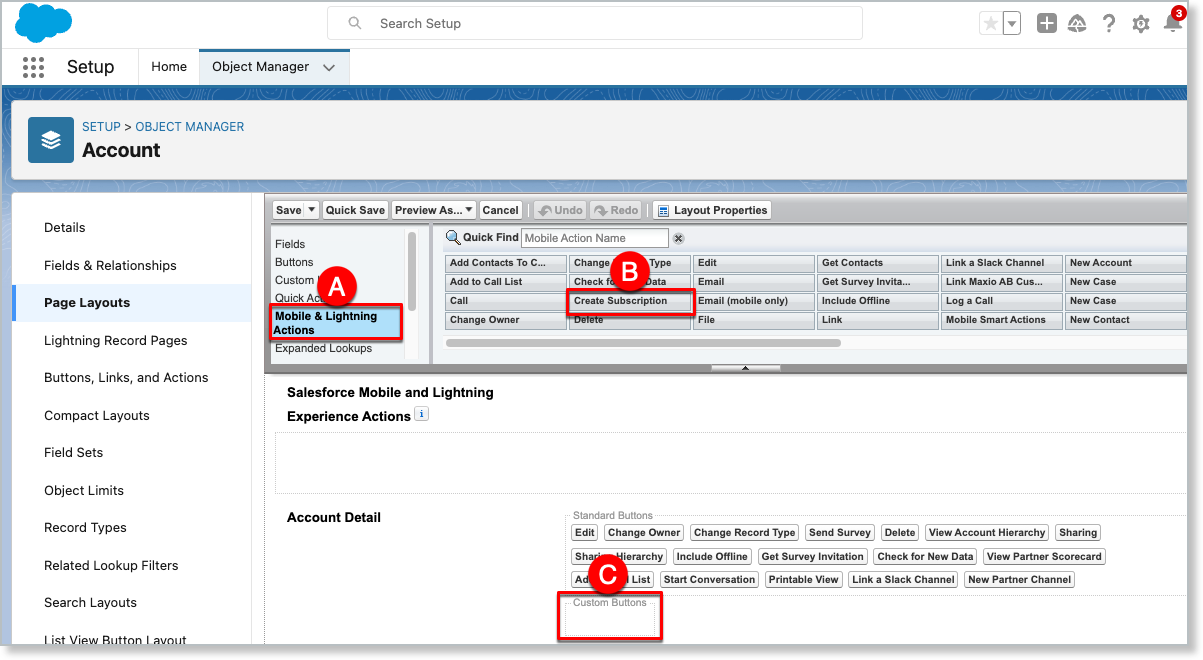
From the palette list, select the Mobile & Lightning Actions view (A in the image below).
-
Drag the Create Subscription action (B) to the Account Details > Custom Buttons area (C) of the layout.
-
From the palette list, switch to the Related Lists view.
-
Drag Maxio AB Subscriptions to the lists section of the layout.
-
Repeat for the other Advanced Billing related lists: Advanced Billing Invoices, Advanced Billing Transaction, and Advanced Billing Events.
-
Click Save.
Set up the Contact layout
Add the same kind of Advanced Billing section and action buttons to the Contact layout.
To configure the Contact layout
-
From the Setup screen, navigate to Object Manager > Contact.
-
Select Page Layouts, then select Contact Layout.
-
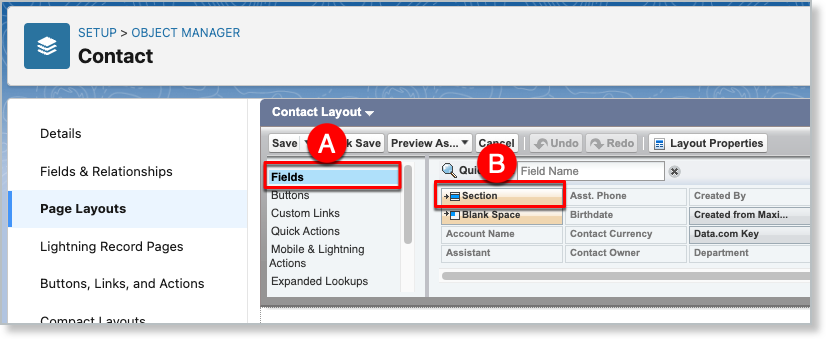
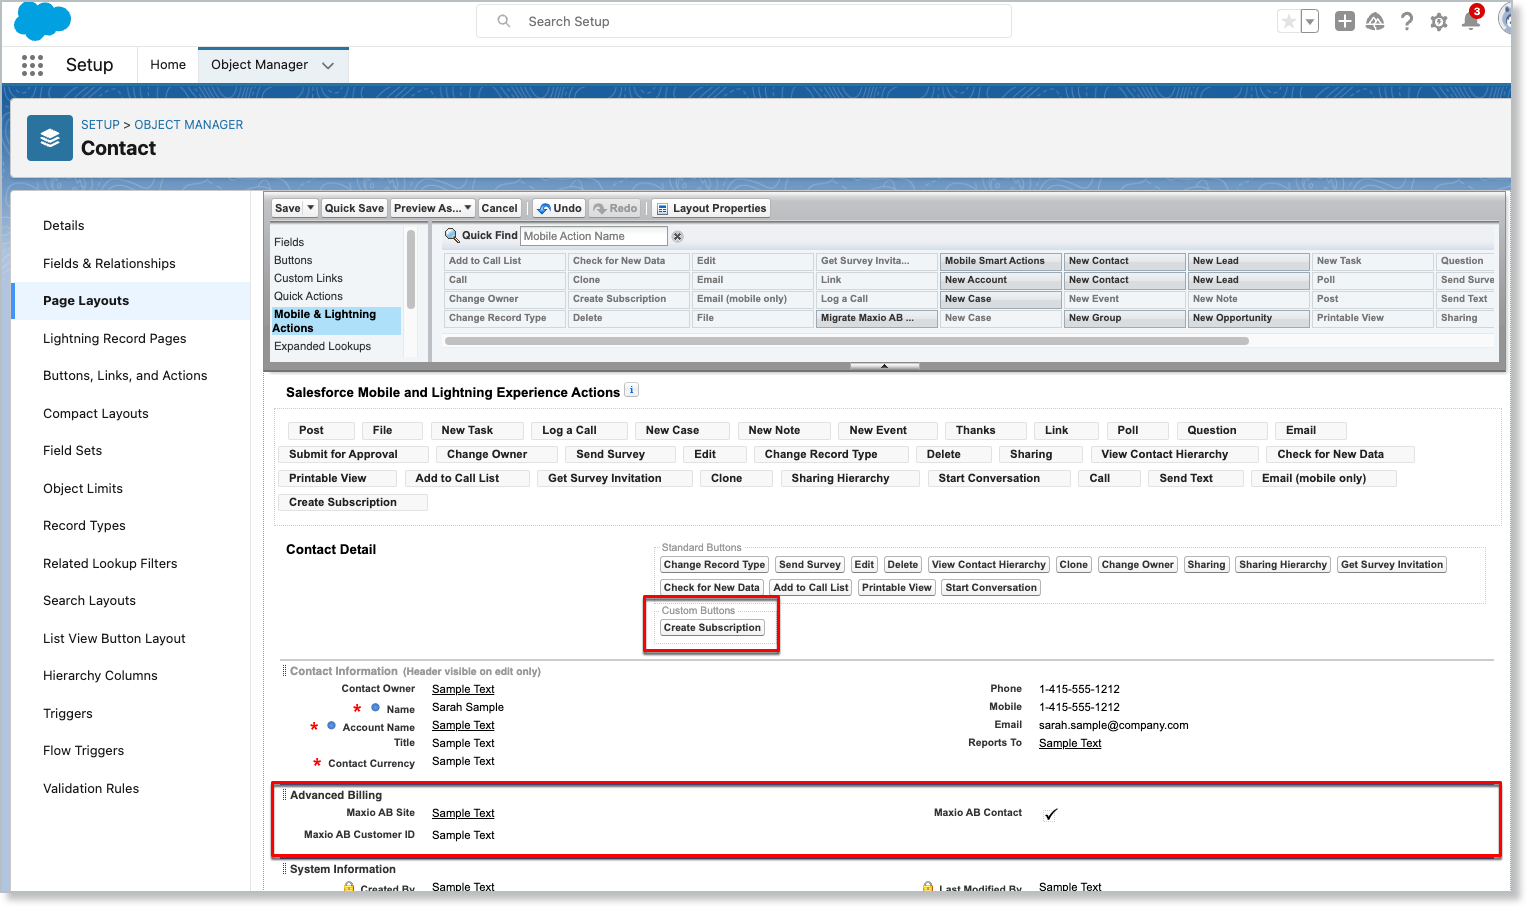
Create an Advanced Billing section: open the palette list and select the Fields view (A in the image below).
-
Drag the Section field (B) into the page layout and name the section Advanced Billing.
-
Select and place the fields you want into the Advanced Billing section.
-
From the palette list, switch from Fields to the Buttons view.
-
Drag the Create Subscription button to the Custom Buttons box in the Contact Details section of the layout.
-
From the palette list, switch from Buttons to the Mobile & Lightning Actions view.
-
Drag the Create Subscription action to the Account Details > Custom Buttons area of the layout.
-
From the palette list, switch to the Related Lists view.
-
Drag Maxio AB Subscriptions to the lists section of the layout.
-
Click Save.
Set up the Product layout
Add an Advanced Billing section and related lists to the Product layout so users can see synced Subscription and Coupon information from a Product record.
To configure the Product layout
-
From the Setup screen, navigate to Object Manager > Product.
-
Select Page Layouts, then select Product Layout.
-
Create an Advanced Billing section: open the palette list and select the Fields view.
-
Drag the Section field into the page layout and name the section Advanced Billing.
-
Select and place the fields you want into the Advanced Billing section.
-
From the palette list, switch from Fields to the Related Lists view.
-
Drag Maxio AB Subscriptions to the lists section of the layout (A in the image below).
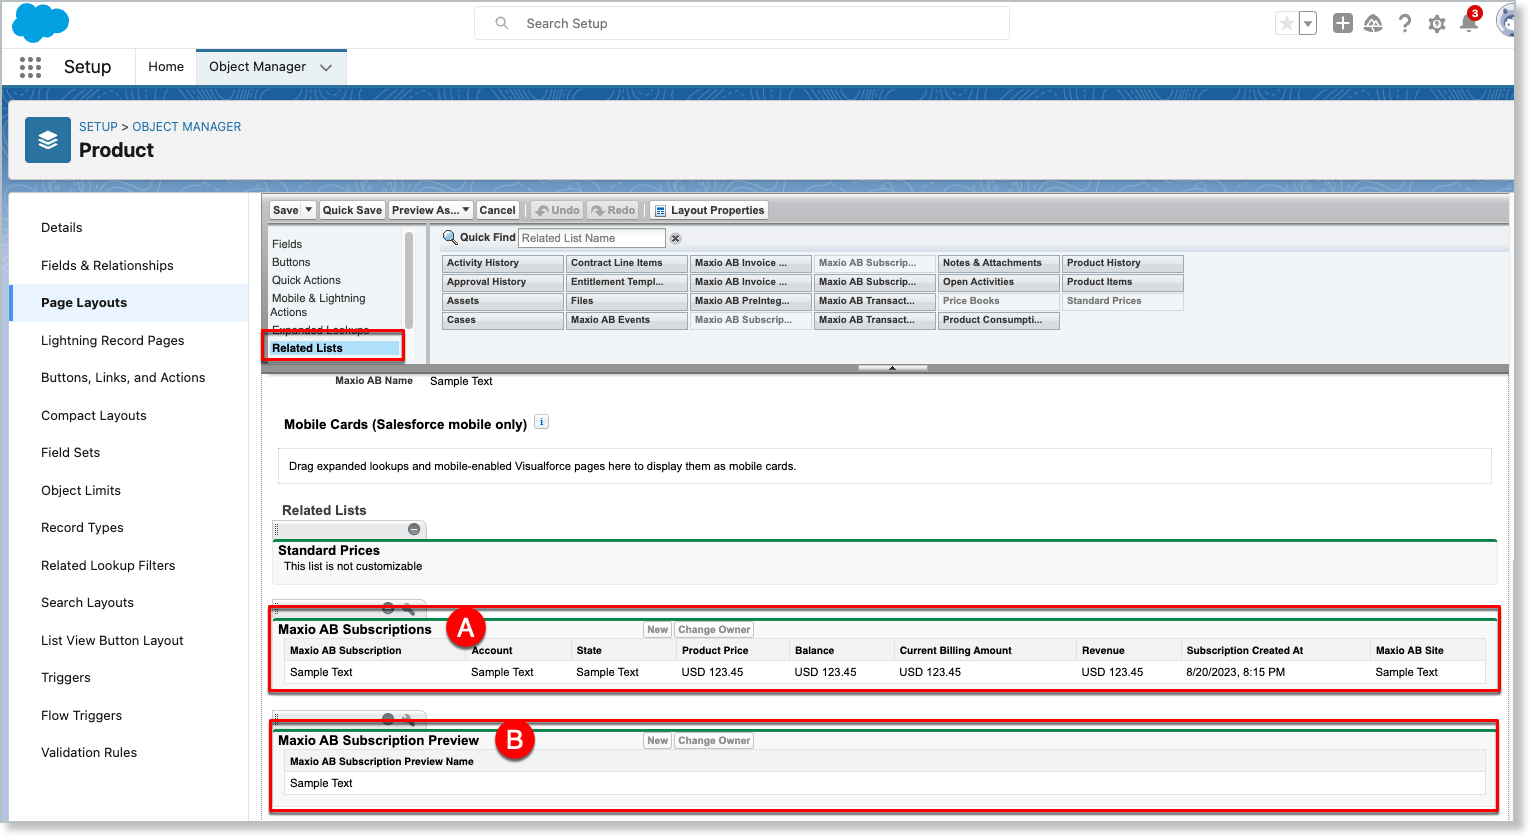
Other Advanced Billing related lists are also available: Maxio AB Invoices, Maxio AB Transaction, and Maxio AB Events.
-
Drag Maxio AB Subscriptions Preview to the lists section of the layout (B in the image above).
-
Click Save.
-
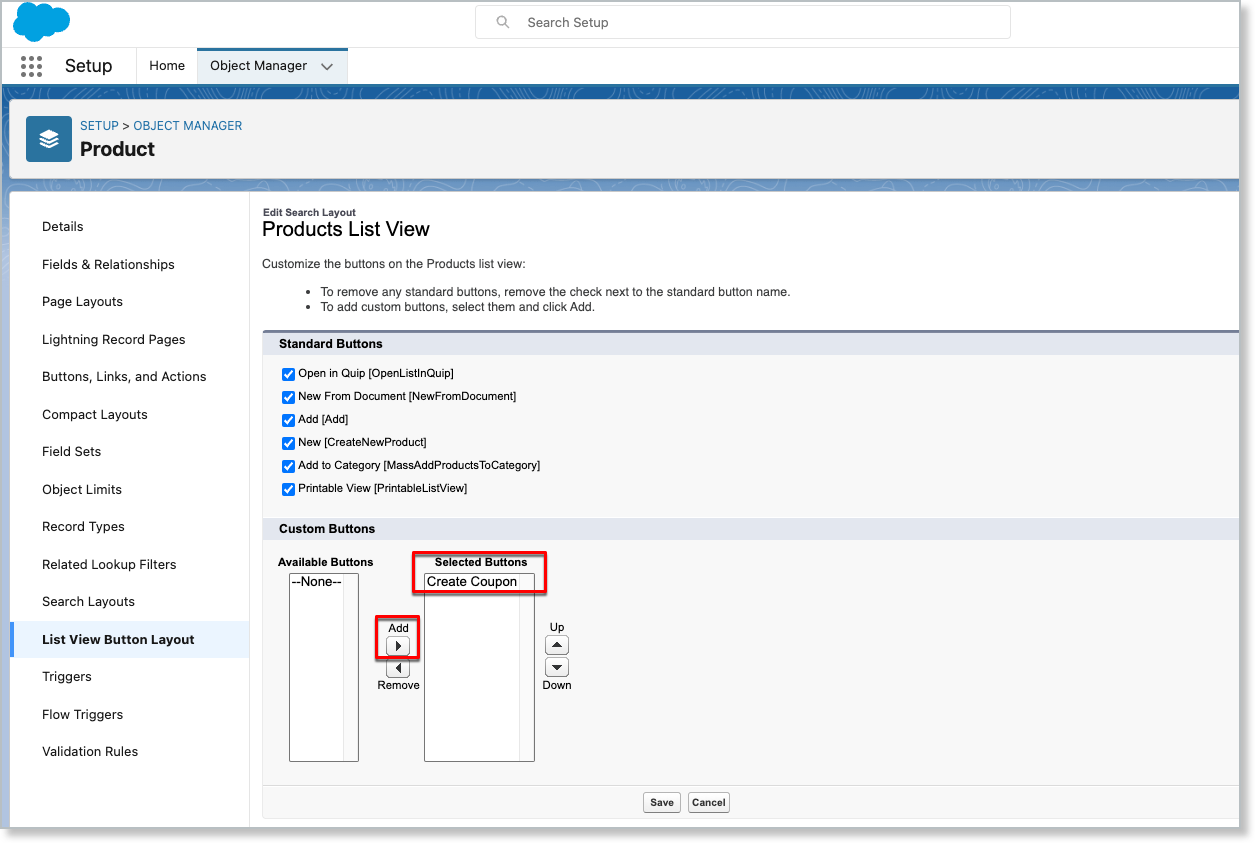
On the left navigation panel, select List View Button Layout.
-
From the List View dropdown, select Edit.
-
Under Custom Buttons, add Create Coupon to the Selected Buttons box.
-
Click Save.
Set up the Opportunity layout
Add a button and action to the Opportunity layout so users can create a new Subscription directly from an Opportunity.
To configure the Opportunity layout
-
From the Setup screen, navigate to Object Manager > Opportunity.
-
Select Page Layouts, then select Opportunity Layout.
-
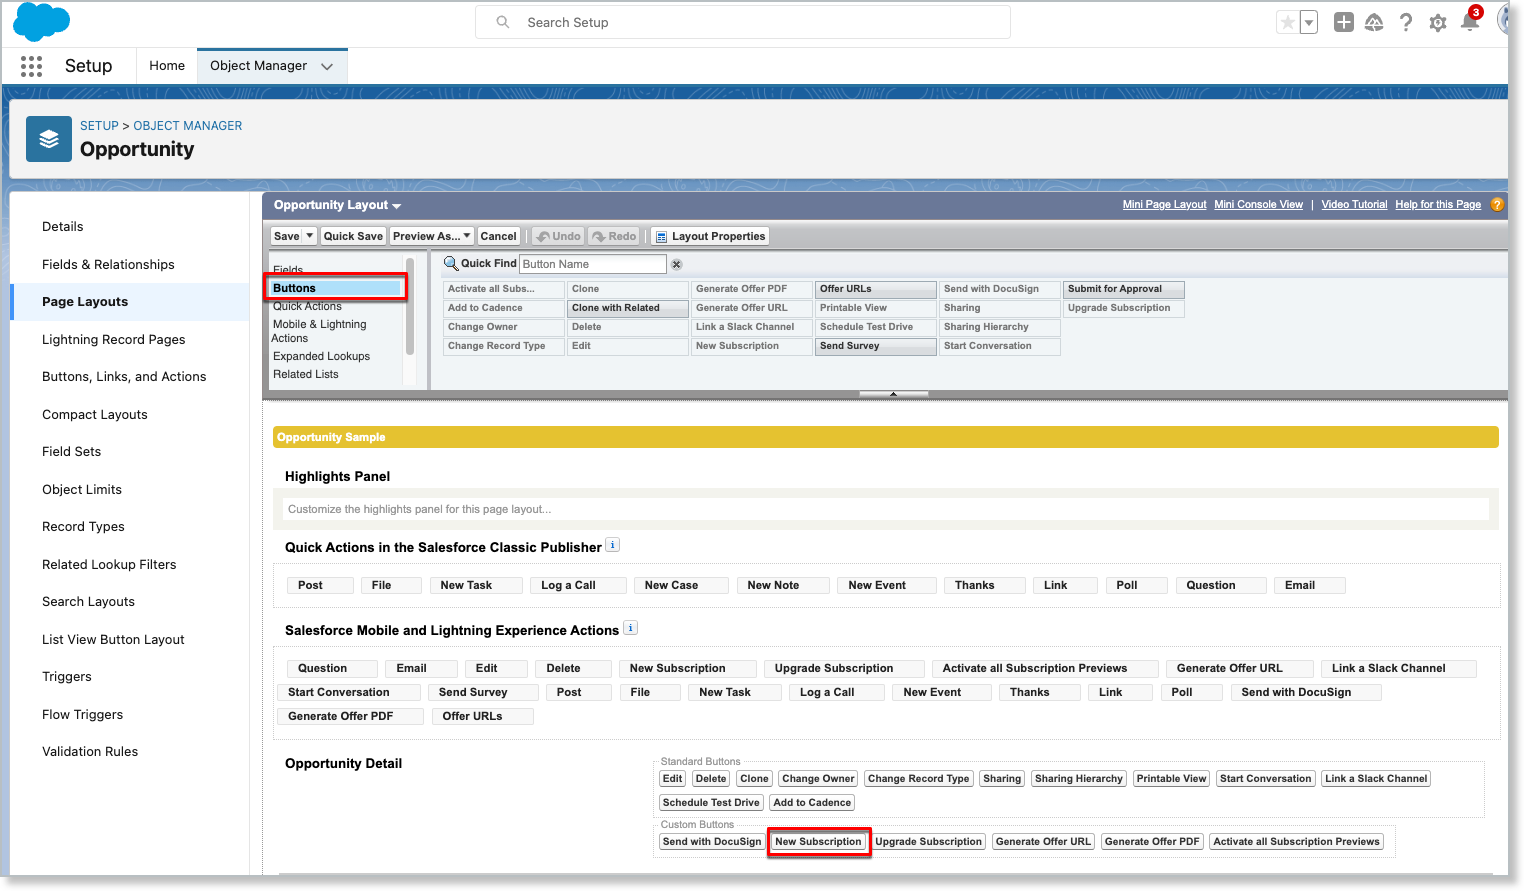
From the palette list, switch from Fields to the Buttons view.
-
Drag the New Subscription button to the Custom Buttons box in the Opportunity Details section of the layout.
-
From the palette list, switch from Buttons to the Mobile & Lightning Actions view.
-
Drag New Subscription to the Salesforce Mobile and Lightning Experience Actions section of the layout.
-
From the palette list, switch to the Related Lists view.
-
Drag Maxio AB Subscriptions to the Related Lists section of the layout.
-
Drag Maxio AB Subscriptions Previews to the lists section of the layout.
-
Click Save.
Set up the Opportunity Product layout
Add a field to the Opportunity Product layout so users can see the linked Subscription Preview from an Opportunity Product record.
To configure the Opportunity Product layout
- From the Setup screen, navigate to Object Manager > Opportunity Product.
- Select Page Layouts, then select Opportunity Product Layout.
- Create an Advanced Billing section: open the palette list and select the Fields view.
- Drag the Section field into the page layout and name the section Advanced Billing.
- Drag the Maxio AB Subscription Preview field into the Opportunity Product Detail section.
- Click Save.
Set up the Advanced Billing Subscription layout
Add the Subscription action buttons to the Maxio AB Subscription layout itself, so users can manage a Subscription from its own record.
To configure the Advanced Billing Subscription layout
-
From the Setup screen, navigate to the Salesforce Object Manager.
-
Select Maxio AB Subscription.
-
Navigate to Page Layouts > Maxio AB Subscription Layout.
-
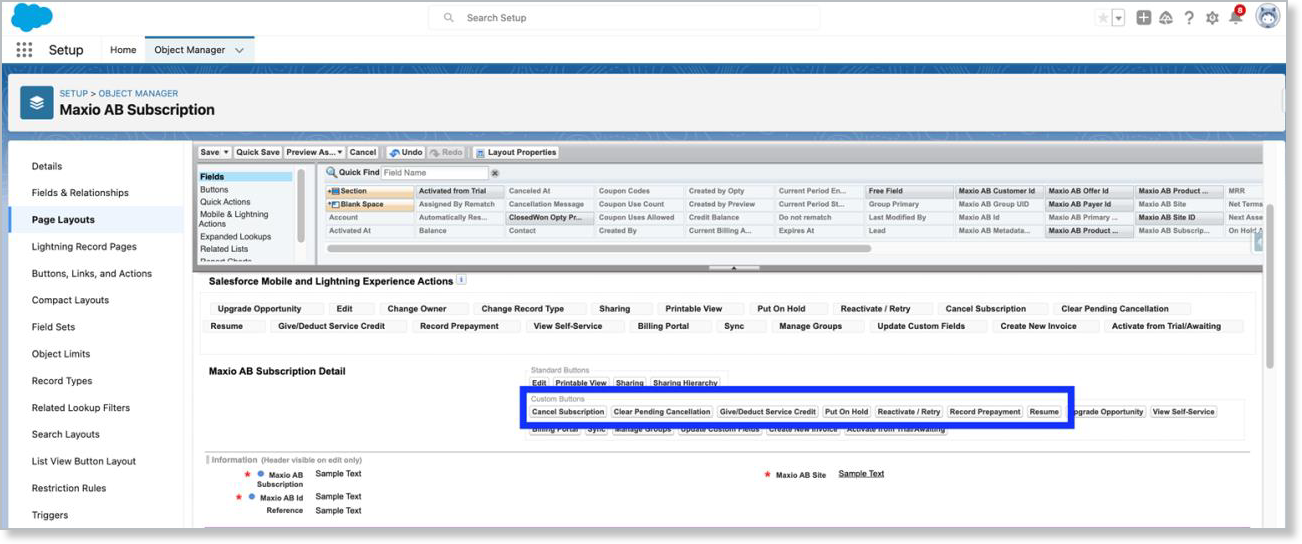
Switch from Fields to the Buttons view.
-
Drag the following buttons into the Custom Button area under Maxio AB Subscription Detail:
- Cancel Subscription
- Clear Pending Cancellation
- Give/Deduct Service Credit
- Put On Hold
- Reactivate / Retry
- Record Prepayment
- Resume
-
From the palette list, switch from Buttons to the Mobile and Lightning Actions view.
-
Drag the same seven actions into the Salesforce Mobile and Lightning Experience Actions area.
-
(Optional) To let users view Subscription component allocations and history, switch to Visualforce Pages.
-
Drag a new Section onto the page and label it Component Allocations.
-
Drag Advanced Billing Components into the newly created section.
-
Click Save.
-
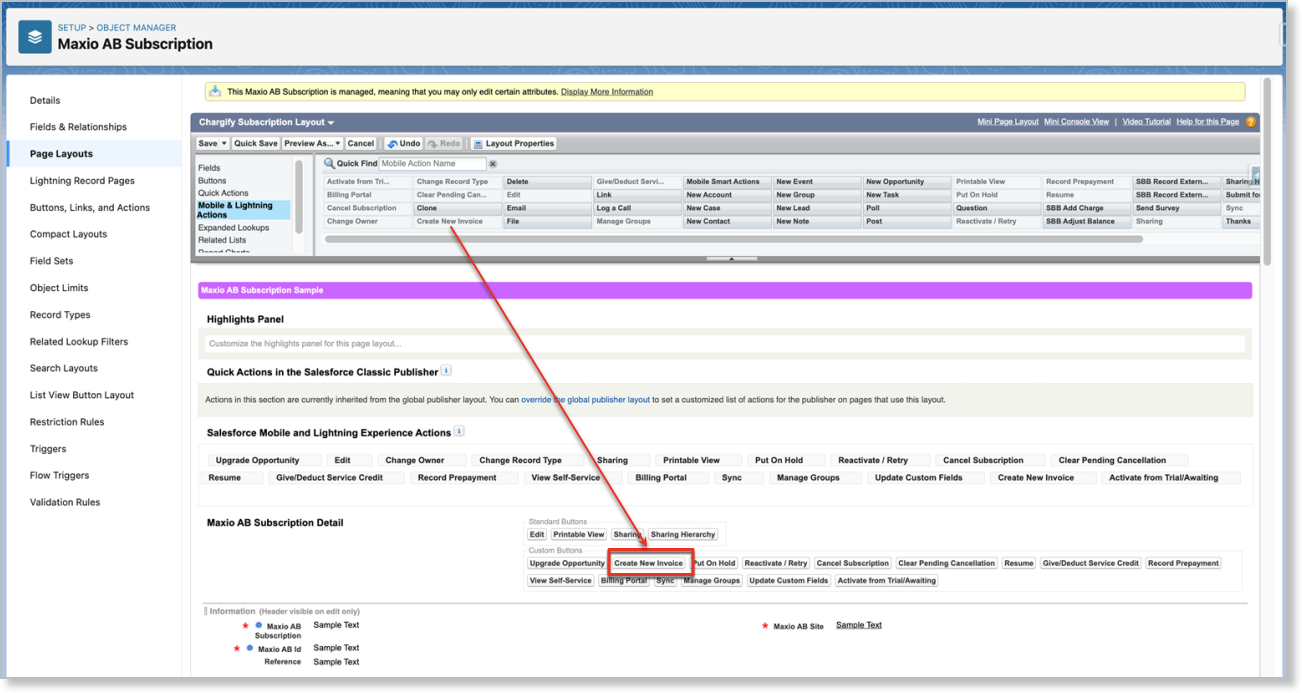
(Optional) To let users create a one-time Invoice from the Subscription record, switch to the Buttons view and drag Create New Invoice to the Standard Buttons area.
-
Switch to the Mobile and Lightning Actions view and drag Create New Invoice to the Salesforce Mobile and Lightning Experience Actions area.
-
Click Save.
Related information
To generate a one-time Invoice once the button is added, see Manage Advanced Billing Invoices in Salesforce.
To install and connect the integration before configuring layouts, see Setup the Salesforce Integration.
Still need help?
Reach out and our support team will take it from here.