
Migrate Legacy Data with Open Balance
Last updated on Sep 19, 2026
Open Balance lets you bring legacy data into Maxio as summary balances instead of rebuilding every historical Transaction. You set a cutover month, enter your Deferred Revenue and Unbilled Accrued Revenue balances at the account level, and add Transaction-level detail afterwards only where you actually want it.
How Open Balance works
Migrating the full detail is still an option: create Transactions for all historical data and everything reports exactly as if it had always been in Maxio. That is accurate but slow, and Open Balance exists to give you a faster route to the same reported balances.
Open Balance is at Admin > Utilities > Open Balance. It must be enabled for your account, and every screen in the utility requires Administrator rights.
Open Balance amounts appear in two Finance reports, Advanced Revenue Summary and Contract Details. Both are built around Open Balance, and both hide it by default. See Step 3: Include Open Balance in reports for how to turn it on.
Subscription Momentum reports, MRR, and ARR are driven by Transactions rather than balances, so they need real Transactions to show the figures you expect. That is what Step 4 is for.
Once Open Balance is configured, the Open Balance Diagnostic Report compares your Open Balance amounts by account pairing against the Transactions allocated to those pairings, for Revenue, Deferred Revenue, and Unbilled Accrued Revenue.
Important: Total Open Balance on a Customer or Contract record is the total balance of all open Invoices dated today or earlier. That is an accounts receivable figure and has nothing to do with this utility, despite the shared name.
Step 1: Set the data migration plan
Start by setting the dates that govern the whole migration.
- Go to Admin > Utilities > Open Balance.
- Click Get Started.
- In Configure Data Migration Plan, choose the month and year of your Cutover Date, and the month and year the revenue date range ends.
- Click Submit.
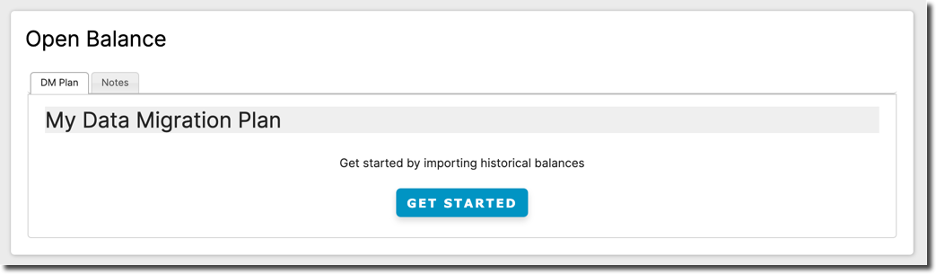
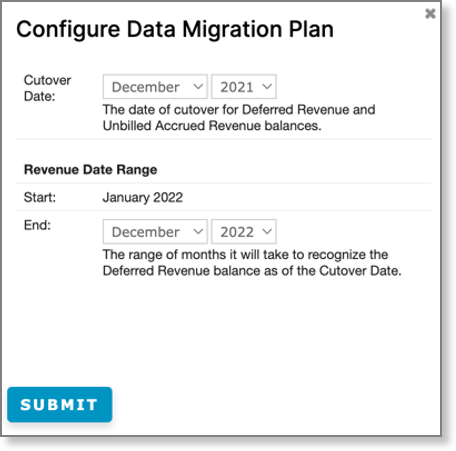
The revenue date range is how long it will take to recognize the Deferred Revenue balance you hold as of the cutover date. Any Unbilled Accrued Revenue balance is also as of the cutover date.
You choose a cutover month, not a day. Maxio treats the last day of that month as the cutover date and starts the revenue date range on the first day of the following month. Choosing December 2021, for example, gives a cutover date of 12/31/2021 and a revenue start date of 01/01/2022. That is why Start is shown as text rather than a field: it follows from the cutover month and cannot be set directly. The end of the range cannot fall before the start.
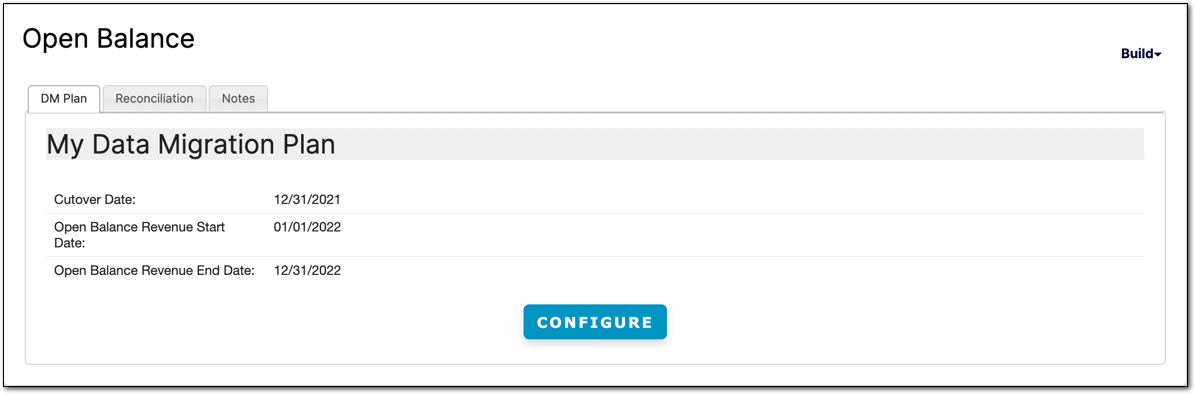
An Administrator can revisit these dates later with Configure, but not freely once amounts exist. You cannot move the start date past your earliest entry, and you cannot pull the end date in ahead of your latest entry. Maxio reports the blocking entry in each case.
Turning Open Balance off is not something an Administrator can do. Contact support@maxio.com if you need it disabled, and note that it cannot be switched off while any entries remain.
Step 2: Build out the balances
With the dates set, enter your Deferred Revenue balance and its recognition schedule by account, and your Unbilled Accrued Revenue balance as of the cutover date.
At the top right of the Open Balance screen, open the Build menu and select:
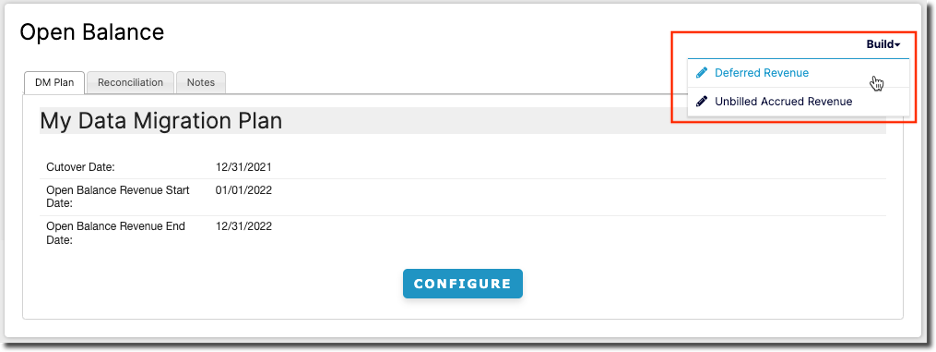
You need at least one Register before you can build. Each builder works on one Register at a time, so with more than one you choose the Register first; with only one, Maxio takes you straight to the builder.
Every builder screen has three controls in the top right: Import opens the importer for that kind of entry, Accounts reopens Select Accounts, and Open Balance Home returns to the home screen.
Deferred Revenue
Select the Register you want to enter a Deferred Revenue balance for. The input dates come from your data migration plan.

Next, choose the accounts that will be part of Open Balance reporting. Select Accounts has two selectors, both drawn from your Chart of Accounts: Liability Accounts, for the Deferred Revenue you are migrating, and Income Accounts, for the accounts that revenue will be recognized into.
In each selector, use the right arrow (>) to move an account into the selected list, then the up and down arrows to order it. The double up arrows send an account to the top.
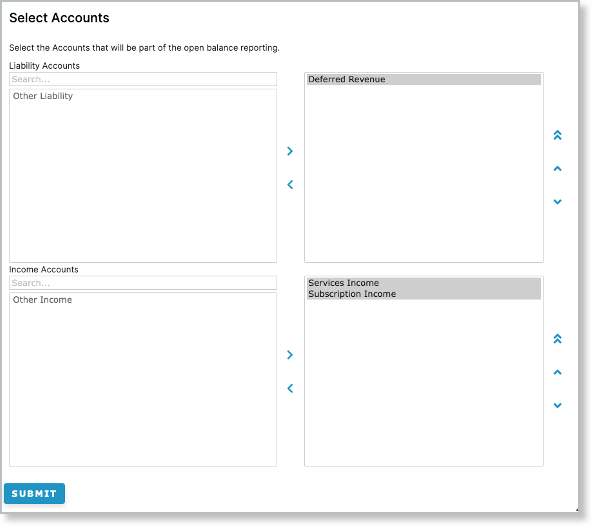
Click Submit, and the Deferred Revenue builder opens with the accounts you chose. It shows one column per month across the revenue date range, a Deferred Revenue field for the balance as of the cutover date, and a row for each income account.
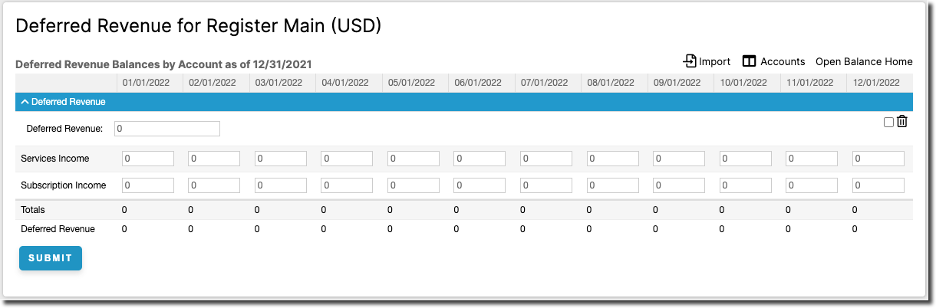
Enter the Deferred Revenue balance as of the cutover date, then enter the revenue to recognize in each month. The Totals row and the running Deferred Revenue row are calculated as you type, so you can see the balance draw down. Enter the amounts the way you want to report on them, whether that is by Customer Contract or by Customer.
Every month needs a value; enter 0 for months with no revenue. On a multi-currency account the builder asks for both a local and a home amount, and the balance field is labeled Local Deferred Revenue. Negative amounts are not accepted, and Maxio resets the field to 0.
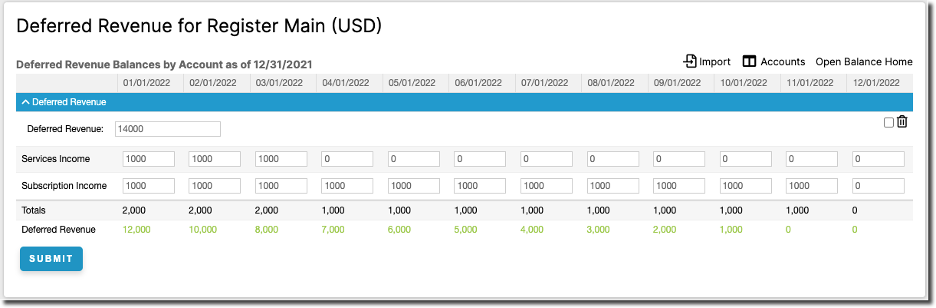
The Deferred Revenue balance must equal the total revenue you recognize, because the balance is not stored separately: it is the sum of the monthly amounts. When the two agree, the running Deferred Revenue row turns green and you can submit. If a month recognizes more than the remaining balance, the row is flagged instead, showing where you have gone past it.
Example for Deferred Revenue
Here the Deferred Revenue balance for the Deferred Revenue account is $14,000 as of 12/31/2021, recognized over 11 months across two income accounts, Subscription Income and Services Income. The running row reaches 0 in the final month, so the entry is in balance.
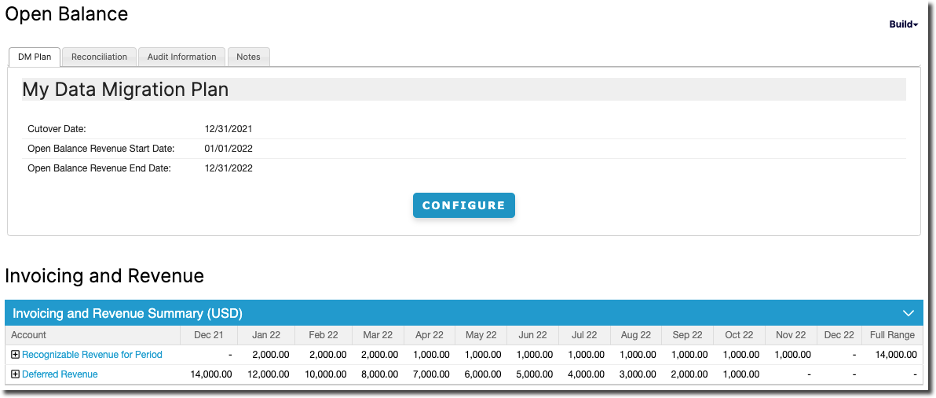
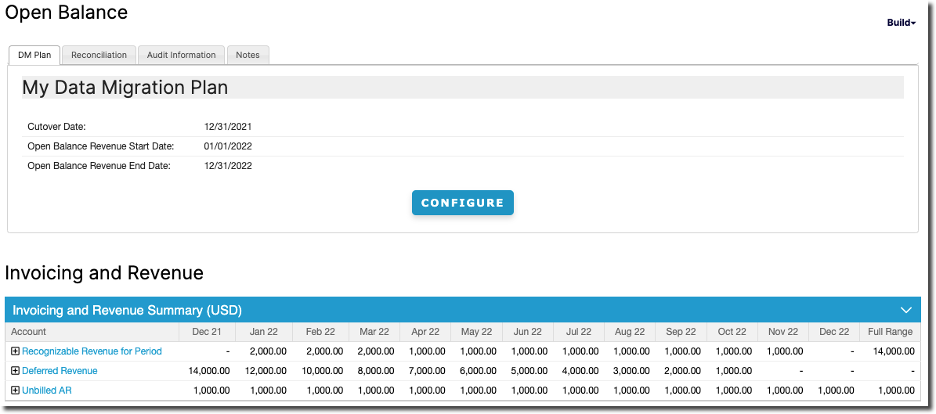
Once the amounts are submitted, they flow into the Advanced Revenue Summary and Contract Details reports, and the Open Balance home screen shows an Advanced Revenue Summary of them, filtered to Only Open Balance.
Click Open Balance Home to go back. To remove an entry, select the checkbox beside its trash icon in the builder and submit.
Unbilled Accrued Revenue
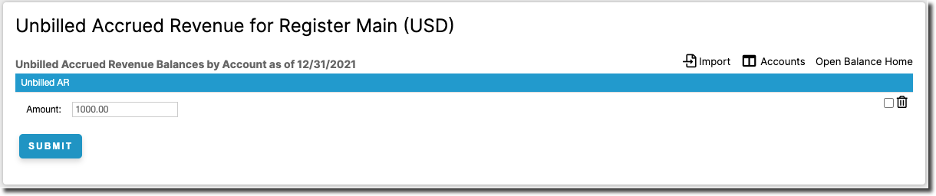
Unbilled Accrued Revenue works the same way, with two differences: Select Accounts offers asset accounts, and there is no recognition schedule, so you enter a single Amount as of the cutover date.
Example for Unbilled Accrued Revenue
Here there is a $1,000 Unbilled AR balance for the Unbilled AR account as of 12/31/2021.
Click Open Balance Home to go back. The Unbilled AR balance now appears in the summary.
Import Open Balance amounts
Instead of entering amounts manually, use the Importer, or the Import link on either builder screen:
- Import Deferred Revenue amounts with the Open Balance Revenue Entries object.
- Import Unbilled AR amounts with the Open Balance Unbilled AR Entries object.
Both support Create, Update, and Create & Update imports, and both offer a sample template to download. The Open Balance Transaction and Invoice Line Item fields can be imported too.
Importing is only available once the data migration plan is configured. You do not have to select accounts first, since importing adds the accounts it uses to your selection for you.
Step 3: Include Open Balance in reports
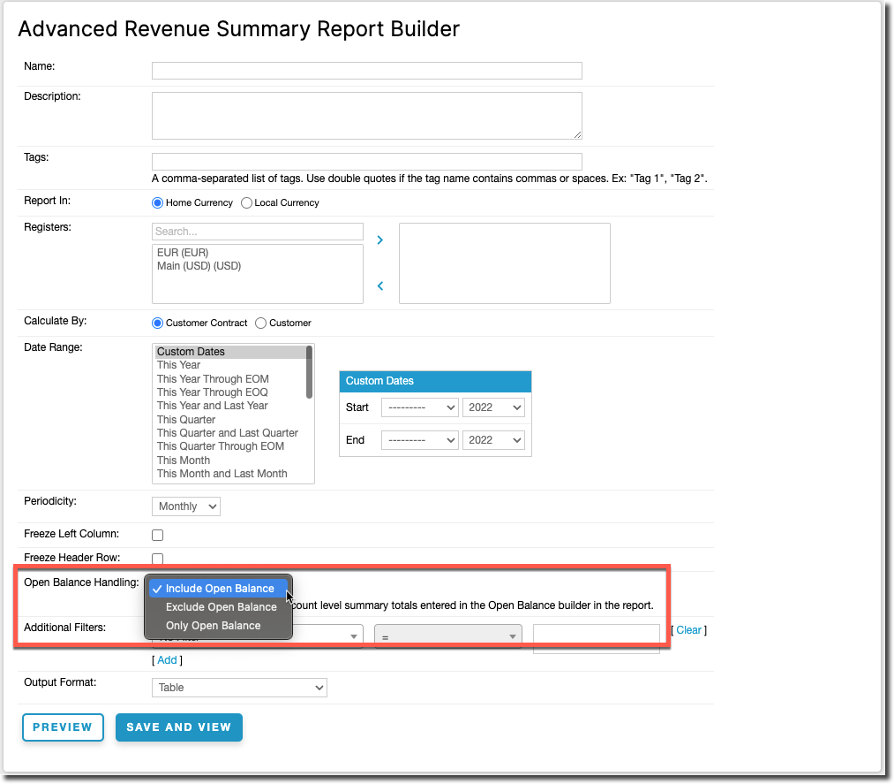
Both the Advanced Revenue Summary and Contract Details reports carry an Open Balance Handling setting, with three options:
- Include Open Balance: Open Balance amounts alongside everything else.
- Exclude Open Balance: Open Balance amounts left out.
- Only Open Balance: nothing but Open Balance amounts.
Exclude Open Balance is the default, so a report you have not changed will not show the balances you entered. Set it to Include Open Balance or Only Open Balance to see them.
Run with the amounts from the example above, the Advanced Revenue Summary looks like this.
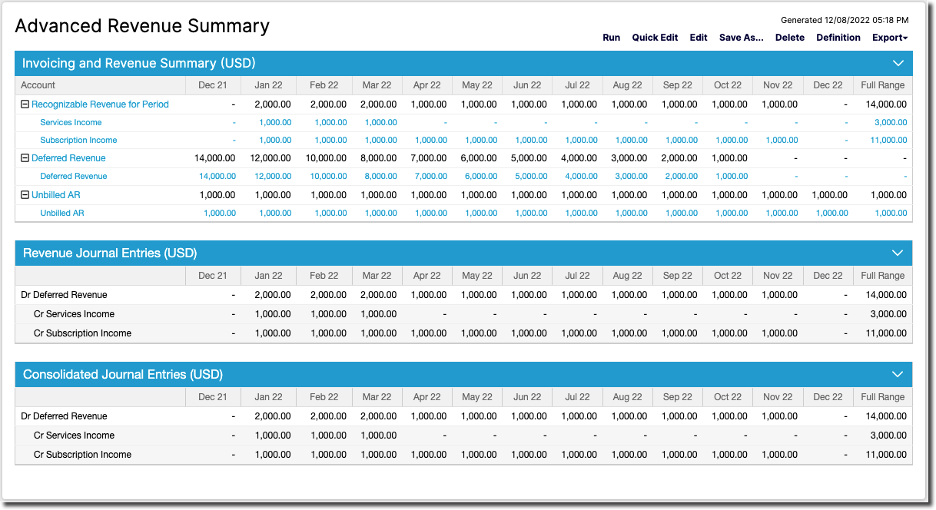
Drilling into any bucket, such as Recognizable Revenue for Period or a single account, opens a detail view built from the Contract Details report. Open Balance amounts are labeled Open Balance in the left-hand columns, in place of a customer and contract, so you can see at a glance that the balance is made up of them.
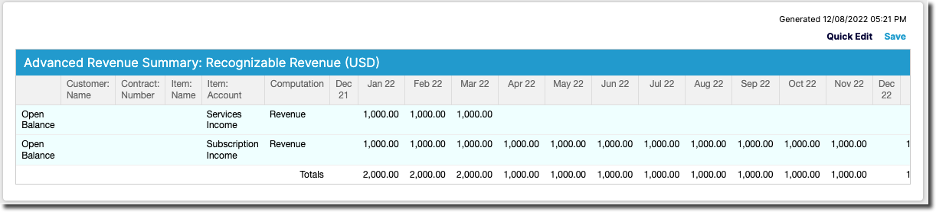
To include Open Balance in a Contract Details report, add the Item Account, the Item Name, or both to Calculate By.

Step 4 (optional): Add Transaction and Invoice Line Item details
You can add detail to your Open Balance amounts by creating Transactions and Invoice Line Items and marking them as part of the balances you already entered. This is worth doing for any part of the migrated data you want to see at a granular level.
For example, you might build Transactions only for the contracts that are mid-term at cutover, so you know when they renew.
To do this, select Included in Open Balance for the Transaction and for its Invoice Line Item.
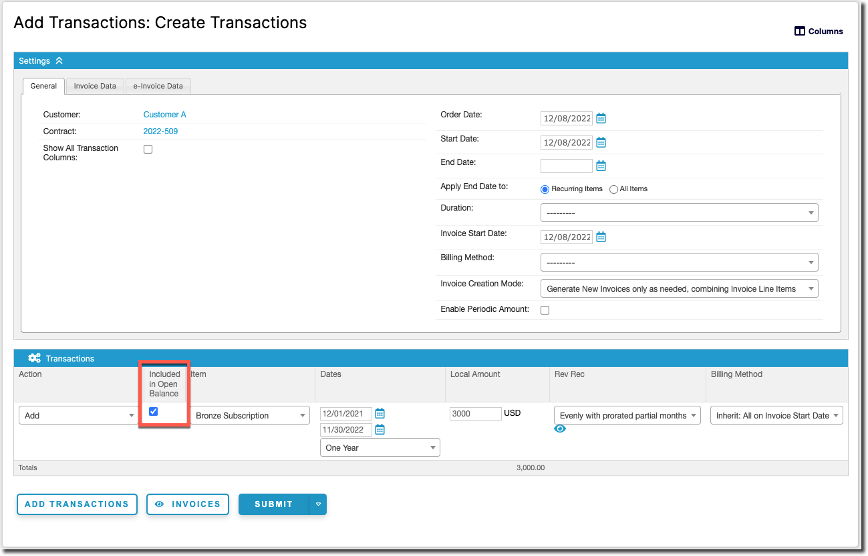
Any Transaction included in Open Balance must be in balance for reporting to be accurate.
You do not have to set either field one record at a time. Both Included in Open Balance and Exclude from Reports are available via import, on List views, and in Bulk Edit.
For Invoice Line Items before the cutover date that you do not plan to build out with Transactions, select Exclude from Reports. Their amounts stay in the Open Balance and are not counted a second time in the Advanced Revenue Summary and Contract Details reports. If you later decide to add Transaction detail for those line items, clear Exclude from Reports and leave Included in Open Balance selected.
Example: adding detail to part of a balance
Continuing the example, you add Transaction detail for part of the Open Balance you entered: a Transaction and Invoice Line Item for $3,000 spanning 12/1/2021 to 11/30/2022, recognized evenly by month, both marked Included in Open Balance.
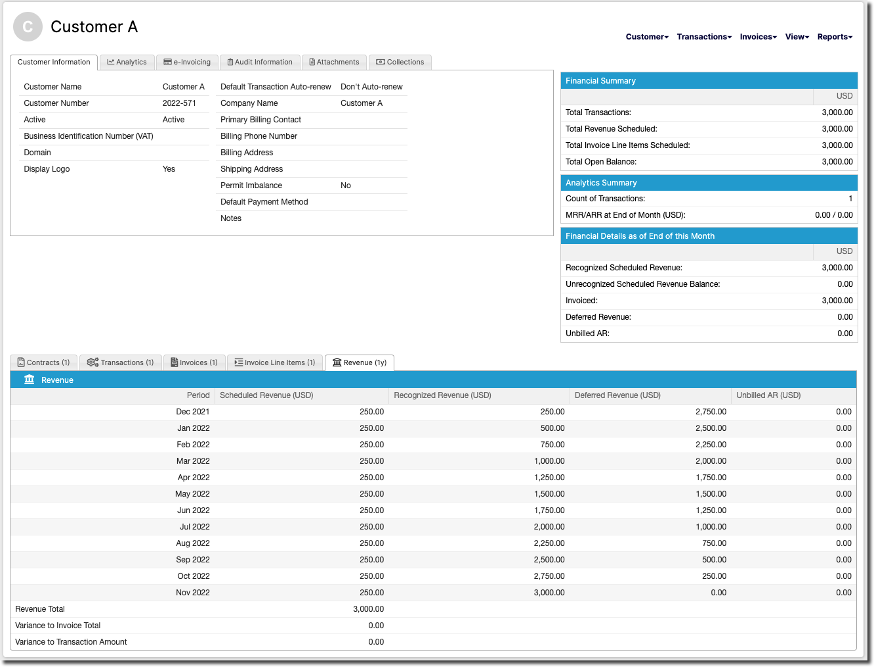
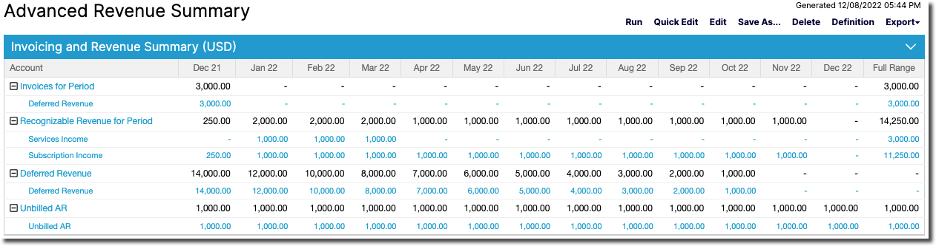
Rerun the Advanced Revenue Summary. Within the Open Balance revenue date range the totals per account are unchanged, with January through November 2022 still coming to $14,000, because you marked the Transaction as part of the balance rather than as new revenue on top of it. What is new is the detail: the Transaction's Invoicing now appears, and the $250 it recognizes in December 2021 is added, since that month falls before the revenue date range starts.
Drilling into Revenue, Deferred Revenue, or Unbilled AR shows how the balance is now split. The Open Balance bucket is reduced by the Transaction's share rather than sitting alongside it.

The revenue schedule from January to December 2022 still matches what you entered in the builder. Subscription Income is now split into $250 a month recognized for Customer A, leaving $750 a month in the Open Balance bucket.
Which accounts the Open Balance totals are drawn down from depends on the accounts assigned to the Items used in the Transactions and Invoice Line Items you included.
Related information
For what each tab on the Open Balance home screen shows, and when the two conditional tabs appear, see Understand the Open Balance Home Screen.
To bring the underlying records in from a file, see Understand Imports.
Before making large-scale changes, see Back Up and Restore Your Account.
To close the periods this migration covers, see Set Close and Lock Dates for Financial Controls.
Still need help?
Reach out and our support team will take it from here.