
Collect Payment Methods in your App with Maxio.js
Last updated on Sep 19, 2026
Maxio.js lets you collect a customer's payment details inside your own application without those details ever touching your servers. Build a Maxio.js page that tokenizes a new payment method, then use that token to attach the payment method to an existing Customer.
Chargify.js is now Maxio.js
The Chargify.js library has been renamed to Maxio.js. This change is fully backwards compatible, so existing integrations continue to work without code changes. Our developer documentation is being updated incrementally, so you will continue to see Chargify.js referenced in code examples and screenshots.
Before you start
| Requirement | Detail |
|---|---|
| Feature | Maxio.js |
| You need | A web app, and developer experience with JavaScript and APIs |
| Code | Yes |
| Difficulty | Medium |
Build the payment page
The result is a working Maxio.js form that lets a signed-in customer add a credit card. For the finished code, see the HTML and JavaScript sample app.
To gather your Advanced Billing credentials
- Know your Subdomain
Your Advanced Billing Site URL takes the formhttps://SUBDOMAIN.chargify.com. - Get your Maxio.js Public Key
In your Advanced Billing Site, go to Config > Integrations > Maxio.js. - Get your Advanced Billing API Key
In your Advanced Billing Site, go to Config > Integrations > API Keys.
Build the form
To start, you need a web form. You can either use an existing form, create a form from scratch, or use a prebuilt example from the Examples section at the end of this page. The steps below use the prebuilt HTML and JavaScript example.
-
Set up your file directory
yourfolder - index.html - load.js - submit.js - styles.css -
Add your code
When you're done, load the page on localhost. The form does not render until you add your real credentials in the next step.
<!doctype html>
<html lang="en">
  <head>
    <!-- meta tags -->
    <meta charset="utf-8">
    <meta name="viewport" content="width=device-width, initial-scale=1, shrink-to-fit=no">

    <!-- include chargifyjs -->
    <script src="https://js.chargify.com/latest/chargify.js"></script>

    <!-- Bootstrap CSS -->
    <link rel="stylesheet" href="https://stackpath.bootstrapcdn.com/bootstrap/4.3.1/css/bootstrap.min.css">

    <!-- Chargifyjs custom CSS (modify as needed) -->
    <link rel="stylesheet" href="styles.css" />
  </head>

  <!-- begin body -->
  <body>
    <div class="form-box">
      <h2 align="left">Chargifyjs for Credit Cards with Billing Address</h2>
      <hr style="margin-top:16px; margin-bottom:32px; border-bottom: 4px solid #e0e1ec;">

      <!-- load spinner -->
      <div id="load_spinner" class="d-flex justify-content-center">
        <div class="spinner-border" role="status">
          <span class="sr-only">Loading...</span>
        </div>
      </div>

      <!-- error banner -->
      <div class="alert alert-danger" role="alert" id="chargify-error-message" style="display:none;"></div>

      <form id="chargify-form" action="create.js" method="POST" style="display:none;">

        <!-- Card Details Section -->
        <h5 style="margin-bottom:32px;">Card Details</h5>

        <div class="form-row">
          <div class="form-group col-md-6">
            <div id="first_name"></div>
          </div>
          <div class="form-group col-md-6">
            <div id="last_name"></div>
          </div>
          <div class="form-group col-md-6">
            <div id="cc_number"></div>
          </div>
          <div class="form-group col-md-6">
            <span id="cc_month"></span>
            <span id="cc_year"></span>
            <span id="cc_cvv"></span>
          </div>
        </div>

        <hr>
        <h5 style="margin-bottom:32px;">Billing Address</h5>

        <!-- billing address -->
        <div class="form-row">
          <div class="form-group col-md-6">
            <div id="billing_address"></div>
         </div>
          <div class="form-group col-md-6">
            <div id="billing_address2"></div>
          </div>
        </div>

        <div class="form-row">
          <div class="form-group col-md-6">
            <div id="billing_city"></div>
          </div>
          <div class="form-group col-md-6">
            <div id="billing_zip"></div>
          </div>
        </div>

        <!-- billing address -->
        <div class="form-row">
          <div class="form-group col-md-6">
            <div id="billing_country"></div>
          </div>
          <div class="form-group col-md-6">
            <div id="billing_state"></div>
          </div>
        </div>

        <!-- Form Submit -->
        <button type="submit" class="btn btn-primary">Save Card</button>

        <!-- Display Chargifyjs Token (make this input hidden in production) -->
        <hr>The Chargify Token is: <input id="chargify-token" type="text" /></br>
        Use this token in your backend to perform an action with the Chargify API

      </form>
    </div>
    <!-- end body -->

    <!-- JavaScript (jquery/bootstrap) -->
    <script src="https://maxcdn.bootstrapcdn.com/bootstrap/4.3.1/js/bootstrap.min.js"></script>
    <script src="https://code.jquery.com/jquery-3.2.1.slim.min.js"></script>

    <!-- Javascript (Chargifyjs load and submit files) -->
    <script src="load.js"></script>   <!-- This contains your Chargify.js file -->
    <script src="submit.js"></script>  <!-- This pauses form submission to create a token -->

    <!-- Smooth form load -->
    <script>
    setTimeout(function () {
        $("#load_spinner").remove();
        $("#chargify-form").show();
    }, 2000);
    </script>

  </body>
</html>
The style values used in load.js below are documented in Configure Maxio.js.
//load.js
var chargify = new Chargify();

//**********
//AVAILABLE STYLES
//See the Maxio.js Configurations article for the full list
//**********

chargify.load({
    publicKey: 'chjs_hy39j8rc2krnhdx9db73ynmb',
    serverHost: 'https://demo-integrations2.chargify.com',
    type: 'card',
    hideCardImage: false,
    optionalLabel: ' ',
    requiredLabel: '*',
    addressDropdowns: true,
    style: {
        field: {
            maxWidth: '100%',
            backgroundColor: null,
            paddingTop: null,
            paddingBottom: null,
            borderRadius: '.25rem',
            color: null,
            border: null,
            fontSize: null,
            fontWeight: null
        },
        input: {
            maxWidth: '100%',
            backgroundColor: null,
            paddingTop: null,
            paddingBottom: null,
            borderRadius: '.25rem',
            color: null,
            border: '1px solid #ced4da',
            fontSize: '16px',
            fontWeight: null
        },
        label: {
            maxWidth: null,
            backgroundColor: '#ffffff',
            paddingTop: '2px',
            paddingBottom: '1px',
            borderRadius: null,
            color: null,
            border: null,
            fontSize: '16px',
            fontWeight: '400'
        },
        message: {
            maxWidth: null,
            backgroundColor: null,
            paddingTop: '2px',
            paddingBottom: '1px',
            borderRadius: null,
            color: null,
            border: null,
            fontSize: null,
            fontWeight: null
        }
    },
    fields: {
        firstName: {
            selector: '#first_name',
            label: 'First Name on Card',
            placeholder: 'John',
            message: 'Invalid First Name',
            maxlength: '30',
            required: true
        },
        lastName: {
            selector: '#last_name',
            label: 'Last Name on Card',
            placeholder: 'Smith',
            message: 'Invalid Last Name',
            maxlength: '30',
            required: true
        },
        number: {
            selector: '#cc_number',
            label: 'Card Number',
            placeholder: 'Card Number',
            message: 'Invalid Card',
            required: true
        },
        month: {
            selector: '#cc_month',
            label: 'Month',
            placeholder: 'MM',
            message: 'Invalid Month',
            required: true
        },
        year: {
            selector: '#cc_year',
            label: 'Year',
            placeholder: 'YYYY',
            message: 'Invalid Year',
            required: true
        },
        cvv: {
            selector: '#cc_cvv',
            label: 'CVV',
            placeholder: 'CVV',
            message: 'Invalid CVV',
            required: true
        }
    }
});//submit.js
document.querySelector('#chargify-form').addEventListener('submit', function() {
var form = this;
event.preventDefault();
chargify.token(
form,
function success(token) {
console.log('{host} token SUCCESS - token: ', token);
// host will write token in hidden input
document.querySelector('#chargify-token').value = token;
// uncomment to initiate form submission
//form.submit();
console.log('{host} form submitted');
},
function error(err) {
//define error message (occurs before token generation attempt)
if (err.message === undefined) { var message = ""; }
else { var message = err.message; }
//define actual error message (occurs after token generation attempt)
if (err.errors === undefined) { var chargify_errors = ""; }
else { var chargify_errors = err.errors; }
//construct error message to display
$("#chargify-error-message").show().text(message + " " + chargify_errors);
}
);
});/* styles.css */
.form-control {
padding: 16px;
}
.form-box {
padding: 20px 5%;
margin-right: 0;
margin-left: 0;
border-width: .2rem;
margin: 1rem -15px 0;
border: solid #f7f7f9;
position: relative;
margin: 0 auto;
max-width: 900px;
}
#first_name iframe,
#last_name iframe,
#cc_number iframe {
width: 100% !important;
}
#cc_month iframe {
width: 30% !important;
}
#cc_year iframe {
width: 30% !important;
}
#cc_cvv iframe {
width: 30% !important;
}Add credentials and customize the form
With the form in place, configure your public credentials, the payment method type, the iframed fields, and their styling.
-
Add your Maxio.js credentials in the load.js file
In load.js, update these:
a) UpdatePublicKeywith the Maxio.js Public Key you created in Step 1.1, and
b) UpdateServerHostwith the Subdomain from Step 1.1 -
Customize chargify.load (as needed)
View more documented examples -
Configure Styling (as needed)
Withinchargify.load, there is astyleobject, which controls the styling of the iframed fields. In the load.js example file, many values are set tonullas a guide. Replace the null values, with real values, as needed, once your form is fully functional. -
Add secure iframed fields (as needed)
The load.js file tells Maxio.js what iframed fields to display on your web form. This is done by includingfields(billing address, billing city, etc) in yourchargify.loadfunction, and those fields map to div IDs in your frontend form. Use the image below, alongside the 5 steps, to guide you.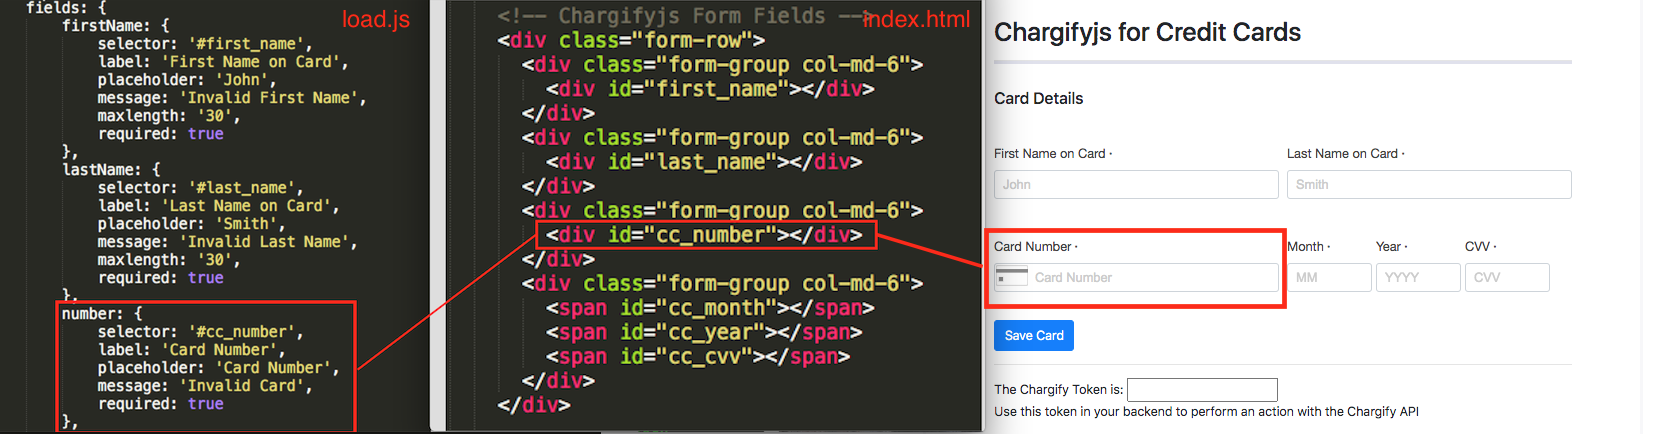
- Add a supported field to the load.js file, such as
number. Add these fields in thefieldsobject. - Set the
selectorto any ID you’d like, such as#cc_number.
3. In the signup.html file, add a div with the matching selector, such as<div id="cc_number"></div>
4. When you load the page, and assuming no errors in your chargify.load function, the secure field is iframed into your web form.
5. Repeat for each field you want to add. For full examples, see the Examples section below.
- Add a supported field to the load.js file, such as
Submit the form to your server
If using example from Frontend Implementation section
- Go into submit.js and uncomment
form.submit(); - Go into signup.html, find the input
chargify-tokenand change 'text' to 'hidden'
If not
If you are not using the example code, just make sure your form can successfully submit and POST to your servers.
Create the payment method for the Customer
On your server, create a Payment Profile that saves the card to the existing Customer.
// EXAMPLE: Chargifyjs for Create Payment Method for Customer
// ENDPOINT: POST /payment_profiles.json
// DOCS: https://developers.maxio.com/http/advanced-billing-api/api-endpoints/payment-profiles/create-payment-profile

// REQUEST BODY
{
  "payment_profile": {
    "customer_id": 12345, //valid customer ID
    "chargify_token": "tok_w68qcpnftyv53jk33jv6wk3w" //the chargifyjs token generated from your form
  }
}
Then, set the newly created payment method as the default.
If you want to set it as the default in real time
You’ll need the subscription id and the payment profile id in your code, then set the payment method as the default for the subscription by performing POST /subscriptions/:id/payment_profiles/:id/change_payment_profile.json. There is no json body for this API call.
If you want to let the user set the default manually
Continue to the next section, and build a UI to let your customer manage multiple payment methods.
Test and add final touches
Test the full implementation end to end, then handle the error and success paths.
- Test the frontend
The form should load, a token should generate, and you should test token generation errors. If you are connected to the Advanced Billing Test Gateway, use a card number of2or3to simulate an error. - Add payment method errors and test
Test a failed API call to Advanced Billing. For example, break the API call on purpose, to test how your implementation responds to that error. Pass the error back to your front end. This is how your customers see errors such as a declined card. - Add a redirect and test success
On success, a user should be redirected successfully, and the entire flow should make sense start to finish.
Let customers manage multiple payment methods
To give customers a UI for their saved payment methods, read the Customer's Payment Profiles and render them, then let the customer choose which one is the default.
-
Read the customer’s payment methods
You’ll need the customer id, and then read the payment profiles for the customer by performing GET /payment_profiles.json?customer_id=:id. Since this endpoint reads all payment profiles and returns a max of 20 as a default, be sure you have a value set as the customer_id to ensure you are fetching the intended customer’s data. -
Parse the data you want to display
For example, the payment profile id sits atresponse[0].payment_profile.id, and the first name atresponse[0].payment_profile.first_name. -
Pass the data to your frontend, and display it
Here is a sample image that shows what an end result might look like in a basic table/list layout: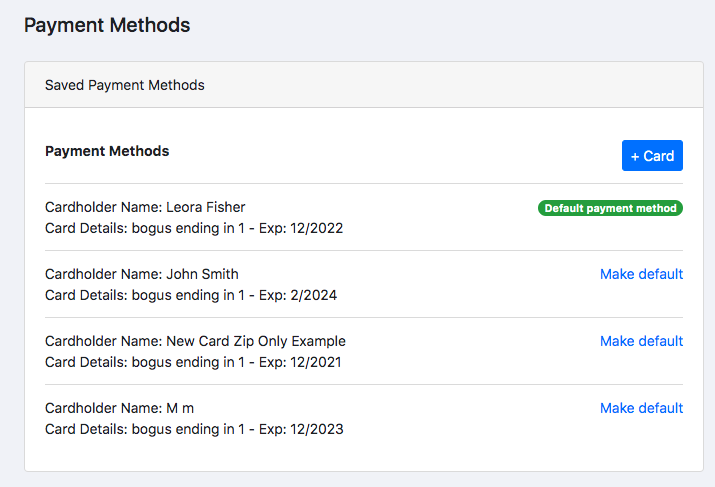
-
Let the user set a payment method as the default
You’ll need the subscription id and the payment profile id, then set the payment method as the default for the subscription by performing POST /subscriptions/:id/payment_profiles/:id/change_payment_profile.json. There is no json body for this API call.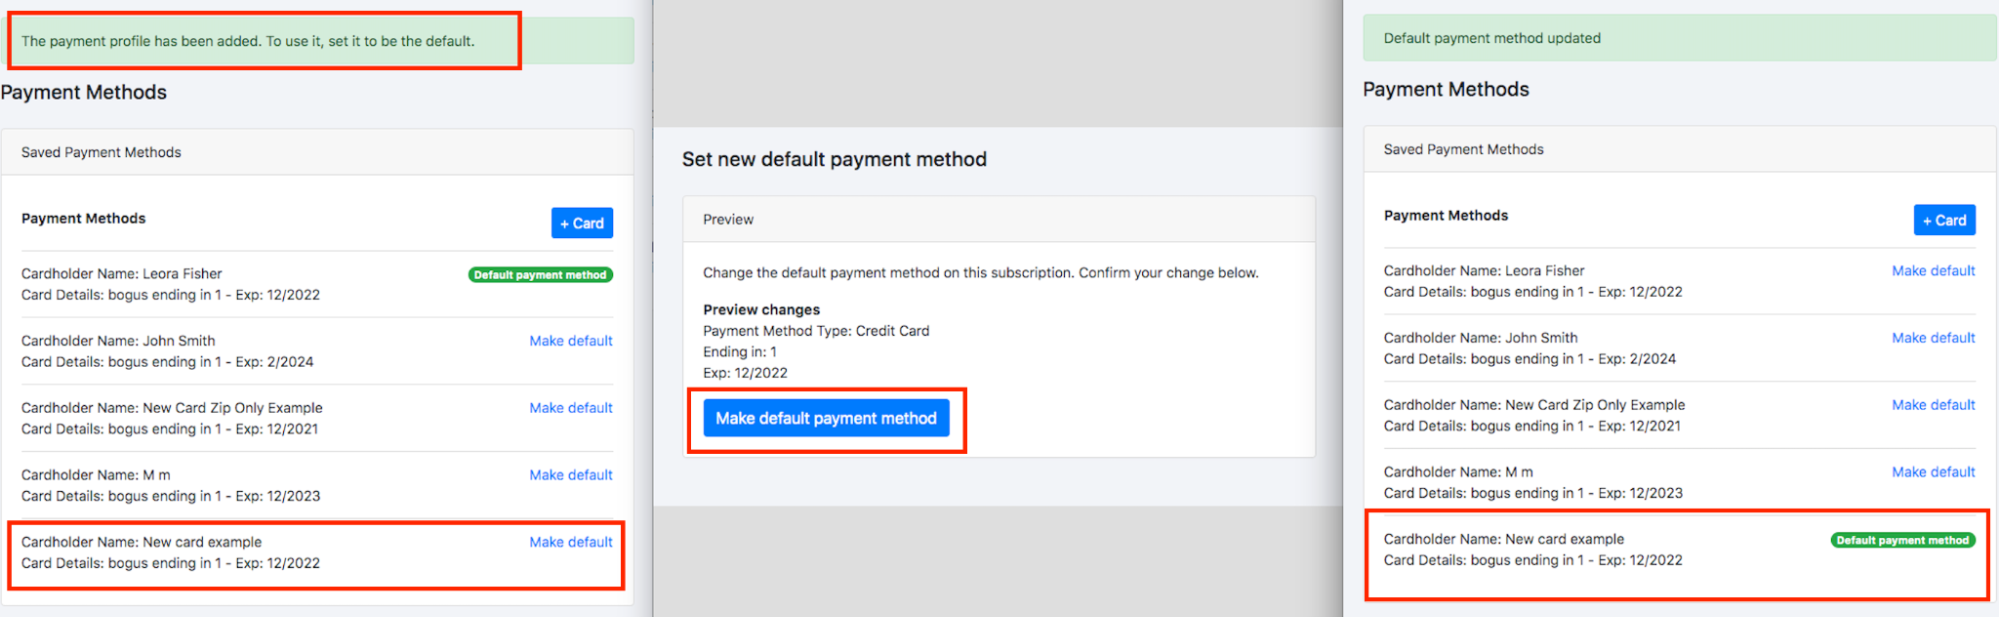
Examples
Related information
For the full list of Maxio.js configuration options and styling values, see Configure Maxio.js.
To build the wider subscription management experience these payment methods sit inside, see Build your own Billing Portal with the Advanced Billing API.
Still need help?
Reach out and our support team will take it from here.