
Create Components
Last updated on Aug 29, 2026
Components are the line items you charge for alongside a product, whether that is a per-seat charge, metered usage, or a flat add-on. Which type you create decides how the charge behaves, so start by matching what you sell to a component type, then follow the steps for that type.
Quantity-Based On/Off Prepaid Usage Metered Usage
Component types and what each one suits
| Component Type | Best for |
|---|---|
| Metered usage | Any usage-based items, billed in arrears |
| Prepaid usage | Any usage-based items that are advanced, and billed upfront |
| Quantity-based | Any recurring items with a quantity of 0, 1, 2+ |
| Quantity-based One-time | Any non-recurring items with a quantity of 0, 1, 2+ |
| On-off | Any recurring items with a quantity of 0 or 1 |
Summary - Create a quantity-based component (one-time or recurring)
- Feature
- Component
- You Need
- Access to your company's price book
- Code
- None
- Difficulty
- ◉◎◎◎◎
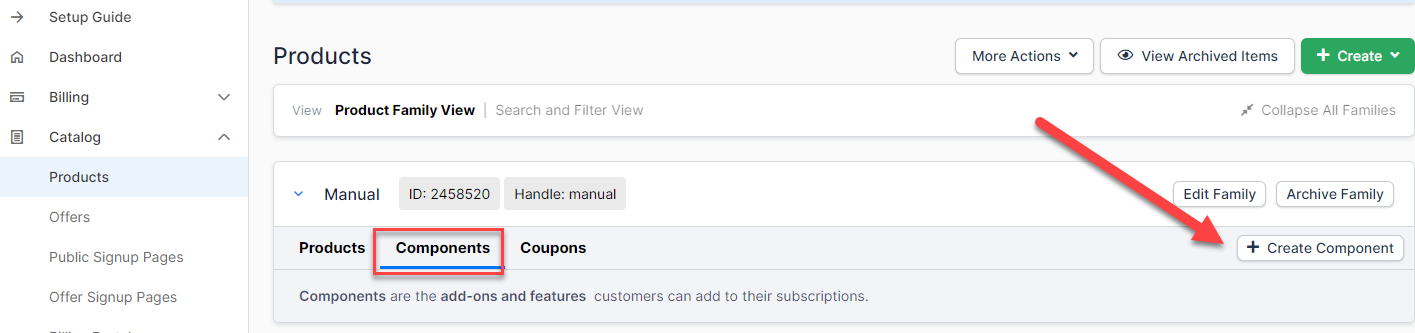
1. Create new component
Open the Products page and select the Components tab.
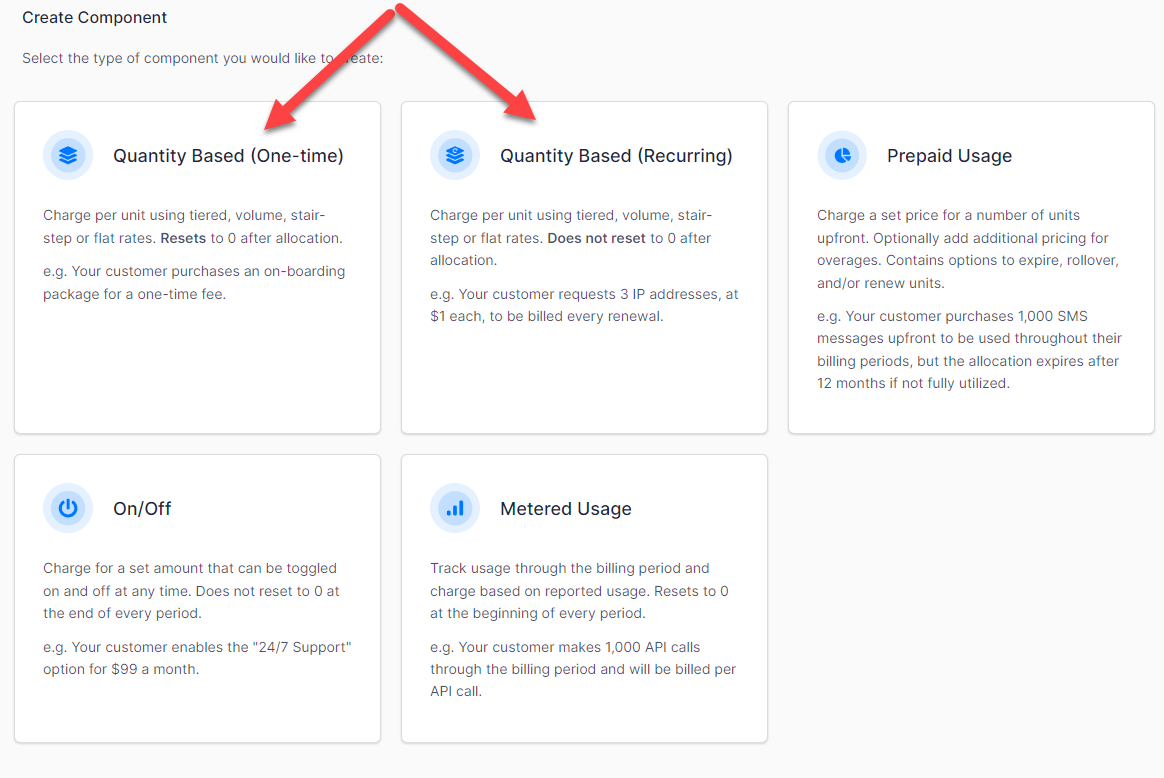
2. Select quantity-based component (one-time or recurring)
Choose whether the charge recurs each billing period or applies once.
3. Set component details
Name the component and set the identifiers, unit name and description that travel with it.
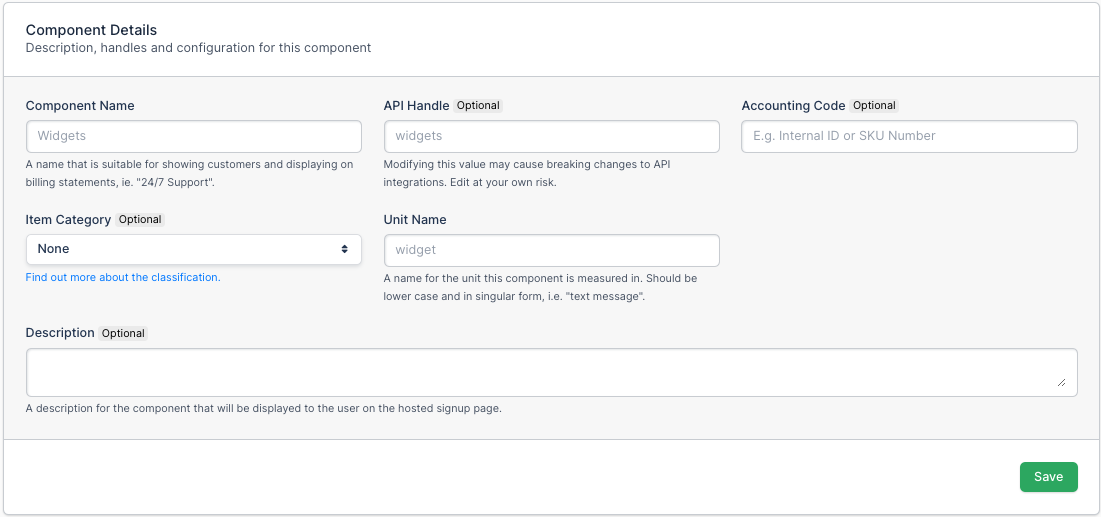
| Field | Description |
|---|---|
| Component Name | (Required) The name of your Component. This shows as a line item on your customer's invoices. |
| API Handle | (Optional) Developers can make API requests to create subscriptions that have components. They use the component's API handle in the API request. |
| Accounting Code | (Optional) A read-only field. |
| Item Category | (Optional) A read-only field. |
| Unit Name | (Required) A singular unit name. If you sell messages, enter "message" without the s. |
| Description | (Optional) A description of your Component. Shows on public signup pages and in the Billing Portal, and doesn't show on customer invoices. |
4. Create a component pricing scheme
Choose how the price scales with the quantity a customer buys.
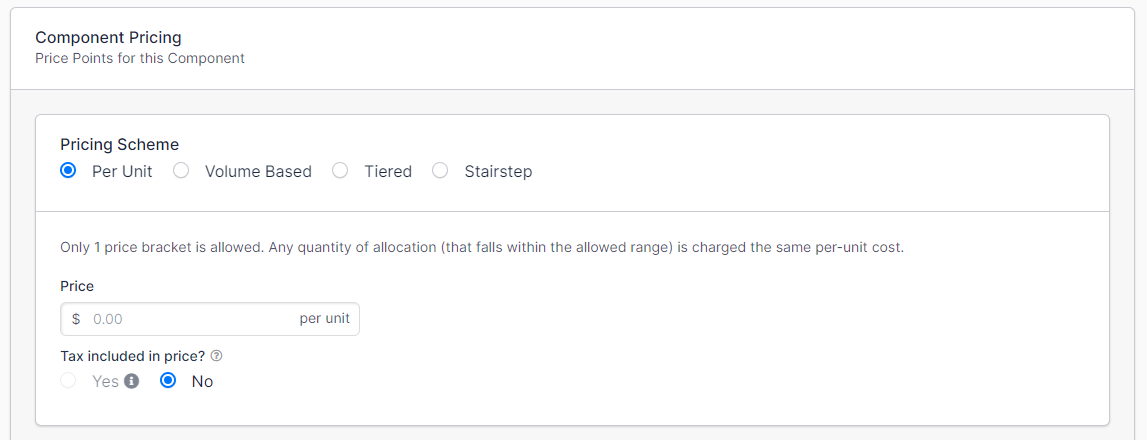
| Option | Description |
|---|---|
| Per Unit | Sets pricing to Per Unit. The component is charged at a single price per unit. |
| Volume Based | Sets pricing to Volume Based. This allows multiple price brackets. A customer who buys into a bracket is charged that bracket's price per unit. |
| Tiered | Sets pricing to Tiered. This allows multiple price brackets. A customer who buys into a bracket is charged that bracket's price per unit plus the previous bracket's price per unit. |
| Stairstep | Sets pricing to Stairstep. This allows multiple price brackets. A customer who buys into a bracket is charged a flat fee for that bracket. |
5. Set up advanced options (optional)
Configure tax treatment, Billing Portal access, and how the charge appears on invoices.
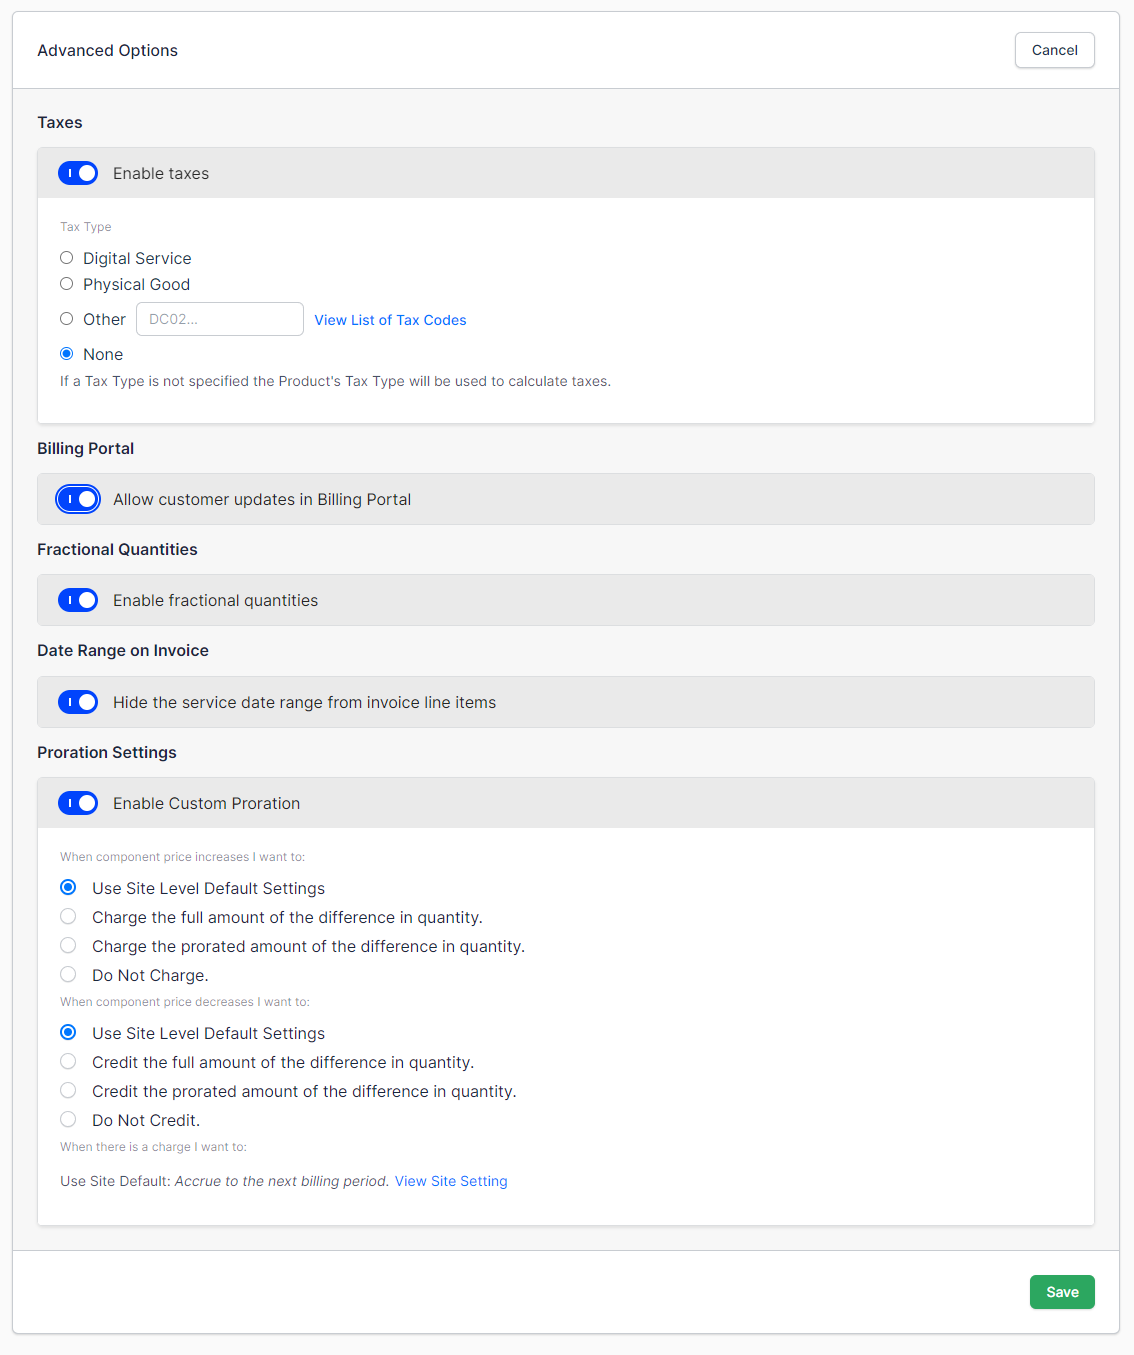
| Field | Description |
|---|---|
| Enable Taxes | Classifies the component as a Digital Service, a Physical Good, a custom tax code, or none. Taxes must be set up on the Site for this to work. |
| Billing Portal | When enabled, customers can edit this component in their Billing Portal, where applicable. |
| Fractional Quantities | Allows fractional quantities for the component. |
| Date Ranges on Invoices | Displays the date range on the invoice for this line item. |
| Proration Settings | Sets proration settings other than the default. |
Summary - Create an on/off component
- Feature
- Component
- You Need
- Access to your company's price book
- Code
- None
- Difficulty
- ◉◎◎◎◎
1. Create new component
Open the Products page and select the Components tab.
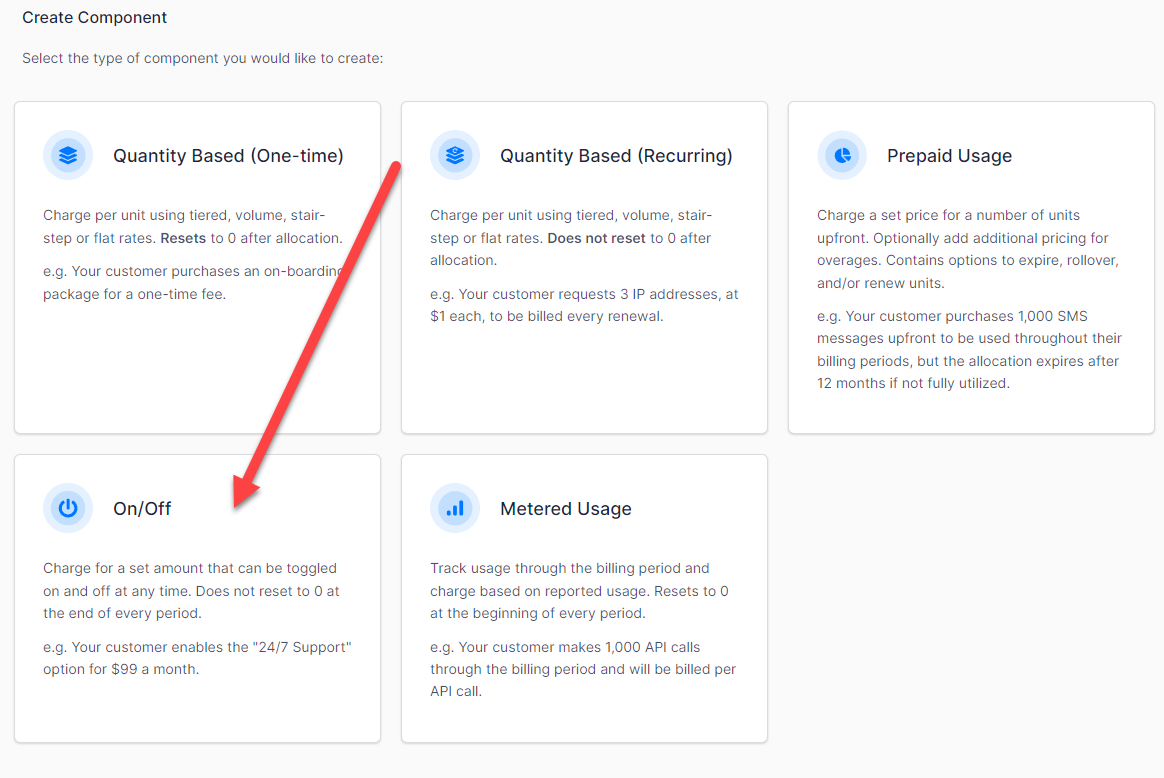
2. Select on/off component
An on/off component is either present on the subscription or not, with no quantity to set.
3. Set component details
Name the component and set the identifiers and description that travel with it.
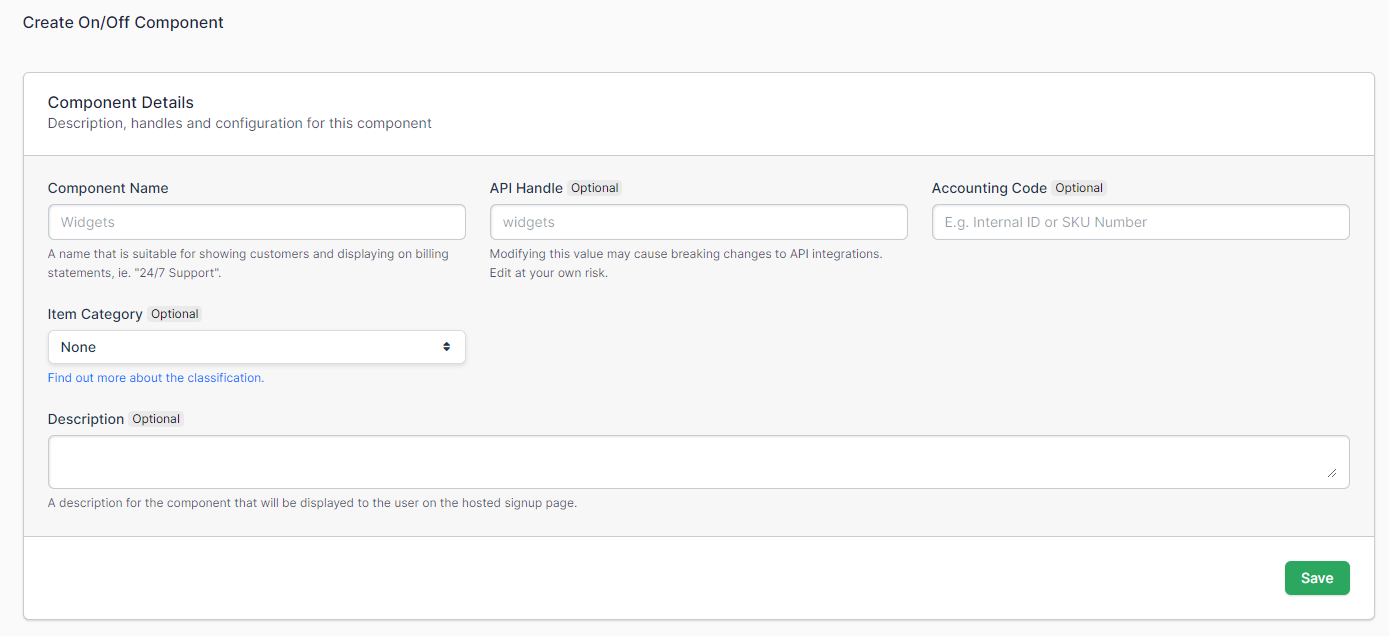
| Field | Description |
|---|---|
| Component Name | (Required) The name of your Component. This shows as a line item on your customer's invoices. |
| API Handle | (Optional) Developers can make API requests to create subscriptions that have components. They use the component's API handle in the API request. |
| Accounting Code | (Optional) A read-only field. |
| Item Category | (Optional) A read-only field. |
| Description | (Optional) A description of your Component. Shows on public signup pages and in the Billing Portal, and doesn't show on customer invoices. |
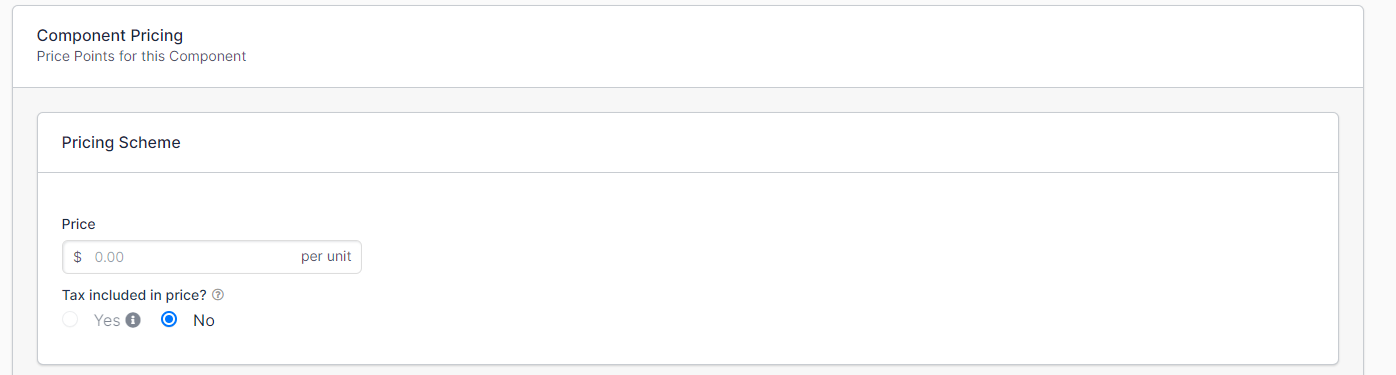
4. Set up price
An on/off component takes a single price, since there is no quantity to scale.
5. Set up advanced options (optional)
Configure tax treatment, Billing Portal access, and how the charge appears on invoices.
| Field | Description |
|---|---|
| Enable Taxes | Classifies the component as a Digital Service, a Physical Good, a custom tax code, or none. Taxes must be set up on the Site for this to work. |
| Billing Portal | When enabled, customers can edit this component in their Billing Portal, where applicable. |
| Fractional Quantities | Allows fractional quantities for the component. |
| Date Ranges on Invoices | Displays the date range on the invoice for this line item. |
| Proration Settings | Sets proration settings other than the default. |
Summary - Create a prepaid usage component
- Feature
- Component
- You Need
- Access to your company's price book
- Code
- None
- Difficulty
- ◉◎◎◎◎
1. Create new component
Open the Products page and select the Components tab.
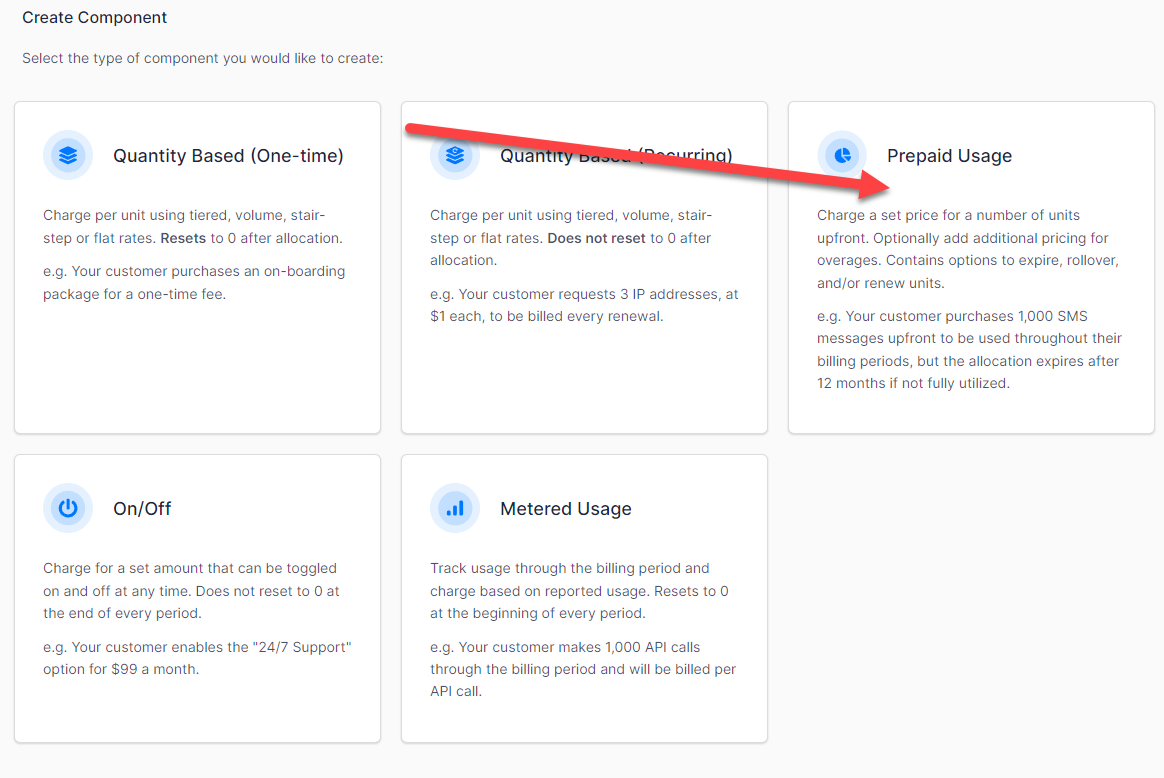
2. Select prepaid usage component
A prepaid usage component bills for usage upfront, against an allocation the customer draws down.
3. Set component details
Name the component and set the identifiers, unit name and description that travel with it.
| Field | Description |
|---|---|
| Component Name | (Required) The name of your Component. This shows as a line item on your customer's invoices. |
| API Handle | (Optional) Developers can make API requests to create subscriptions that have components. They use the component's API handle in the API request. |
| Accounting Code | (Optional) A read-only field. |
| Item Category | (Optional) A read-only field. |
| Unit Name | (Required) A singular unit name. If you sell messages, enter "message" without the s. |
| Description | (Optional) A description of your Component. Shows on public signup pages and in the Billing Portal, and doesn't show on customer invoices. |
4. Create a component pricing scheme
Choose how the price scales with the quantity a customer prepays for.
| Option | Description |
|---|---|
| Per Unit | Sets pricing to Per Unit. The component is charged at a single price per unit. |
| Volume Based | Sets pricing to Volume Based. This allows multiple price brackets. A customer who buys into a bracket is charged that bracket's price per unit. |
| Tiered | Sets pricing to Tiered. This allows multiple price brackets. A customer who buys into a bracket is charged that bracket's price per unit plus the previous bracket's price per unit. |
| Stairstep | Sets pricing to Stairstep. This allows multiple price brackets. A customer who buys into a bracket is charged a flat fee for that bracket. |
5. Set up unit options
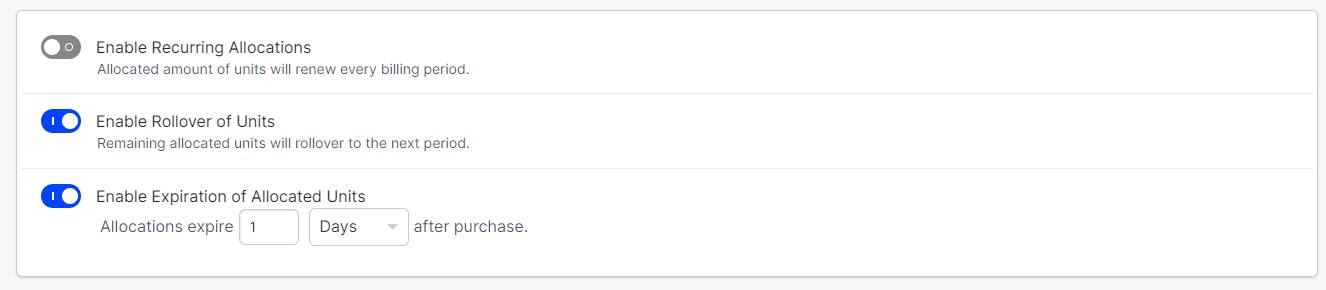
Control whether the allocation renews, and what happens to units the customer doesn't use.
| Option | Description |
|---|---|
| Enable Recurring Allocations | Allows the allocated amount to renew every billing period. |
| Enable Rollover of Units | Allows any leftover units to carry over into the next billing period. |
| Enable Expiration of Allocated Units | Only applicable if Enable Rollover of Units is enabled. Sets an expiration timer for the rollover units. |
6. Set up overage pricing
Set what a customer pays for usage beyond their allocation. The pricing schemes are the same ones offered for the base price.
| Option | Description |
|---|---|
| Per Unit | Sets pricing to Per Unit. The overage is charged at a single price per unit. |
| Volume Based | Sets pricing to Volume Based. This allows multiple price brackets. A customer who buys into a bracket is charged that bracket's price per unit. |
| Tiered | Sets pricing to Tiered. This allows multiple price brackets. A customer who buys into a bracket is charged that bracket's price per unit plus the previous bracket's price per unit. |
| Stairstep | Sets pricing to Stairstep. This allows multiple price brackets. A customer who buys into a bracket is charged a flat fee for that bracket. |
7. Set up advanced options (optional)
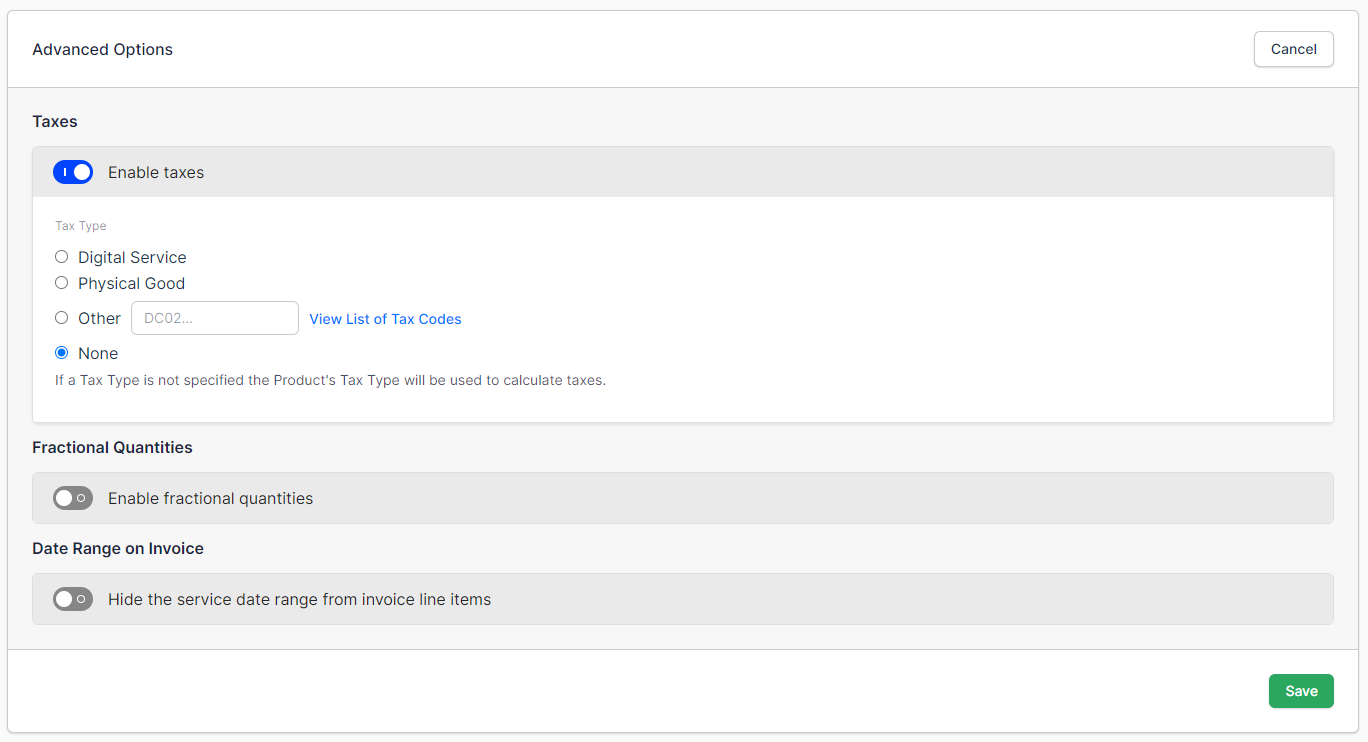
Configure tax treatment and how the charge appears on invoices.
| Field | Description |
|---|---|
| Enable Taxes | Classifies the component as a Digital Service, a Physical Good, a custom tax code, or none. Taxes must be set up on the Site for this to work. |
| Fractional Quantities | Allows fractional quantities for the component. |
| Date Ranges on Invoices | Displays the date range on the invoice for this line item. |
Summary - Create a metered usage component
- Feature
- Component
- You Need
- Access to your company's price book
- Code
- None
- Difficulty
- ◉◎◎◎◎
1. Create new component
Open the Products page and select the Components tab.
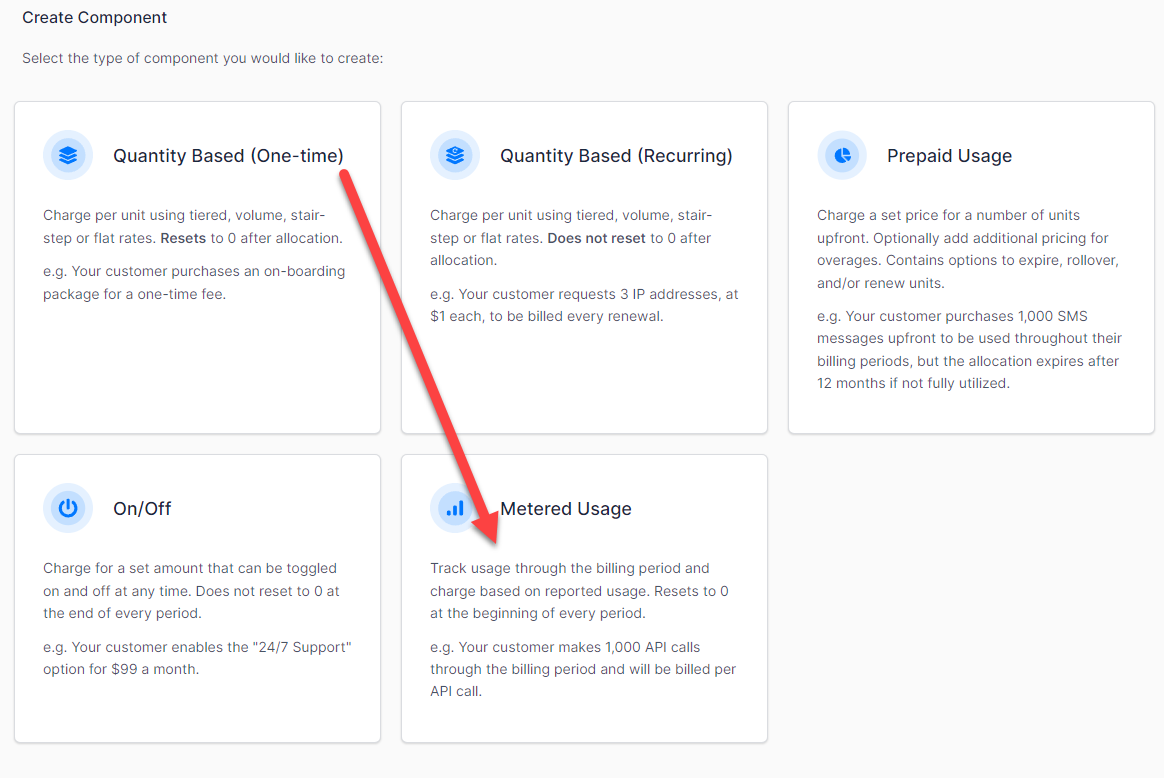
2. Select metered usage component
A metered usage component bills in arrears for usage recorded against a meter.
3. Set component details
Name the component, set its identifiers and unit name, and choose the meter that feeds it.
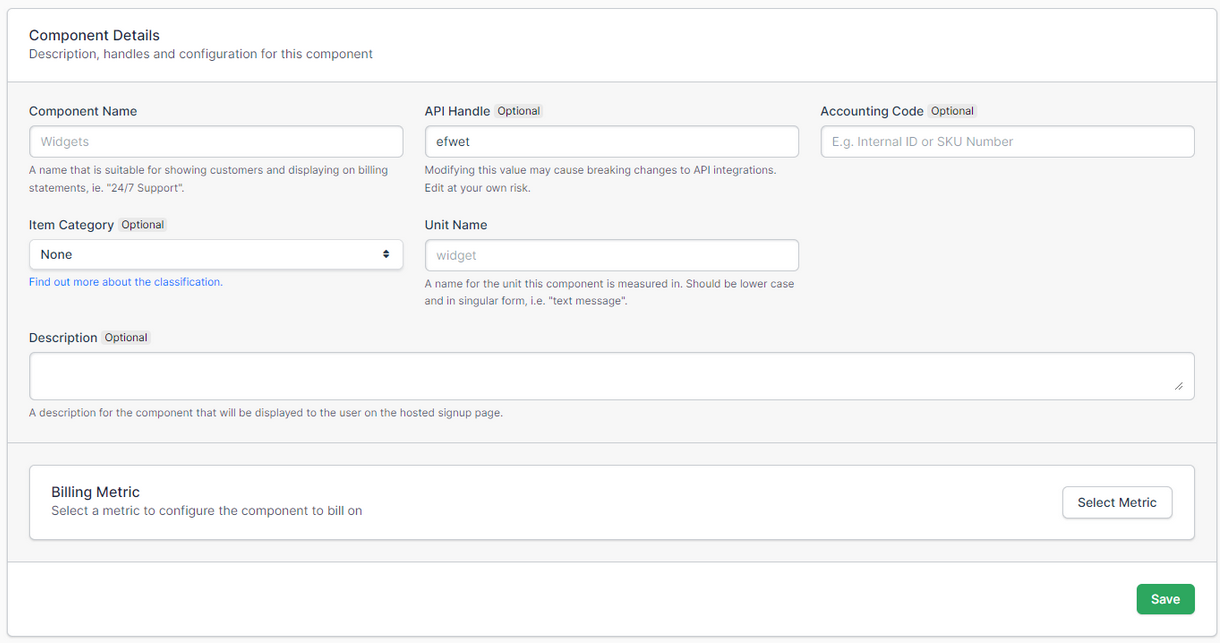
| Field | Description |
|---|---|
| Component Name | (Required) The name of your Component. This shows as a line item on your customer's invoices. |
| API Handle | (Optional) Developers can make API requests to create subscriptions that have components. They use the component's API handle in the API request. |
| Accounting Code | (Optional) A read-only field. |
| Item Category | (Optional) A read-only field. |
| Unit Name | (Required) A singular unit name. If you sell messages, enter "message" without the s. |
| Description | (Optional) A description of your Component. Shows on public signup pages and in the Billing Portal, and doesn't show on customer invoices. |
| Billing Meter | Set the meter you want to use for this component. |
4. Create a component pricing scheme
Choose how the price scales with the usage a customer records.
| Option | Description |
|---|---|
| Per Unit | Sets pricing to Per Unit. The component is charged at a single price per unit. |
| Volume Based | Sets pricing to Volume Based. This allows multiple price brackets. A customer who buys into a bracket is charged that bracket's price per unit. |
| Tiered | Sets pricing to Tiered. This allows multiple price brackets. A customer who buys into a bracket is charged that bracket's price per unit plus the previous bracket's price per unit. |
| Stairstep | Sets pricing to Stairstep. This allows multiple price brackets. A customer who buys into a bracket is charged a flat fee for that bracket. |
5. Set up advanced options (optional)
Configure tax treatment and how the charge appears on invoices.
| Field | Description |
|---|---|
| Enable Taxes | Classifies the component as a Digital Service, a Physical Good, a custom tax code, or none. Taxes must be set up on the Site for this to work. |
| Fractional Quantities | Allows fractional quantities for the component. |
| Date Ranges on Invoices | Displays the date range on the invoice for this line item. |
Related information
To set up the meter a metered usage component reads from, see the Get Started with Maxio Metering help article.
Still need help?
Reach out and our support team will take it from here.