
Manage Branding Themes
Last updated on Aug 25, 2026
View and organize all Branding Themes from a central dashboard. Compare Published and Unpublished themes, edit settings, and take lifecycle actions from a single workspace.
Go to Config > Branding to manage your Branding Themes.
Understand theme status and actions
Published themes are typically used for assignment in billing workflows, depending on your configuration. Unpublished themes remain available for editing until you are ready to publish them.
Actions let you delete, clone, edit, or manage the lifecycle of a theme.
Switch between published and unpublished themes
The themes list is grouped by status so you can quickly filter what you need. Use the Published and Unpublished tabs to move between them.
Review each theme tile
Each theme tile shows key details so you can review status and usage without opening the theme. This makes the list useful for quick management tasks.
- Theme preview image
- Theme name
- Last edited date
- Customer count
Open the Customer list
If a theme has assigned Customers, its Customer count becomes a link you can open to see a Customer list filtered to that theme.
Create a new theme
Click Add Brand Theme to create another theme. New themes typically appear in Unpublished until you publish them.
Use the actions on each tile
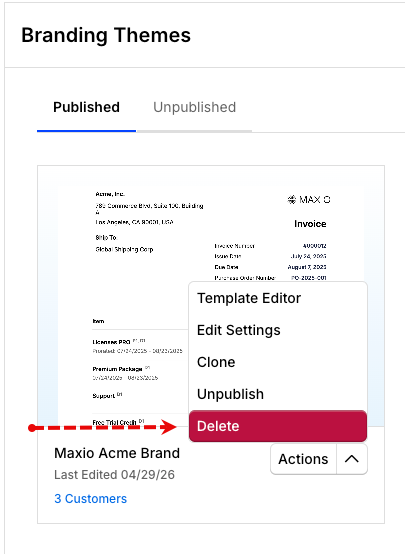
Each tile includes quick actions for editing and lifecycle management. Click Actions to access the dropdown menu:
- Template Editor for managing the look and feel
- Edit Settings for updating the name and logo
- Clone to duplicate the theme
- Publish or Unpublish to manage the lifecycle of the theme
- Delete to permanently remove the theme
Clone a theme
Cloning quickly duplicates an existing Branding Theme. The clone appears in the Unpublished tab by default.
Publish a theme
Publishing makes an unpublished theme available for use and moves it into the Published tab. Use this when the theme is ready to be assigned in live workflows.
To publish a theme
- On the Unpublished tab, select a Branding Theme.
- Click Actions.
- Click Publish.
Unpublish a theme
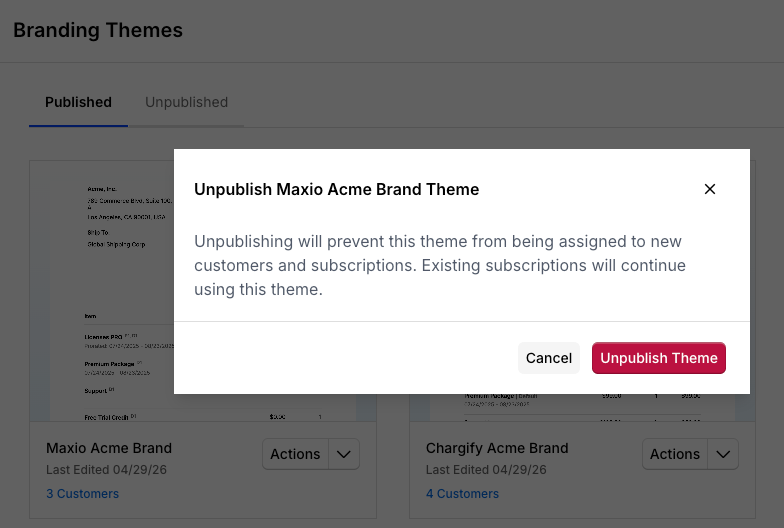
Unpublishing moves the theme back into Unpublished and prevents it from being assigned to new Customers and Subscriptions. Existing Subscriptions continue using the theme. The theme remains available for editing after it is unpublished.
To unpublish a theme
- On the Published tab, select a Branding Theme.
- Click Actions.
- Click Unpublish.
- Confirm the action with Unpublish Theme.
Delete a theme
WARNING: Deleting a theme permanently removes it. This is different from unpublishing, and it cannot be undone. Any Customer or Subscription the theme was assigned to loses that assignment; their Invoices use the next applicable theme, or Advanced Billing's standard, non-themed template if none applies.
To delete a theme
- Select a Branding Theme.
- Click Actions.
- Click Delete.
- Confirm the action with Delete Theme.
How themes are applied
For the full theme assignment hierarchy, see Understand Branding Themes.
Lifecycle actions affect how themes appear and may influence how they are used in future workflows. Existing Subscriptions may continue using their assigned theme unless you update those assignments.
- Unpublished themes are not available for new assignments.
- Deleting a theme removes its assignment from any Customer or Subscription that had it; their Invoices use the next applicable theme, or Advanced Billing's standard, non-themed template if none applies.
Related information
To design and publish your first theme, see Create a Theme.
To change an existing theme's colors, fonts, language, or logos, see Update Theme Settings.
Before publishing your changes, see Preview a Theme Before Publishing to check how they appear to Customers.
Still need help?
Reach out and our support team will take it from here.