
Understand Public Signup Page Details
Last updated on Sep 19, 2026
Advanced Billing’s Public Signup Pages let you sell products and services through your website or a direct email link. Display a purchase option wherever you want, then redirect potential subscribers to a Public Signup Page to complete the sale. Advanced Billing collects their signup information and processes the transaction through your gateway.
Sell without a developer
Advanced Billing provides Public Signup Pages for our merchants who would like an alternative to integrating with our application via API. When a potential subscriber wishes to purchase a product, direct them to a Public Signup Page. This will allow them to complete the sale, and let Advanced Billing process the signup and transaction via your gateway.
Public Signup Pages display a clean, easy to read signup form for subscribers viewing on a web browser. If they're accessing via a mobile device, Advanced Billing detects this dynamically and serves up the mobile-optimized version of the Public Signup Page. No coding experience necessary.
See an example signup
- Joe arrives at the website for
http://www.example.com - He decides to purchase the Gold Product and selects Purchase Now from
http://www.example.com/buynow - He’s redirected to an Advanced Billing-hosted Public Signup Page that depicts all of the charges for the product he wishes to purchase
- He enters the required info
- The sale is completed
Explore a Public Signup Page section by section
In the examples below, we’ll break down a Public Signup Page into individual sections. Each section deals with the origins of what is displayed on the Public Signup Page, plus how to edit and control the content.
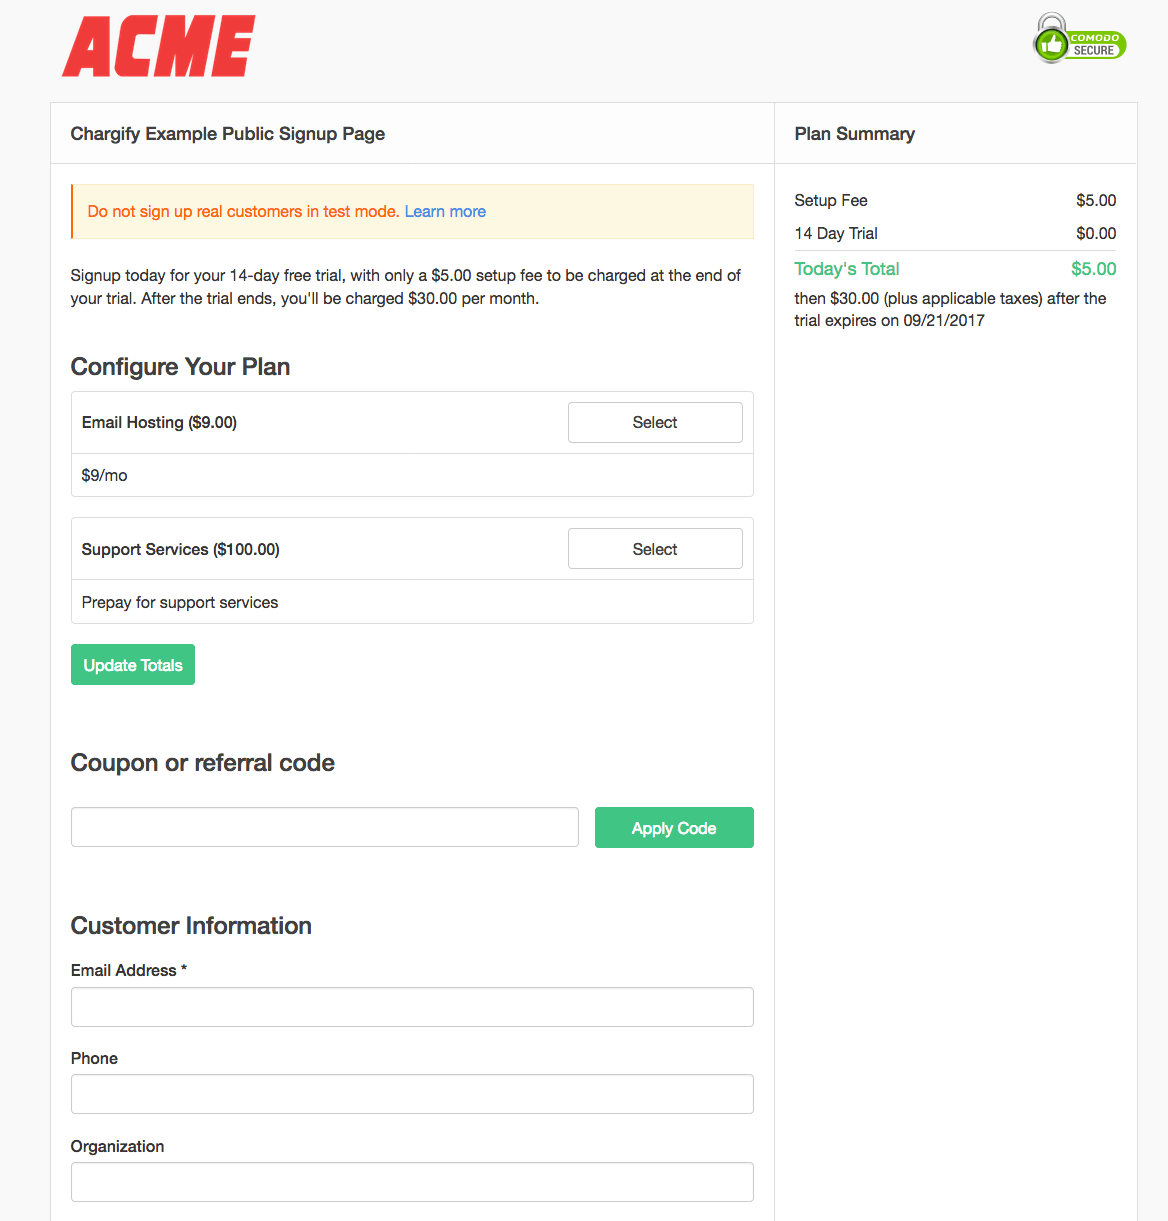
Page title
In our example, Advanced Billing Example Public Signup Page is the page title of this Public Signup Page. To edit or change the page title, edit the Public Signup Page by following the instructions in Set a page title.
Product description
In our example, the description is:
Signup today for your 14-day free trial, with only a $5.00 setup fee to be charged at the end of your trial. After the trial ends, you’ll be charged $30.00 per month.
The product description that appears in the Public Signup Page is lifted from the content used to create the product for sale. Visit the edit page for the product to control or edit this information; see Creating Plans.
Public Signup Pages are built to support the sale of one product from your Advanced Billing Site. You can elect to add as many add-on components and custom fields to your Public Signup Page. It’s also important to display clear information to your potential subscriber so that they understand which product they are purchasing, and any other details about the product. This will lessen any questions for your support team after the signup process has ended.
Beyond the description, potential subscribers also see other product details, such as:
- Trial period and setup fee, if applicable (see Setting Up Plan Price Points)
- Tax information (see Creating Plans)
- Billing date (see Understand Calendar Billing)
The Configure Your Plan section
When your subscriber purchases a product through your Public Signup Page, you can also offer them the option to purchase additional components, or add-ons. Use components to give your subscriber additional purchase options. For more information about components, see Understanding Product Settings.
If you enable a set of components on your Public Signup Pages, a subscriber will have the option to customize their purchase:
- Entering the quantity of quantity-based components to purchase
- Entering the quantity of metered-based components to purchase
- Toggling on/off components
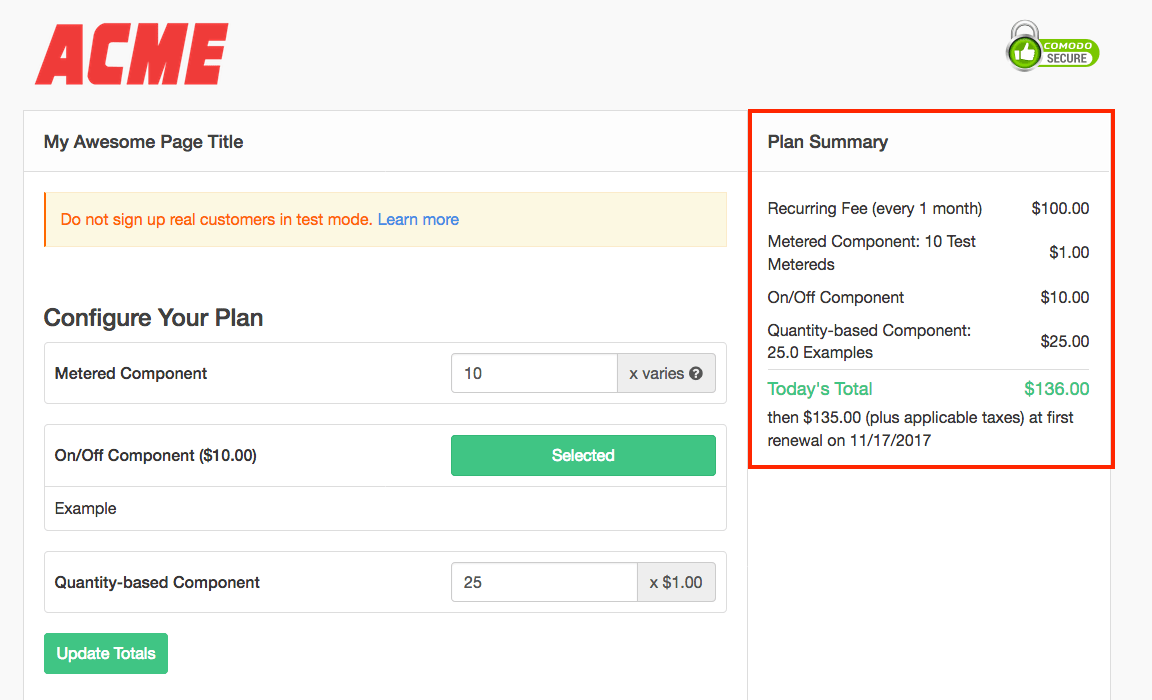
Subscribers must select Update Totals in order for the Plan Summary information to reflect accurate pricing.
Choose which components display
In order for components to display on a Public Signup Page, select the desired component you wish to display from the edit page of the Public Signup Page. For more information, see Configure components.
In the example below, we see that the following components have been added to a subscription:
- 10 Metered Components
- 1 On/Off Component
- 25 Quantity-based Components
If a subscriber wishes to add/remove components to their current purchase, they must enter the new amount and select Update Totals in the Public Signup Page. Once the new amount has been entered, the amount calculated in the Plan Summary will reflect the new changes.
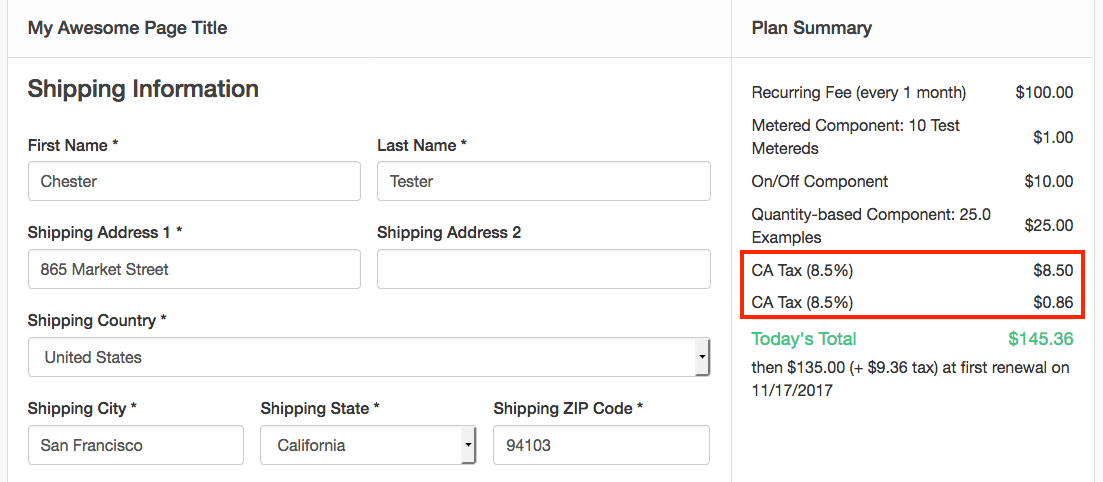
Show tax information
If your Configure Custom Taxes and Creating Plans settings are configured to collect taxes from a subscriber, the amount due for taxes will be clearly broken down in a Public Signup Page for your subscriber to view and understand. This breakdown provides your subscriber with a clear view of what taxes are due based on their locale.
VAT number
For EU based merchants, there are a few things to keep in mind if you wish to display a field for an EU resident to enter their VAT number. This would be useful in the situation where your subscriber’s VAT number exempts them from paying a tax on the subscription purchase.
The following is a list of prerequisites for displaying the VAT number collection field on a Public Signup Page:
- You must enter a valid EU address for your tax origin address in Advanced Billing
- You must specify a group of EU countries in which to collect VAT
- The Public Signup Page must be for a taxable product
- Tax will be applied when your subscriber completes the shipping or billing address
- Advanced Billing uses the billing or shipping address to determine the VAT amount that will display on the Public Signup Page
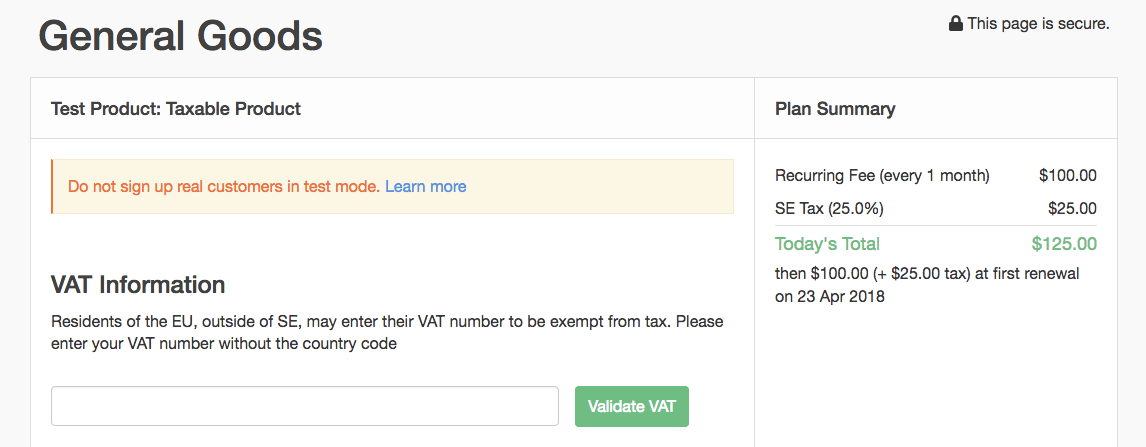
In some cases, a valid VAT number will not exempt a purchase from taxes. In this case, the subscriber will receive a specific message citing the VAT number’s country of origin and a message as depicted below:
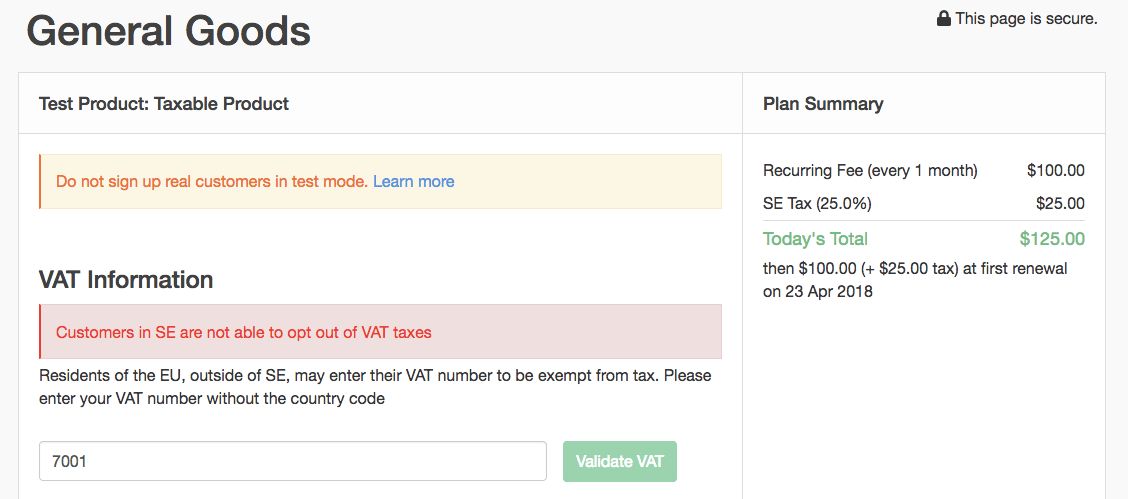
For more information on VAT numbers for subscribers within your account, see View Customer Information.
Display coupon codes
If you would like to have a coupon displayed on your Public Signup Page, you must enable the option in the page. For more information, see Display a coupon field.
Redeem a coupon or referral code
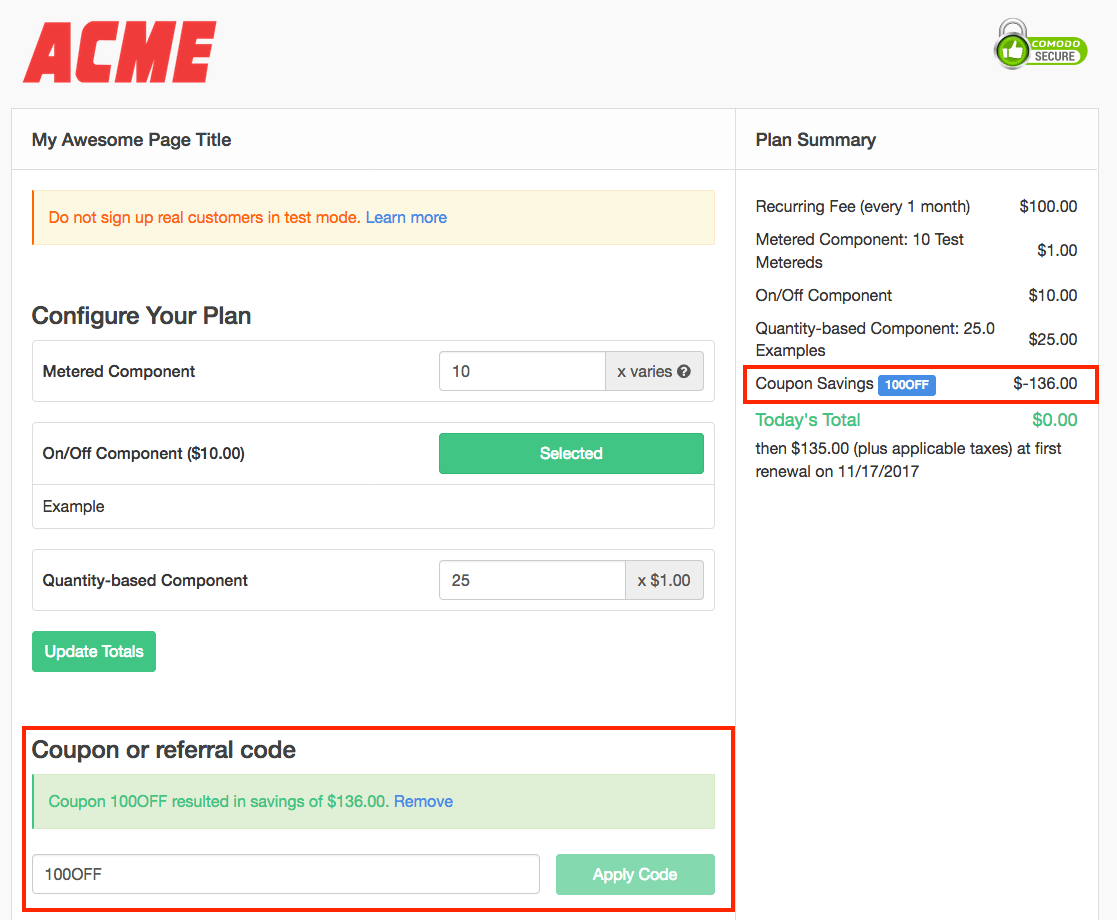
A subscriber is given the option to enter an Advanced Billing generated coupon code in order to obtain a discount before purchase. After a user supplies a code, they can select Apply Code to check the validity of the code. If the code is valid, it will automatically be applied to the Plan Summary.
- The amount of the discount will be reflected in the Plan Summary for the Public Signup Page.
- If need arises to remove the discount from the subscription, select Remove next to the validated coupon code.
- Only one coupon code may be added to a subscription via a Public Signup Page at this time.
- You may add multiple subscriptions to a subscription via the application or via API.
Referral codes
To display a referral code on your Public Signup Page, enable the option to display this checkbox to your subscribers. See Display a referral field.
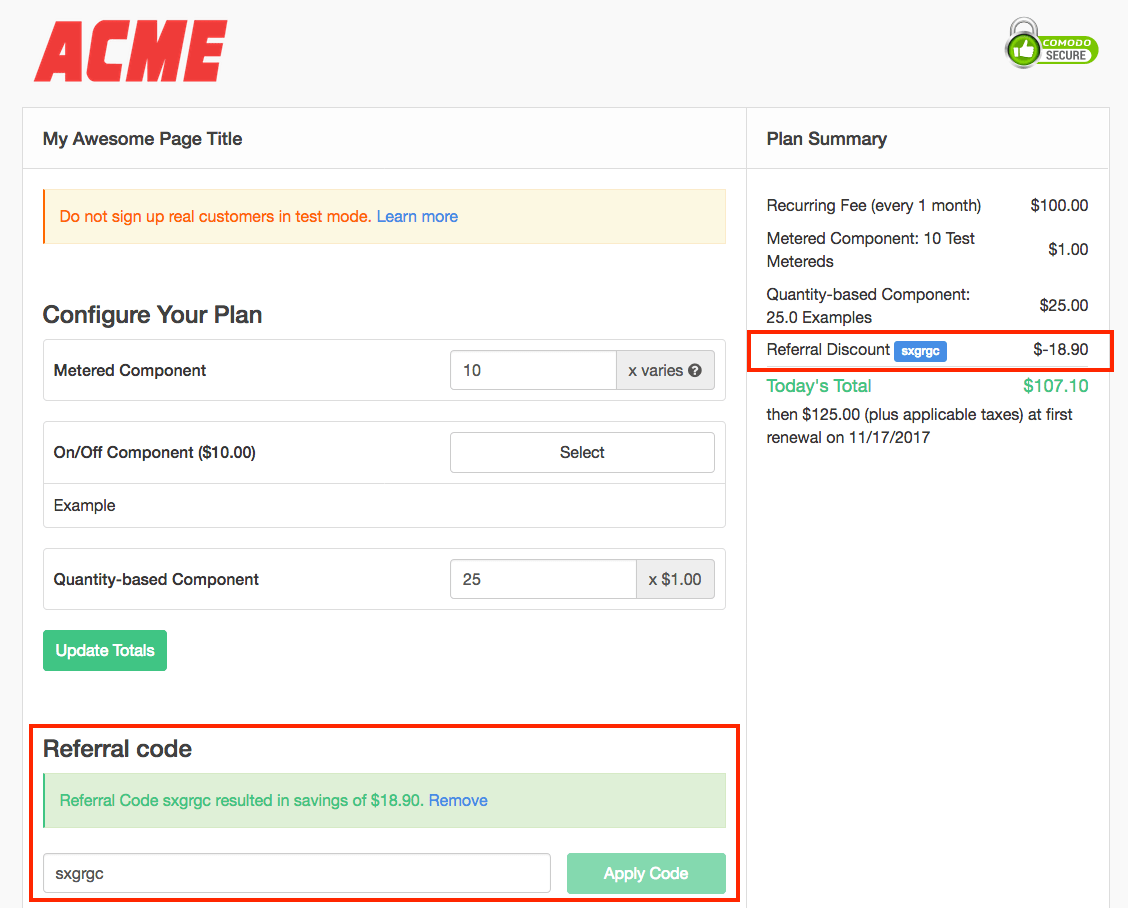
When a subscriber enters a referral code, they must select Apply Code to check its validity. If a successful referral code has been entered, the discount will appear under the Plan Summary for the subscription.
Coupon and referral code limits
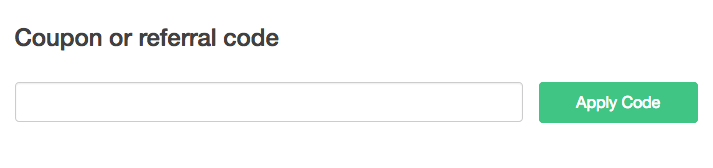
You may only allow a coupon OR a referral code to be entered at the time of signup. More than one discount code cannot be applied to a subscription.
If you’ve selected to display the coupon code and the referral code on your Public Signup Page, only one field will appear. A subscriber may enter a coupon code or a referral code in this field.
Collect customer information
When a subscriber enters information under the subheader titled "Customer Information," this data is used to create an entry in the customer tab of your Site. It’s important to understand the relationship between customer data and subscription data in your Advanced Billing account. For a quick overview of the differences between customer and subscription entries, see View Customer Information.
Collect shipping information
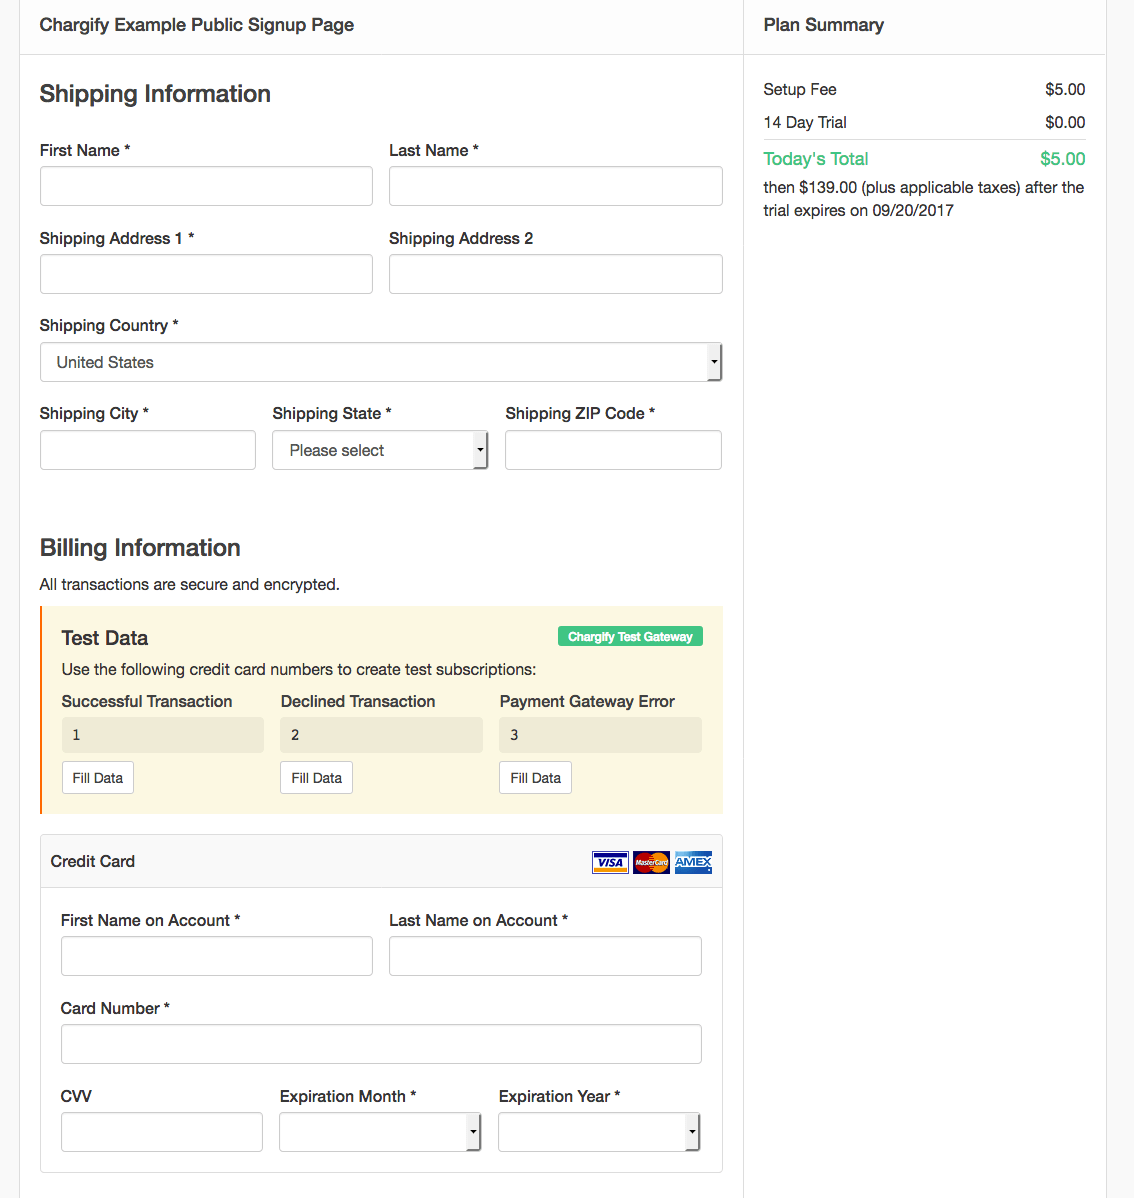
When a potential subscriber enters shipping information, the shipping information is stored with the subscription, as part of the customer details. For more information on customer details, see View Customer Information.
Collect billing information
The Billing Information portion of the Public Signup Page is very straightforward. This is the part of the signup process where Advanced Billing securely collects your subscriber’s payment information. From here, we transfer this information directly to your gateway.
In the example shown, test gateway information is shown as a courtesy to aid in testing your Public Signup Page. No need to use real credit card numbers. Simply use the supplied test data to complete transactions.
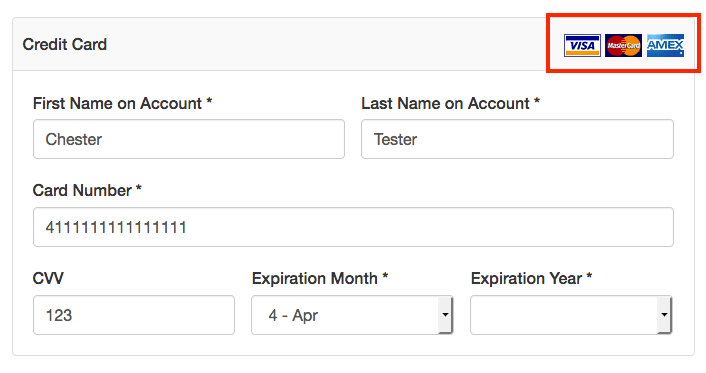
Display credit card badges
Your Public Signup Page can indicate what types of credit card your merchant gateway can accept. Configure these to clearly indicate what types of cards you are willing to accept.
To display a set of specific credit card badges, select the types of cards in your default Configuring Public Page Default Settings.
Indicating which cards you would prefer to accept via Advanced Billing will not restrict what cards a subscriber can enter via a Public Signup Page. For full control of which cards your gateway will accept, contact your gateway for further instructions on how to accomplish this.
Collect a billing address
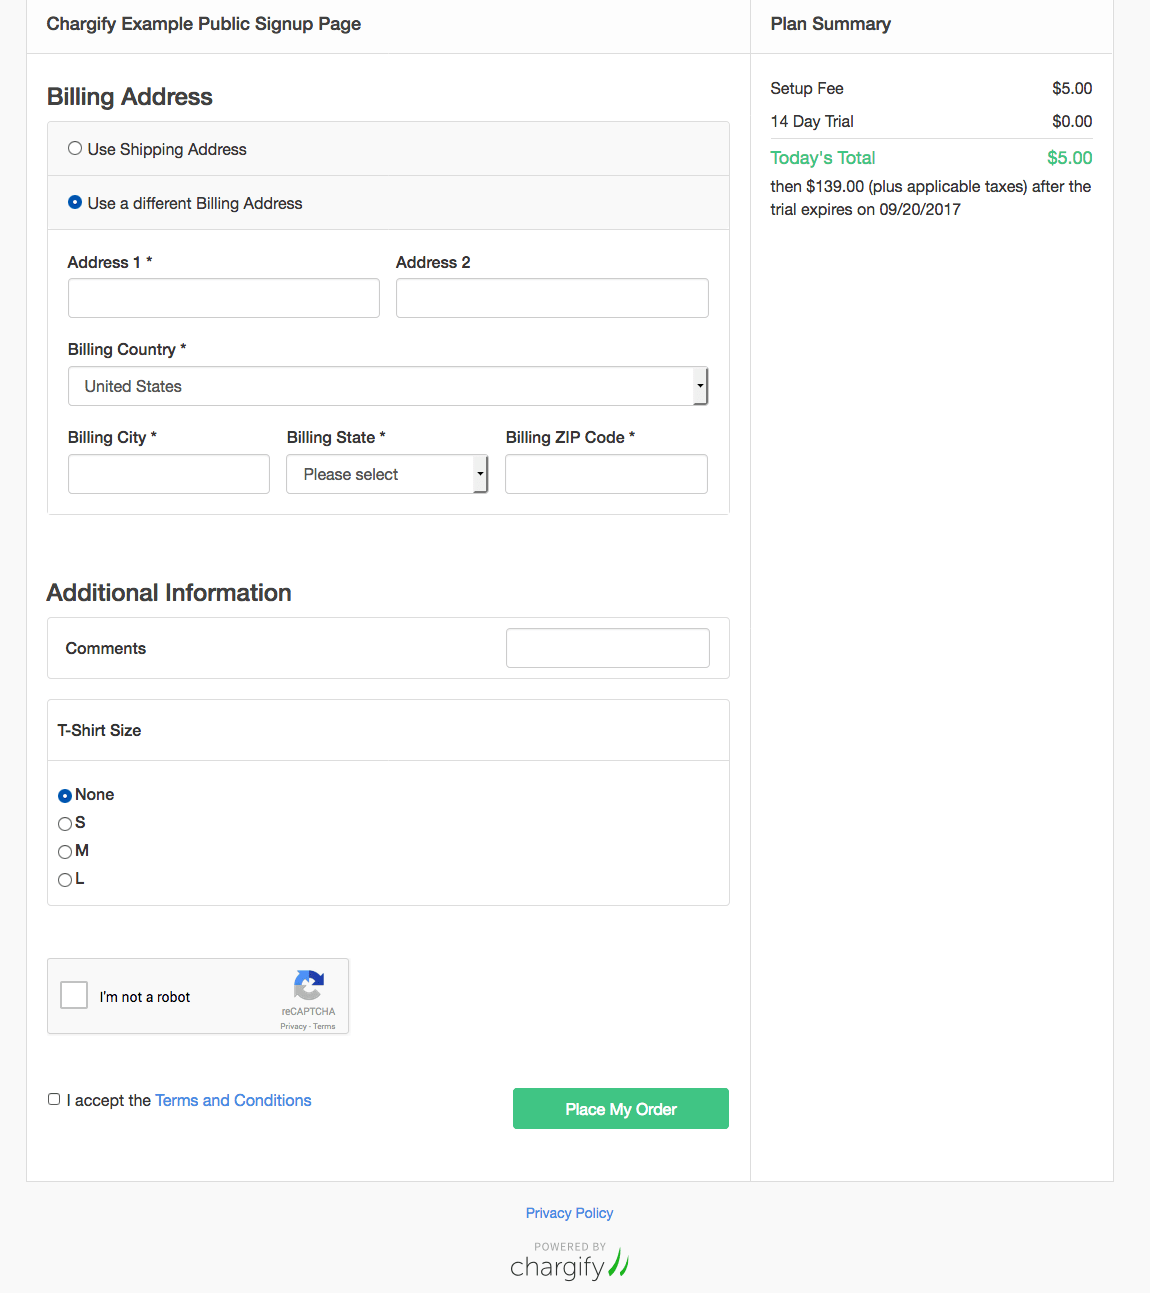
If provided, subscribers have the option of using the Shipping Address as the billing address, or to provide an alternate address.
AVS (Address Verification Service), as provided by your gateway, plays an important role here. When your subscriber provides a billing address, this information is sent on to the gateway to verify that the billing address matches the cardholder’s information. For more information and suggestions on how AVS should be configured for your gateway, see Quickpay Gateway Setup Guide.
Switch payment methods without losing entered details
If a subscriber changes their mind about how they want to pay — for example, switching from Credit Card to Direct Debit — the page keeps the customer information and billing address they already typed. A brief loading indicator appears while the page updates, and everything they entered, including their name, customer details, and billing address, reappears once the new payment method's fields are ready. Choosing "Use a different Billing Address" also survives the switch, rather than reverting to the shipping address.
Card numbers, bank account and routing numbers, and other sensitive payment details are never retained across a switch. Manually reloading the page, rather than switching payment methods, still starts the form over from empty.
Accept PayPal signups
If you are using the Braintree gateway which supports payment via PayPal, a subscriber can elect to pay via PayPal on your Public Signup Page. The subscriber must select PayPal at the Billing Information section.
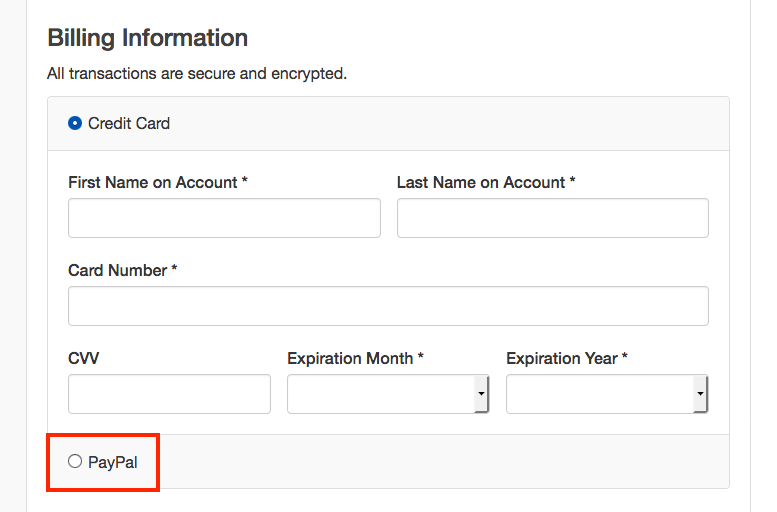
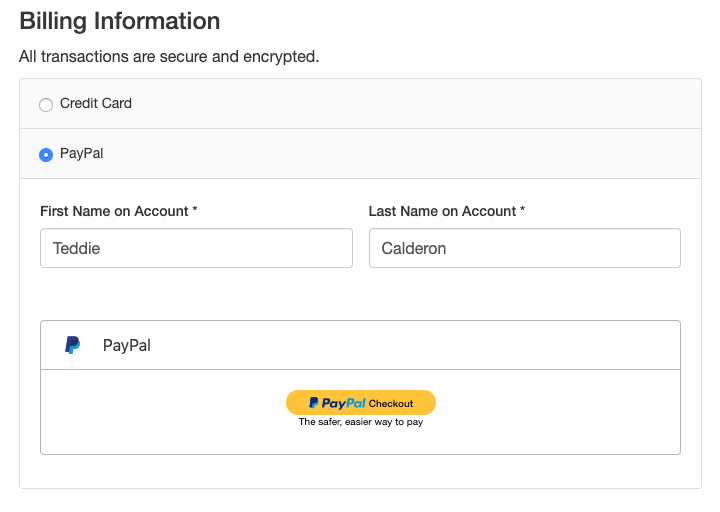
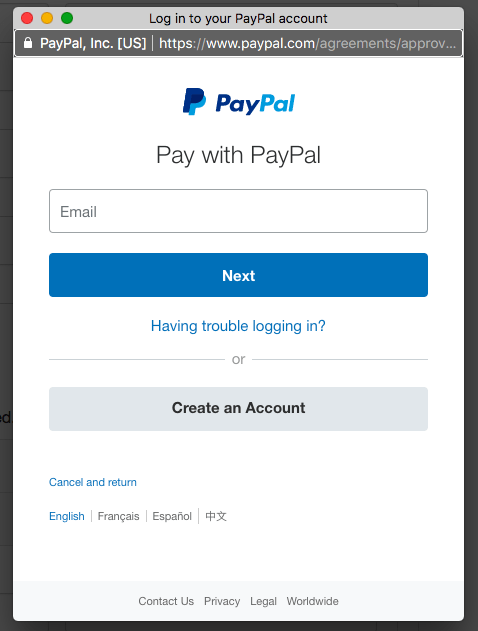
After selecting PayPal, a pop-up will appear where the subscriber can enter their PayPal credentials. Afterwards, they will return back to the Public Signup Page to complete the order.
Collect additional information
Subscribers are given the option towards the end of the signup process to provide additional information about their purchase. Use custom fields to collect information that’s in relation to your product, helpful feedback about your product, or any other information that’s important to track during this stage of the subscription lifecycle.
Custom fields can be displayed on a Public Signup Page. As a merchant, you must enable them to appear. For more information on how to configure custom fields to display on Public Signup Pages, see Configure custom fields.
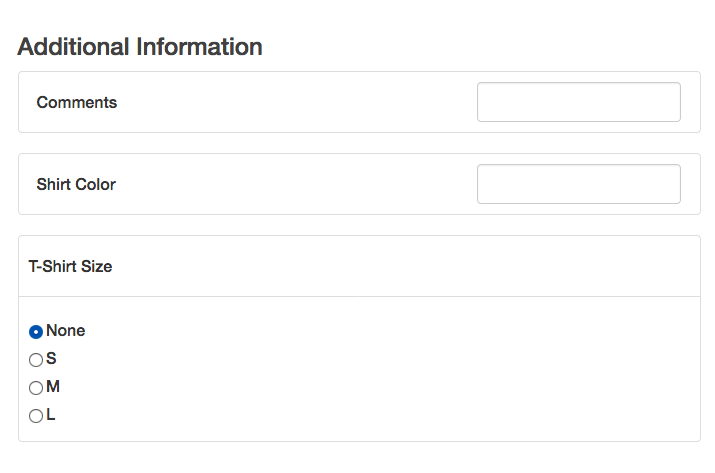
Your subscriber has the option to enter in any additional information that’s relevant to the subscription purchase.
Show a receipt page
Once the signup process is complete, your subscriber will receive a confirmation of their purchase in the form of a receipt page. An example page below:
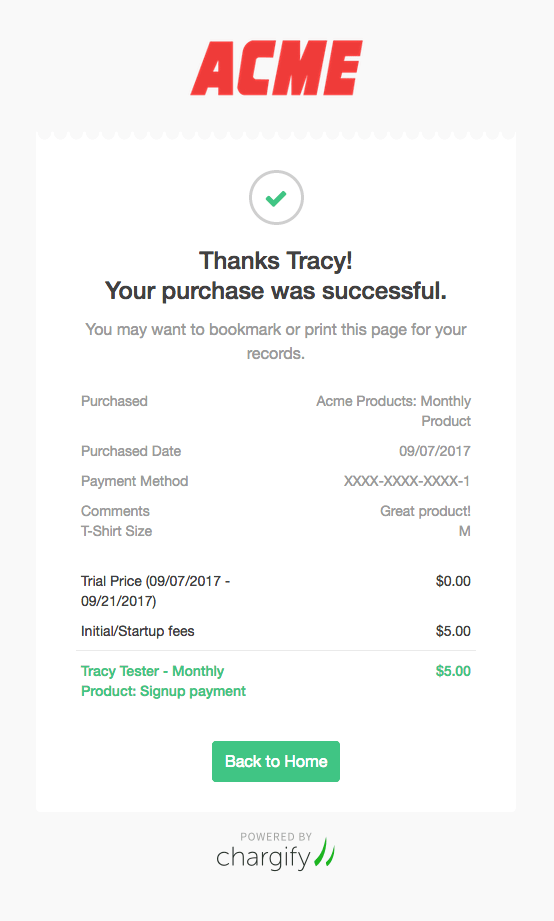
The confirmation page is automatically generated from data received during the signup process. The information included in the confirmation page will vary based on product purchased and price.
If your subscriber signs up for a $0 product, the receipt page will not include a line item for a signup payment. Instead, a line item will appear for the product name and billing period only.
You can circumvent the redirect to the signup page by adding a Return URL after successful signup. If a redirect is added, the confirmation page will not be shown.
Add coupons, referrals, and custom fields
In addition to purchasing a product, you can also amend the data you collect through Public Signup Pages with any of the following:
- Custom fields for collection of additional data
- Coupons
- Referrals
Customize the page
Public Signup Pages can be customized from a design perspective. Signup Pages can also be customized to omit certain data points, or restructure the layout of information. Advanced Billing offers a set of basic fields to edit the text of your Public Signup Pages.
If you’re looking to customize the Public Signup Pages to match the branding efforts of your organization, or simply change the layout, this can be accomplished using JavaScript and CSS. We’ve published a host of sample code to get you started. For a list of customization options, plus CSS classes and IDs, see Customize a Modern Public Signup Page with JavaScript and CSS.
Pre-populate subscriber data
Advanced Billing allows you to easily pre-populate subscriber data with any relevant data that may have been collected from your signup funnel. This can be an excellent addition to any Public Signup Page to make signups easy for your potential subscribers.
See Pre-populate a Public Signup Page via URL Parameters for further information.
Understand PCI compliance
With Public Signup Pages, Advanced Billing handles all of your subscriber’s credit card data securely. Advanced Billing is PCI DSS Level 1 Compliant.
For more information on PCI Compliance and SAQ FAQ for merchants, see Understand PCI Compliance.
After signup
When a subscriber completes a signup via a Public Signup Page, a subscription entry will be created in your Advanced Billing account. This information is broken down into two categories, subscription information and customer information. This information is stored securely in your Advanced Billing account, on a site-by-site basis.
Limitations
There are a few customizations that currently are not possible with Public Signup Pages. If your business would like to make use of one of these, we recommend exploring Understand Maxio.js for signups.
The following are not supported:
- Changing the domain, hostname, or URL; the Public Signup Page must always be your Advanced Billing site’s subdomain on
chargifypay.com - Changing the favicon
- CORS
- iframes
Still need help?
Reach out and our support team will take it from here.