
Choose the Right Billing Model
Last updated on Aug 27, 2026
Maxio’s Advanced Billing offers flexible tools to support a wide range of subscription and product pricing models. This guide brings together many billing scenarios—from simple recurring charges to complex, usage-based, and bundled configurations—so you can quickly match your setup to your business needs. Each scenario includes a short description, step-by-step instructions, and examples to help you create products and components that align with your pricing strategy. Whether you’re just starting out or fine-tuning an advanced setup, this single reference will help you choose, configure, and launch the right billing approach for your customers.
Basic recurring
When to use: Use when you want to bill customers automatically on a set interval (e.g., monthly, annually) for the same amount. Common for SaaS subscriptions, memberships, or service retainers.
Once you’ve done this, future subscribers can sign up for your product by using a Public Signup Page and will be billed on a recurring basis if indicated.
Basic recurring with taxes
When to use: Same as Basic Recurring, but for situations where you must collect sales tax or VAT.
- Create a product
- When defining your product, make the product subject to taxes
- Enable taxes for your site
Using taxes with Advanced Billing requires you to request/require a billing or shipping address. For more information on how to create a taxable subscription, please see Understand Tax Options.
Recurring with fixed setup fee
When to use: When a one-time onboarding or implementation fee should be charged at the start of a subscription. Example: Professional services setup for a SaaS account.
- Create a product
- Define a setup fee and when it should be charged
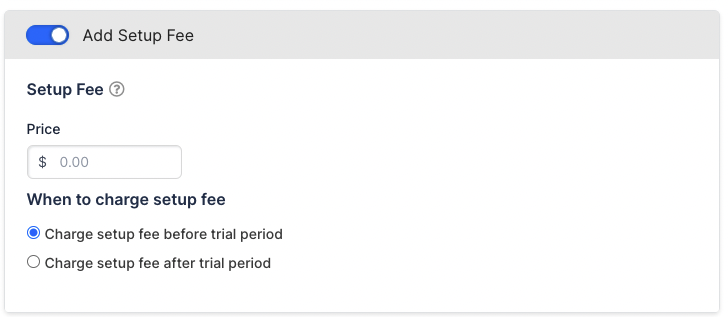
Enter setup fee
Recurring with setup fee and trial
When to use: When you want to charge a setup fee and also provide a trial period, either charging the fee before or after the trial. Example: A service that requires upfront configuration before trial access.
- Create a product
- Define your setup fee (using a fixed setup fee)
- Select “When to Charge Setup Fee” / Charge Setup Fee Before Trial Period
- This option only applies to the setup fee cost
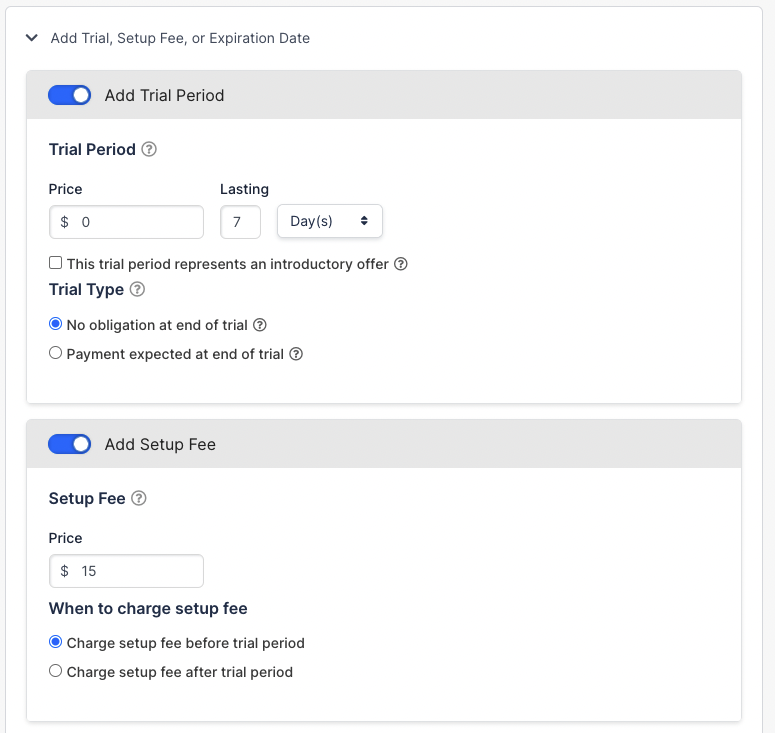
Include trial period length and setup fee
The example above: This is a free trial for 7 days with a $15 setup fee that charges before the trial begins. Alternatively, you can charge the setup fee after the trial period.
Free trial with credit card required
When to use: For trials that should auto-convert to a paid subscription unless canceled, ensuring payment details are on file. Example: PLG model where the trial period is risk-free but transitions smoothly to paid.
- Create a product
- When defining your product, set the price to $0, and set the recurring period to the length of your free trial.
- Require a payment method when creating your product. This requires your customer to enter their credit card upon signup.
- Create component(s) (optional) . Any components you create will not be billed until the end of the free trial.
Example 29.99/mo with a 30-day free trial. Credit card required.
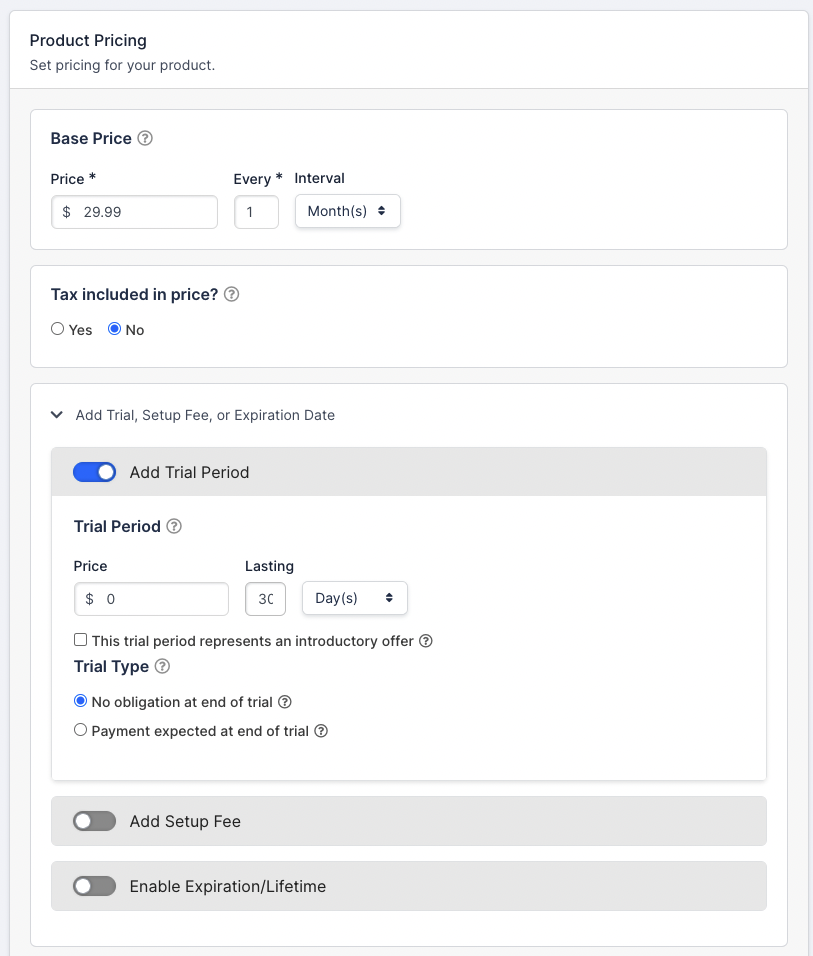
Set up free trial ($0) and recurring cost
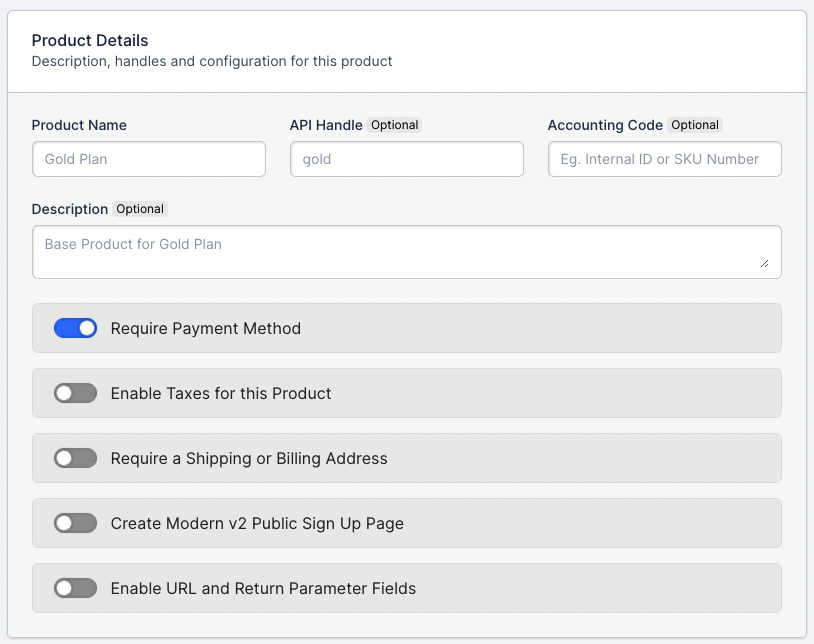
Require payment method.
Free trial with no credit card required
When to use: For frictionless signups where payment details are collected only if the customer decides to continue. Best for low-barrier acquisition strategies.
- Create a product
- When defining your product, set the price to $0, and set the recurring period to the length of your free trial.
- Disable the option to “require a payment method” in your product so your customer is not required to enter a credit card.
- Choose what happens after the trial ends when there is no card on file.
- Create component(s) (optional)
- Any components you create will not be billed until the end of the free trial.
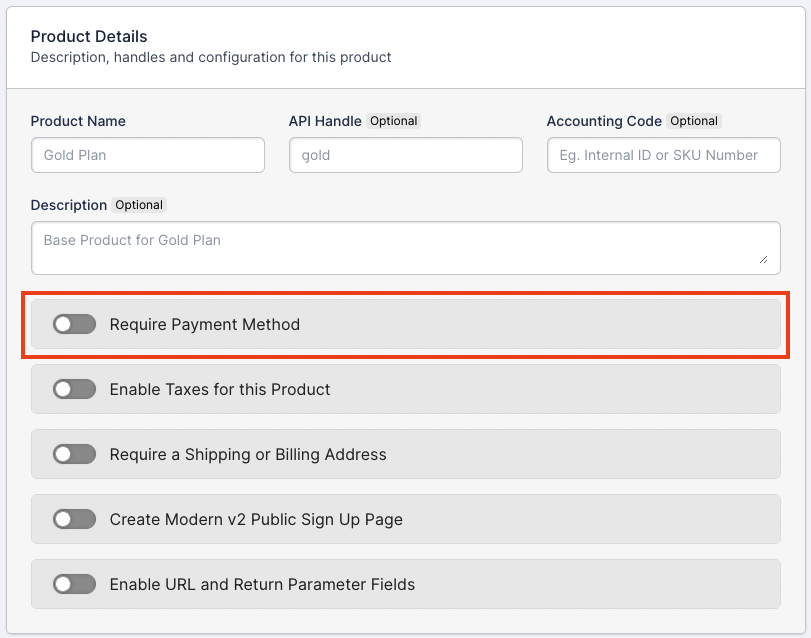
Disabling the payment method requirement is the key step.
Recurring with coupon
When to use: When you want to offer a temporary or ongoing discount without altering the product’s base price. Example: Promotional discount for first 3 months.
- Create a product
- Create component(s) (optional)
- Create coupon(s)
- Define your coupon (see image below)
- Coupons appear as a separate line item on invoices
- Enable your coupon to display on Public Signup Pages
Tip: Use the Recurring Discount? option to define how often the coupon will be used for your customer
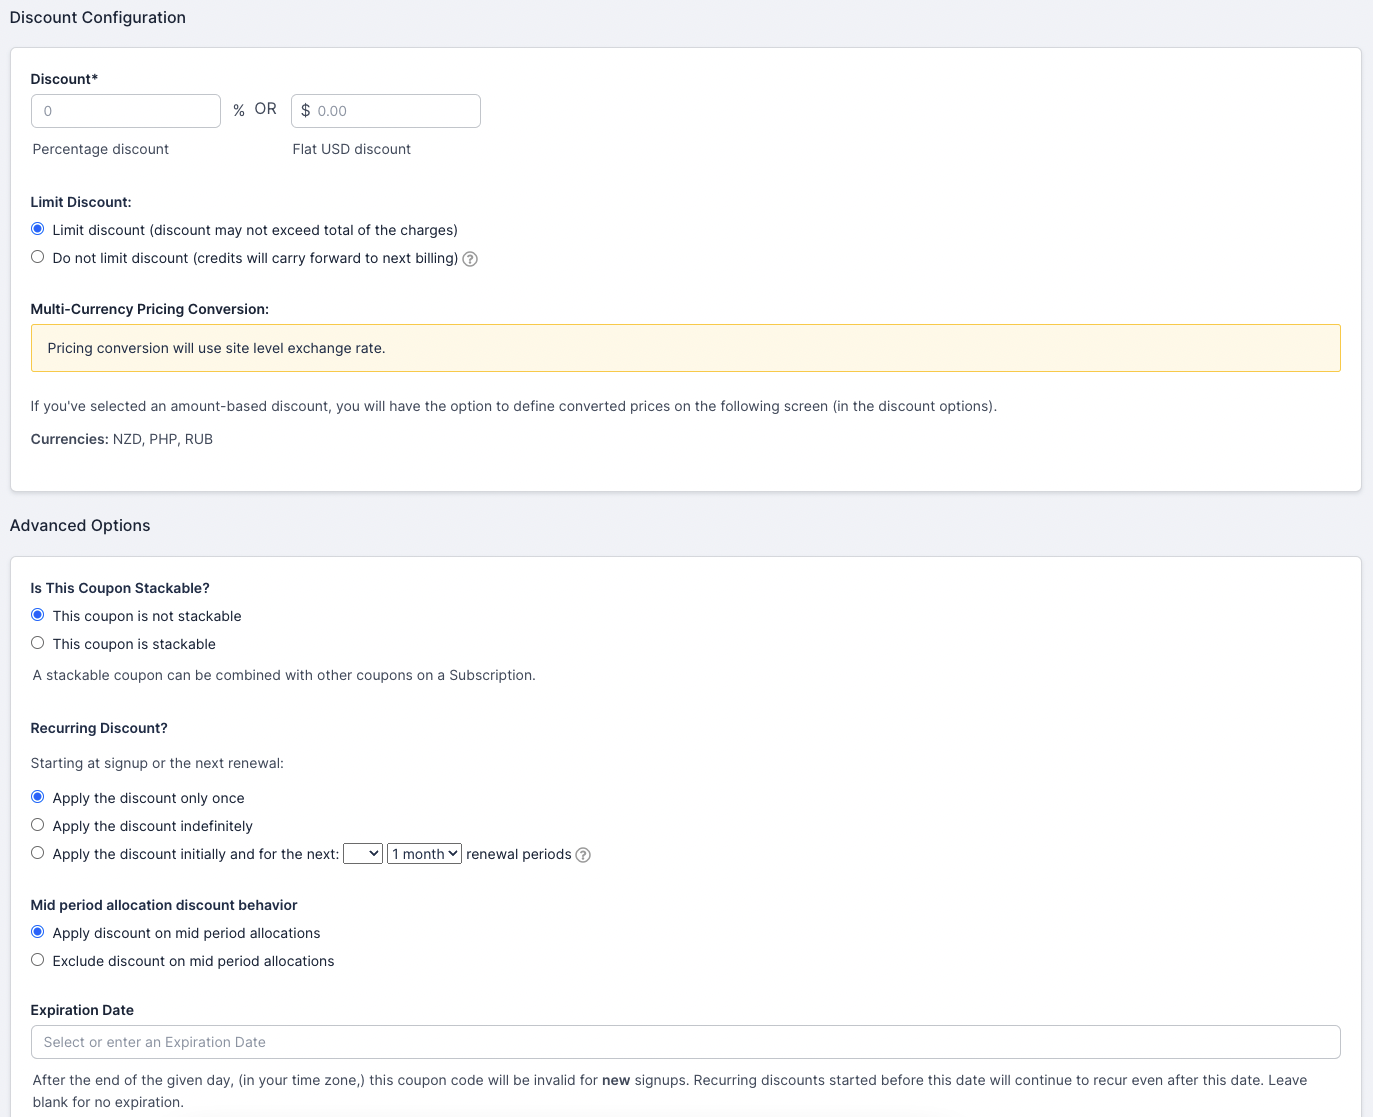
Create a coupon with a recurring discount.
Included usage + overage billing
When to use: When a subscription includes a set amount of usage and additional usage should be billed per unit. Example: 100,000 SMS messages included; $0.05 per extra message.
- Create a product.
- Create a metered component.
- When defining your metered component's pricing, set the first bracket to $0 to represent the amount included in the base product price.
- Set the subsequent brackets to reflect overage fees.
- Review our detailed guide on tiered pricing.
Example: A SaaS company charges for monthly SMS messages
- If the base product is $99/month for 100,000 SMS messages and charges $0.05 per additional SMS, configure your metered component accordingly.
- This setup uses a tiered pricing scheme.
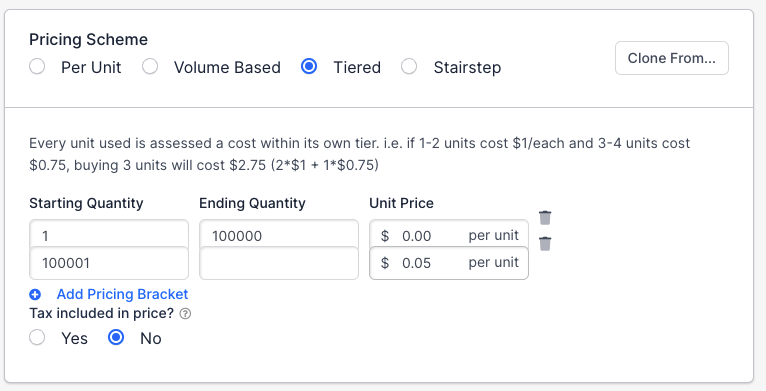
Example pricing scheme
Quantity based recurring billing
When to use: For fixed-quantity subscriptions where billing is based on the number of units purchased (e.g., per-seat licensing).
- Create a product.
- If you only bill for the quantity of some unit and not a base product, create a $0 product.
- Create a quantity-based component.
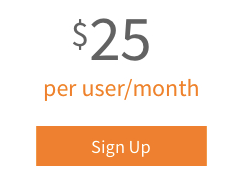
Example of signup for $25/month
Customer selected add-ons
When to use: When a base subscription includes optional add-ons that customers can select. Example: selling an optional add-on like 24/7 support.
- Create a product.
- Create each of your components.
- During the “Configure Components” step, choose which components appear on your Public Signup Pages.
- If using the API, reference the component IDs in your bundle.
Example: Three On/Off components used for bundled selections
- Company charging $100/month, plus $10/month per user.
- Option for high-priority support at $50/month.
- Bundle of TV, internet, and phone from a communications company.
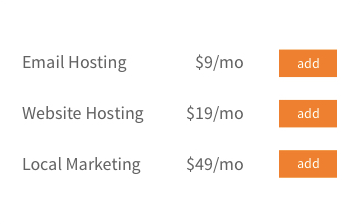
Example of selections a subscriber can purchase
Multiple subscriptions
When to use: When a customer has multiple subscriptions that should be billed together. Useful for:
- Multiple contracts for different departments under the same AP team
- Products with different shipping addresses or tax rates
- Selling multiple distinct products to the same customer
- Create a $0 product.
- Create components where each represents a subscription:
- On/Off Components: Use for flat-rate, non-variable subscriptions.
- Quantity Components: Use if customers can add multiple instances of the same subscription.
- Optional: Remove the $0.00 at first renewal message with a Custom CSS snippet. See Hide the renewal price or expiration message on a Public Signup Page.
See Also: Consolidate Subscription Groups
Example 2a: Multiple subscriptions using on/off components
- Base product: $20/mo + optional add-ons.
- Or use a $0/mo base if add-ons are entirely optional.
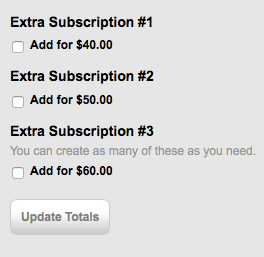
Public Signup Page example
Example 2b: Multiple subscriptions using quantity components
- Customer can configure quantity of additional subscriptions.
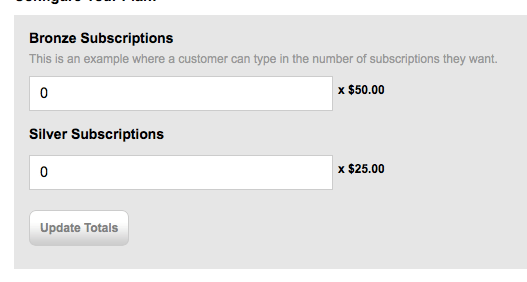
Configure the subscription quantity
Charge customers on the same day each month
When to use: When you want all customers billed on the same calendar date, regardless of signup date. Example: Align all invoices to the 1st of the month for operational simplicity. See the full article on calendar billing for details.
- Create a product adhering to these rules:
- Product period must be 1 month
- No trial period
- No expiration
- Create a Public Signup Page for the intended signup date.
- Review proration settings carefully.

Choose the day of the month all signups are billed on
Expiring subscriptions
When to use: For subscriptions with a fixed term length that automatically end at the term’s conclusion—similar to a contract end date. Example: commitment in the form of a 12-month term.
Example: $100/month for 12 months, then expires
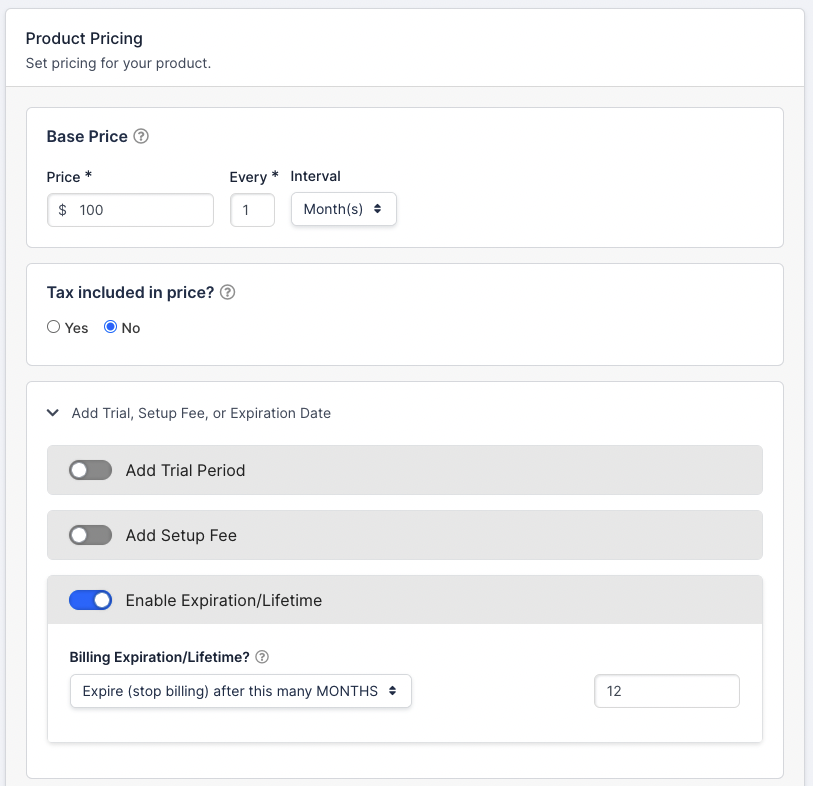
A $100/month product set to expire after 12 months
Custom pricing for sales-led contracts
When to use: Use when you need to model a negotiated contract or Term Subscription with sales-led pricing. Custom Pricing lets you enter the exact agreed price—rather than relying on catalog list prices and coupons—making it a flexible way to represent discounts and one-off deals.
Example: A sales team closes a 12-month contract at $950/month with discounted component rates that aren’t in the catalog.
Steps to configure:
- Create a Subscription.
- When selecting a Product Price Point, choose Custom Pricing instead of Catalog Pricing.
- For Products, define the base price, interval, trial, setup fee, and expiration terms as needed.
- For Components, define the pricing scheme and billing interval.
- Save and activate the subscription.
Multi-entity seller
When to use: For organizations billing under multiple legal entities or brands, each with its own catalog, customers, and payment gateways. Example: Holding company with multiple subsidiaries.
- Create your first site (master site for resellers).
- Create a site for each company entity.
- Create products and components for each site.
- Set up appropriate user permissions.
- Define settings and connect payment gateways per site.
Referrals (track salesperson for commissions)
Track referral sources and assign sales commissions using custom fields on sign-up pages.
-
Create a custom field for the salesperson ID.
-
Check the field box for visibility.
-
Find the field ID by editing it and checking the URL — it is the number just before
/edit, as inhttps://<your-site>.chargify.com/setup/metafields/10463/edit. -
Add the custom field as a URL parameter:
?sales=mysalespersonID -
Pre-populate and hide the field via JavaScript.
Modern Public Signup Pages
function getUrlVars() {
  var vars = {};
  var parts = window.location.href.replace(/[?&]+([^=&]+)=([^&]*)/gi,
  function(m,key,value) {vars[key] = value;});
  return vars;
}
var sales = getUrlVars()["sales"];
$(function() {
  if (sales) {
    $("#subscription_metafields_10463").val(sales);
  }
});
$(".form__section--additional-information").hide();
Classic Public Signup Pages
function getUrlVars() {
  var vars = {};
  var parts = window.location.href.replace(/[?&]+([^=&]+)=([^&]*)/gi,
  function(m,key,value) {vars[key] = value;});
  return vars;
}
var sales = getUrlVars()["sales"];
$(function() {
  if (sales) {
    $("#metafield_10463").val(sales);
  }
});
$('.metafield_configuration').hide();
$('#contact_info+h2').hide();
Still need help?
Reach out and our support team will take it from here.